Unknown's avatar

DIY Multi-Strand Bracelet Highlighting Peacock Colors Using the New Crystal Rainbow Dark Effect

free-diy-swarovski-crystal-rainbow-dark-bracelet-design-and-instructions

Free Crystal DIY Multi-Strand Bracelet Featuring the New Fall/Winter Swaorvski Innovations. It features gorgeous color combinations in an array of peacock type hues that are especially on trend in the cooler months.

With the cooler Fall weather in the air, it’s been exciting looking forward to all of the new activities Autumn has to offer. Mike, Kashi and I enjoyed one of our favorite traditions, leaf peeping! Here in Colorado there is no shortage of one of my favorites trees, Aspens. We set off early in the morning, driving up through Estes Park and on to a quintessential drive called the Peak to Peak highway. It’s absolutely gorgeous and both Kashi and I have our heads and toungs hanging out the window the whole time 😉

kashi-and-harmony-fall-hiking-2016

Hiking through the woods and seeing all of the rich golden colors, truly makes my heart soar. I always feel at home in nature and it brings more peaceful, loving energy into my heart. It inspires me in many ways and I feel refreshed and alive. It also helps me to feel more creative and I love to pour that refreshing sense of awe and gratitude into making new types of jewelry for not only myself, but gifts for my friends and family.

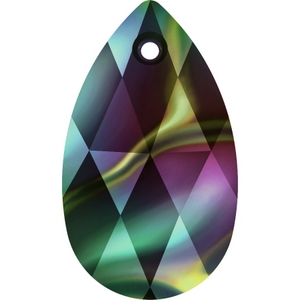
As we transition into the cooler months, our fashion and jewelry styles change and we begin to embrace the darker tones. With this years’ new coating from Swarovski, the Crystal Rainbow Dark 2X, is such a gorgeous blend of peacock colors, showcasing purple, green and yellow hues set on a black background. It will certainly be a new staple when making crystal jewelry designs that stand out as being unique and captivating.

6106 Pear-shaped Pendant

Swarovski Innovations Fall Winter 2017/18

The Crystal Rainbow Dark effect is almost as if Swarovski took the most popular coating, the Crystal AB and placed it on a black backdrop. It’s quite a brilliant idea and leave it to Swarovski for making it spectacular. It resembles an oil mark splashed onto a Crystal, which is very innovative and fits perfectly with the overall trend of people wanting to express themselves in novel ways and wear truly unique pieces.

Swarovski Crystals used in this jewelry project:

Swarovski 5328-6mm Xilion Bicone Beads in Crystal Rainbow Dark 2X ~ 70 Pieces

Swarovski 5040-6mm Rondelle Beads in Crystal Rainbow Dark 2X ~ 47 Pieces

Swarovski 5051-8x6mm Mini Oval Beads in Amethyst ~ 204 Pieces

Swarovski 5051-10x8mm Mini Oval Beads in Emerald ~ 4 Pieces

Swarovski 5728-12mm Scarab Beads in Amethyst ~ 4 Pieces

Swarovski 5514-8×8.5mm Pendulum Beads in Emerald ~ 8 Pieces

Swarovski 5045-6mm New Rondelle Beads in Emerald ~ 8 Pieces

Swarovski 5045-4mm New Rondelle Beads in Emerald ~ 2 Pieces

Supplies:

2  Beaded 5-1 End Bars 

TierraCast® 94-3056-18 or similar end bars

4      6mm round copper jump ring

10    2mm crimp beads

10    3mm crimp covers

1      copper lobster clasp

10”   beading wire

Instructions 

Step 1:       Cut beading wire into 5 10” pieces. Using one piece of beading wire slide on one crimp bead and crimp to the #1 loop on the beaded end bar.  Attach crimp cover.  Slide on one 5328 6mm, one 5045 6mm, one 5328 6mm, one 5040 6mm, one 5328 6mm, one 5514 8×5.5mm, one 5328 6mm, one 5040 6mm, one 5328 6mm, one 5051 8x6mm, one 5328 6mm, one 5040 6mm, one 5328 6mm, one 5514 8×5.5mm, three 5040 6mm, one 5514 8×5.5mm, one 5328 6mm, one 5040 6mm, one 5328 6mm, one 5051 8x6mm, one 5328 6mm, one 5040 6mm, one 5328 6mm, one 5514 8×5.5mm, one 5328 6mm, one 5040 6mm, one 5328 6mm, one 5045 6mm, one 5328 6mm, and one 5045 4mm.  Now slide on one crimp bead and crimp to #1 loop on the other beaded end bar.  Attach crimp cover.

Step 2:       Using one piece of beading wire slide on one crimp bead and crimp to the #2 loop on the beaded end bar.  Attach crimp cover.  Slide on one 5045 6mm, one 5040 6mm, one 5328 6mm, one 5051 8x6mm, one 5328 6mm, one 5040 6mm, one 5328 6mm, one 5051 10x8mm, one 5328 6mm, one 5040 6mm, one 5328 6mm, one 5728 12mm, one 5328 6mm, one 5040 6mm, one 5328 6mm, one 5728 12mm, one 5328 6mm, one 5040 6mm, one 5328 6mm, one 5051 10x8mm, one 5328 6mm, one 5040 6mm, one 5328 6mm, one 5051 8x6mm, one 5328 6mm, one 5040 6mm, and one 5045 6mm.  Now slide on one crimp bead and crimp to #2 loop on the other beaded end bar.  Attach crimp cover.

Step 3:       Using one piece of beading wire slide on one crimp bead and crimp to the #3 loop on the beaded end bar.  Attach crimp cover.  Slide on three 5328 6mm, three 5040 6mm, three 5328 6mm, three 5040 6mm, three 5328 6mm, three 5040 6mm, three 5328 6mm, three 5040 6mm, three 5328 6mm, three 5040 6mm, and three 5328 6mm.  Now slide on one crimp bead and crimp to #3 loop on the other beaded end bar.  Attach crimp cover.

Step 4:       Repeat Step 3 using the #4 holes and repeat Step 2 using the #5 holes.

Step 5:       Attach 3 jump rings to create a small chain at one end of the beaded end bar.  Using one jump ring attach the lobster clasp to the other end. 

swarovski_crystal_heart_bead_5741-crystal_paradise_shine

Hope you love creating new jewelry using the Crystal Rainbow Dark 2X Effect!

Harmony and Kashi

Keep Smiling and Keep Shining!

swarovski_authorized_reseller

Unknown's avatar

DIY Made Simple ~ Learn How Easy It Is To Crystallize This Gorgeous Marble Cocktail Ring!

swarovski-crystal-how-to-make-a-sparkling-coctail-ring

Free DIY Sparkling Marble Ring Design and Instructions

Celebrate the raw and earthy splendor of fall’s jewelry designs with timeless pieces that have meaning, as well as natural beauty. The “Sparkling Marble” ring is a modern heirloom—all you need is modeling clay and crystals. Easy!

This on trend style of cocktail ring embellished with Swarovski Crystals is oh so fashionable! You can create this crystallized look around any type of natural stone or gemstone. Gemstone jewelry is very stylish and adding touches of Swarovski crystals to them, elevates your designs in a brilliant way! Get creative and set crystals around any type of jewelry, whether is necklaces, bracelets, or earrings. Working with Ceralun, which is Swarovski’s ceramic epoxy clay specifically designed to set Swarovski Crystals, is very easy and fun to use, leaving your DIY designs looking professional and beautiful!

SWAROVSKI CRYSTALS Used in this jewelry design:

Swarovski Crystal 1028-8pp Crystal (Foiled) Round Stones (pointed back) 170 Pieces

Ceralun in Walnut Color

SUPPLIES and TOOLS

1 Marbled gemstone, brown (or any color you like)

1 Ring with disc, rose gold color

Tweezers, or a Crystal Katana

Weighing Scale

diy-swarovski-crystal-cocktail-ring-with-step-by-step-instructions

diy-swarovski-crystal-cocktail-ring-with-step-by-step-instructions-step-1

diy-swarovski-crystal-cocktail-ring-with-step-by-step-instructions-step-2

diy-swarovski-crystal-cocktail-ring-design-with-step-by-step-instructions

STEP 1: Follow the Swarovski Ceralun instructions to prepare the Ceralun. Glue the gemstone with Ceralun onto the disc of ring.

STEP 2: Apply Ceralun at the edge of gemstone and place Swarovski Round Stones 1028 PP8 around the edge using tweezers or a Crystal Katana.

Hope you’re inspired to make this design and hope it gets your creative juices flowing to add sparkling touches to other jewelry designs!

swarovski_5741-blush_rose__17139-1423175570-300-300

Harmony and Kashi

Keep Smiling & Keep Shining!

swarovski_authorized_reseller

Unknown's avatar

“Gone to the Beach” DIY Swarovski Crystal Necklace Design & Instructions

DIY Free Swarovski Crystal Necklace Design and Instructions

“Gone to the Beach” Necklace Inspiration from SWAROVSKI’s Create Your Style

Create this DIY Swarovski Crystal Necklace Design with Instructions, that Incorporates the New Crystal Innovations.

Celebrate a sun-kissed summer with boho jewelry. This necklace is made using shell-like Mother of Pearl with Sea Snail Pendants and Jelly Fish Fancy Stones from Swarovski. Make and wear it with a sparkling megawatt smile!

Here are the Swarovski Crystals used in this necklace design:

Swarovski Crystal Fancy Stones 4195 – 14mm Cyrstal 3 pieces (please contact me for details)

Swarovski Crystal Fancy Stones 4195-22mm Crystal 2 pieces (please contact me for details)

Swarovski Settings 4195/S 1PH2OH  14mm Rhodium 3 pieces (please contact me for details)

Swarovski Settings 4195/S 1PH2OH 22mm Rhodium 2 pieces (please contact me for details)

Swarovski Crystal Beads 5000 – 3mm Crystal AB 52 pieces

Swarovski Crystal Pendants 6731 – 14mm Crystal AB 7 pieces

Supplies & Tools

Supplies

Chain, 10cm, 5x7mm, silver

Cord, 42cm, Ø 6mm, beige

2x Cord endings, Ø 6mm, silver

4x Head pins, 6cm, silver

8x Jump rings, 4mm, silver

7x Jump rings, 6mm, silver 1x Jump ring, 7mm, silver

4x Mother of pearl cockle pendants, 24mm, white

12x Mother of pearl disc pendants, 25mm, white

1x Spring ring, 7mm, silver Wire, 1m, 0.7mm, silver

Tools

Flat nose pliers

Round nose pliers

Scissors

Side cutter

Toothpick

Tweezers

There are step by step instructions after the picture instructions.

DIY Free Swarovski Crystal Necklace Design and Instructions Step 1

DIY Free Swarovski Crystal Necklace Design and Instructions Step 2

DIY Free Swarovski Crystal Necklace Design and Instructions Step 3

DIY Free Swarovski Crystal Necklace Design and Instructions Step 4

DIY Free Swarovski Crystal Necklace Design and Instructions Step 5

DIY Free Swarovski Crystal Necklace Design and Instructions Step 6

DIY Free Swarovski Crystal Necklace Design and Instructions Step 6.5

DIY Free Swarovski Crystal Necklace Design and Instructions Step 7

DIY Free Swarovski Crystal Necklace Design and Instructions Step 8

DIY Free Swarovski Crystal Necklace Design and Instructions beach style

STEP 1: Insert a 4mm jump ring and Swarovski Pendant art. 6731 14mm Crystal AB onto a 6mm jump ring. Repeat this process six more times, but on the last one just use the 6mm jump ring.

STEP 2: Cut 14 6cm long pieces of wire and make a loop at one end to form eye pins.

STEP 3: Insert Swarovski Fancy Stones art. 4195 Crystal F 14mm and 22mm into the Swarovski setting. Gently close prongs using tweezers. Thread the Swarovski Fancy Stones onto a head pin and form a loop at the other end. Cut off excess wire. Repeat this step four more times, but thread the last one onto an eye pin as shown in our illustrations with this step.

STEP 4: Insert the disk pendant and the 4mm jump ring including Swarovski Pendant into the loop of one of the eye pins made in step 2. Thread 4 Swarovski Bead art. 5000 3mm Crystal AB onto the eye pin and then add the shell pendant. Make a loop at the top of the shell pendant as shown.

STEP 5: Attach another eye pin and Swarovski Pendant onto the loop make at the top of the shell pendant in the previous step. Insert 4 more Swarovski Beads and the disk pendants. Repeat this step one more time – see illustrations for clarification.

STEP 6: Insert the Swarovski Fancy Stone art. 4195 14mm into the top most loop of the piece from step 5. Repeat steps 4-6 three more times to get three more similar pieces but of different structure. See illustrations for clarification.

STEP 7: Cut a 10cm long chain and a 42cm long cord. Glue the cord ends into the cord endings. Attach one of them to a spring ring and the second one to a 7mm jump ring.

STEP 8: Attach all the four pieces from steps 4-6 to the chain leaving a spare of 4cm to act as an extension. Attach the last Swarovski Pendant to the last link of this extension.

Have fun making this beautiful Swarovski Crystal jewelry design!

Harmony and Kashi

Keep Smiling & Keep Shining!

Swarovski_5741-Crystal_AB_Heart Bead

Unknown's avatar

Colorful Crystal Bikini Design & Instructions ~ DIY Summer Fashion!

Free Swarovski Crystal Instructions on how to crystalize a bikini

DIY Colorful Polka Dots Bikini

Go girlie and get the ’70s vibe with this pretty crocheted polka-dot bikini sprinkled with sunshine, thanks to Yellow Opal Flat Back Hotfix from Swarovski. Now lose the phone, head for the beach, and chill!

Adding Swarovski Crystals to your bathing suit is super simple with the Hot Fix Rhinestones. Simply place the stones where you want them and iron them on, it’s as easy as that! You can also use a Bejeweler Pro Hot Fix applicator to apply the stones individually. You can use the colors in this project or customize it with your favorite colors. Click here to choose from a beautiful selection of colors and sizes:

Swarovski Crystal Flatbacks in Hot Fix

Free Swarovski Crystal Instructions on how to add crystals to a bikini bathing suit step by step instructions

SWAROVSKI Crystals Used in this Project

Swarovski Crystal Flatbacks 2078 16ss Aquamarine Hotfix 26 pieces

Swarovski Crystal Flatbacks 2078 16ss Black Diamond Hotfix 26 pieces

Swarovski Crystal Flatbacks 2078 16ss Rose Peach Hotfix 26 pieces

Swarovski Crystal Flatbacks 2078 16ss Yellow Opal Hotfix 26 pieces

Free Swarovski Crystal Instructions on how to add crystals to a bikini bathing suit step 1

Free Swarovski Crystal Instructions on how to add crystals to a bikini bathing suit step 2

Free Swarovski Crystal Instructions on how to add crystals to a bikini bathing suit

STEP 1: Place Swarovski Flat Backs Hotfix art. 2078 onto the bikini. Place a transfer film on top of the Swarovski Crystals and iron the transfer film to adhere the crystals onto the bikini. Gently pull the transfer film back. If any of the crystals do not stick, replace transfer film and iron once more.

Swarovski Crystal Heart Bead Blush Rose

Harmony and Kashi

Keep Smiling & Keep Shining!

Unknown's avatar

Your Bohemian Fashion Guide and Free Embellished Hippie Chic Hat Design and Instructions

Free DIY Swarovski Crystal Hat Design wholesale Swarovski Crystals

Free Swarovski Crystal Hippie Chic Boho Hat Design and Instructions

Dance the day away with your crowning glory tucked under a cool, wide-brimmed hat. Customized with tribal trim accented with Crystal Scarabaeus Green, it’s your must-have festival accessory that will look equally great with denim or dresses.bohemian fashion style and definition

There is a soft and feminine, almost dreamy-like quality to this bohemian trend, where magical touches of lace, rhinestones, colorful beads, tassels, braids and embroidered details are worn with love. The bohemian girl adores nature, feeling drawn to floral prints and pastel colors.

Bohemian Color Trends and the Matching Swarovski Crystal Colors and Pearls

Lavender = Provence Lavender or Light Amethyst, Lavender Pearls and Mauve Pearls

Mint = Mint Alabaster, Pastel Green Pearls

Baby Pink = Light Rose, Rosaline, Rose Water Opal, Rosaline Pearls, and Powdered Rose Pearls

Baby Blue = Light Sapphire, Lavender, and Light Blue Pearls

Silver = Crystal CAL, Crystal CAL Fully CoatedCrystal Light ChromeCrystal Silver Shade, Light Grey Pearls

how-to-wear-bohemian-style

A How-To Guide For Bohemian Style by Fashion Gone Rogue

The bohemian hippie chic fashion trend is is a very popular style this summer. There are many ways to express your individuality while embracing this whimsical look. Creating your own jewelry and accessories with shapes and colors that you are drawn to, is a wonderful way to feel more connected to this style.

Free DIY Swarovski Crystal Hat Design wholesale Swarovski Crystals from Rainbows of Light.com step 5

Now that you have this fashionable bohemian style guide under your belt, here are the step by step instructions on how to make your own stylish boho chic floppy hat embellished with Swarovski Crystal Beads and Flatbacks!

Swarovski Crystals

Swarovski Crystal Flatbacks 2078-12ss Capri Blue Hot Fix 189 pieces

Swarovski Crystal Flatbacks 2078-12ss Crystal Scarabaeus Green Hot Fix 189 pieces

Swarovski Crystal Flatbacks 2078-12ss Indian Pink Hot Fix 189 pieces

Swarovski Crystal Flatbacks 2078-12ss Light Sapphire Hot Fix 189 pieces

Swarovski Crystal Flatbacks 2078-12ss Light Topaz Hot Fix 189 pieces

Swarovski Crystal Round Beads 5000-6mm Indian Pink 45 pieces

Swarovski Crystal Round Beads 5000-8mm Crystal Scarabaeus Green 30 pieces

Swarovski Crystal Round Pearls 5810-6mm Lapis 40 pieces

Swarovski Crystal Round Pearls 5810-6mm Turquoise 50 pieces

Supplies and Tools

Supplies

Alcantara, 62cm, 25mm, dark brown

Hat, light brown

Nylon stretch, Ø 0,5mm, 3m, transparent

Sewing thread, 2m, light brown

Two part adhesive glue

45x Wooden beads, 6mm, dark brown

Tools

Iron, Needle, Scissors, and Tweezers

Free DIY Swarovski Crystal Hat Design wholesale Swarovski Crystals from Rainbows of Light

Free DIY Swarovski Crystal Hat Design wholesale Swarovski Crystals from Rainbows of Light.com step 1

Free DIY Swarovski Crystal Hat Design wholesale Swarovski Crystals from Rainbows of Light.com step 2

Free DIY Swarovski Crystal Hat Design wholesale Swarovski Crystals from Rainbows of Light.com step 3

Free DIY Swarovski Crystal Hat Design wholesale Swarovski Crystals from Rainbows of Light.com step 4

Free DIY Swarovski Crystal Hat Design wholesale Swarovski Crystals from Rainbows of Light.com step 5

STEP 1: Cut the Alcantara to the appropriate length of your hat and make one of the ends into an arrow shape. Create a transfer as shown in the illustrations with this step using the Swarovski Hotfix Flat Backs and iron it onto the Alcantara.

STEP 2: Sew one end of the Alcantara onto the hat and place the entire length around the hat.

STEP 3: Insert the rest of the Swarovski Crystals on the material list onto the nylon stretch cord. Tie a double knot at end and cut off the extra length.

STEP 4: Put some glue onto the knot and insert the knot into one of the Swarovski Crystals near to it. Let dry for a couple of minutes and lay it around the hat.

Bohemian fahsion style

Peace

Swarovski_5741-Crystal_Paradise_Shine

Love

Harmony boho style

and Harmony 🙂