Learn how to make this gorgeous, one-of-a-kind “Velvet Orchid” necklace made with the new SWAROVSKI Crystal Innovations!
Stage-manage your personal red-carpet moment with this statement necklace designed to highlight the amazing new flexible and stunning technology of Graphic Rocks!
The brilliant sparkle from this unique product and design element exclusively made by SWAROVSKI, will elevate your look in a new fresh way. I guarantee everyone will admire this piece and will want to get a closer look, maybe even “cop a feel” (wink-wink) just to experience these crystal clusters up close and personal. The soft and idyllic Orchid colors blend flawlessly with the new Crystal Iridescent Purple Pearls.

Below are the SWAROVSKI Crystals used in this necklace design and the corresponding information listed for each one and take a look and the step-by-step instructions below.
Style, Amount, Size, Color, Color Code
Beads 5000 6pcs. 6mm Amethyst 204
Beads 5000 2pcs. 8mm Purple Velvet 277
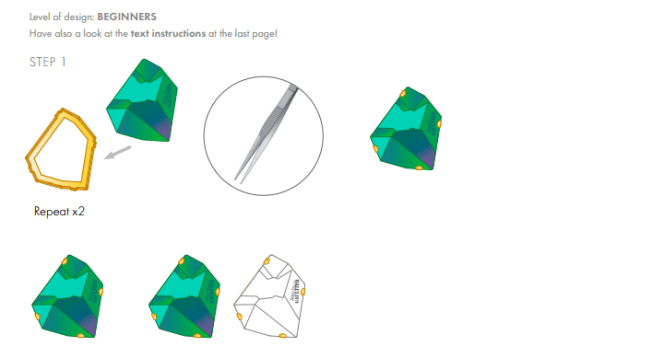
Graphic Rocks 72035 3pcs. 89x69mm GP 10104022001 (please contact me for details)
Crystal Pearls 5810 4pcs. 8mm Crystal Iridescent Purple Pearl 943
Crystal Pearls 5810 3pcs. 8mm Crystal White Pearl 001 650
Crystal Pearls 5810 10pcs. 10mm Crystal Iridescent Purple Pearl 001 943
Crystal Pearls 5810 3pcs. 10mm Crystal White Pearl 001 650
Crystal Pearls 5810 1pc. 12mm Crystal Iridescent Purple Pearl 001 943
Crystal Pearls 5810 4pcs. 12mm Crystal White Pearl 001 650
Crystal Pearls 5810 2pcs. 14mm Crystal Iridescent Purple Pearl 001 943 (please contact me for details)
Crystal Pearls 5810 7pcs. 14mm Crystal White Pearl 001 650 (please contact me for details)
Crystal Pearls 5840 1pc. 14mm Crystal Iridescent Purple Pearl 001 943
Supplies and Tools
Supplies
Alcantara, 30x10cm, violet 2x Cord endings, 6mm, silver 2x Crimping tubes, silver Grosgrain ribbon, 1m, 18mm, violet Nylon thread, 3m, transparent Tiger tail 50cm, 0.3mm, silver and Two part adhesive glue.
Tools
Crimping pliers, Darning needle, Iron, Lighter, Scissors, Sewing needle, Side cutter, and Tape.
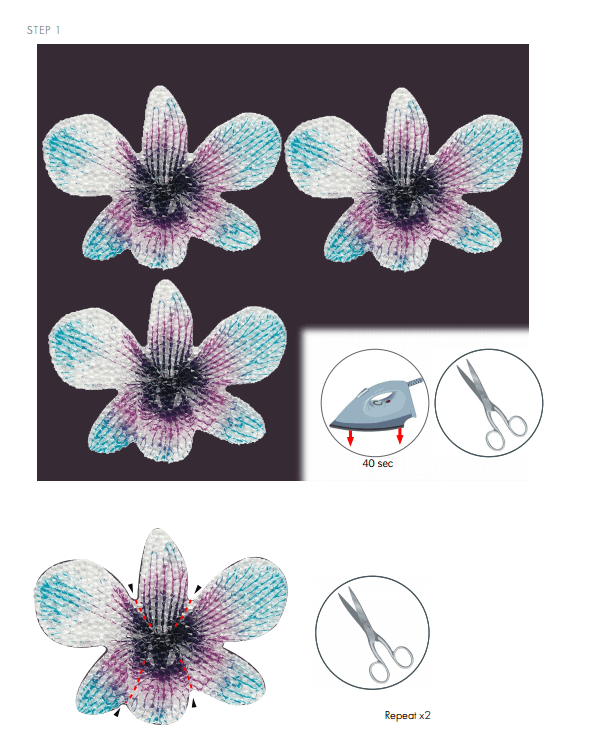


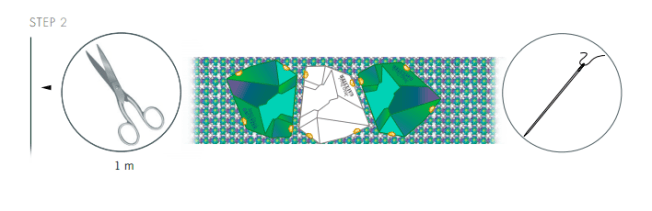
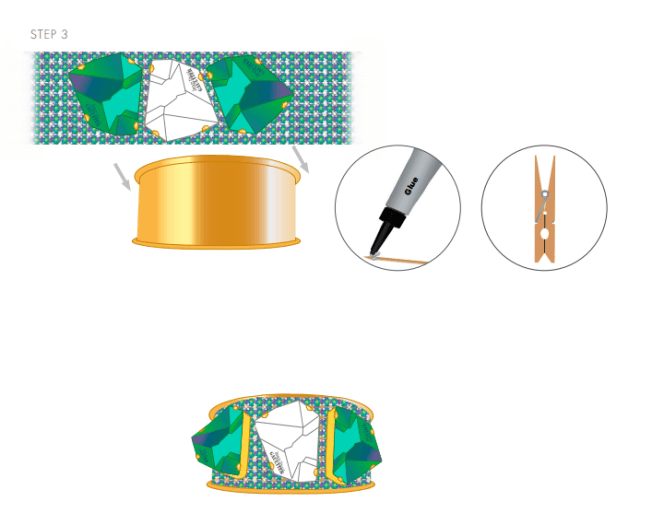
STEP 1: Place the Swarovski Crystal Graphic Rocks art. 72035 flowers onto the Alcantara fabric. Iron them and cut out as shown in the illustrations. Repeat 2x with others flowers.
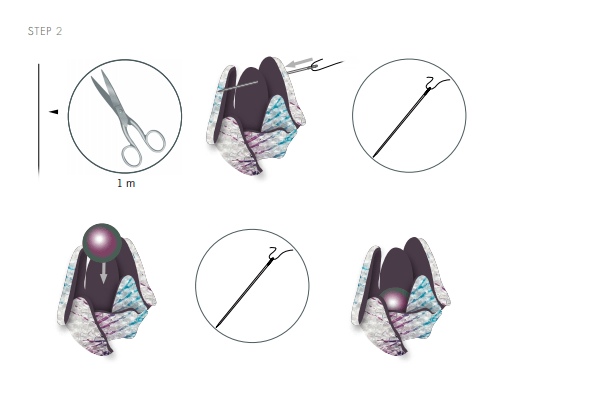
STEP 2: Cut 1m nylon thread and sew one of the flowers to form it into a bud shape. Sew Swarovski Crystal Pearl art. 5810 14mm Crystal Iridescent Purple Pearl into this bud.
STEP 3: Cut 50cm long tiger tail, secure one end with a piece of tape. Slide on a crimping tube and art. 5810 8mm Crystal Iridescent Purple Pearl 3x. Stitch a hole into the orchid, by using a darning needle. Thread tiger tail through the flower from back side to top side. Slide on all Swarovski Crystals of material list in order as shown in the illustrations. Slide on another crimping tube and secure the end with a piece of tape.
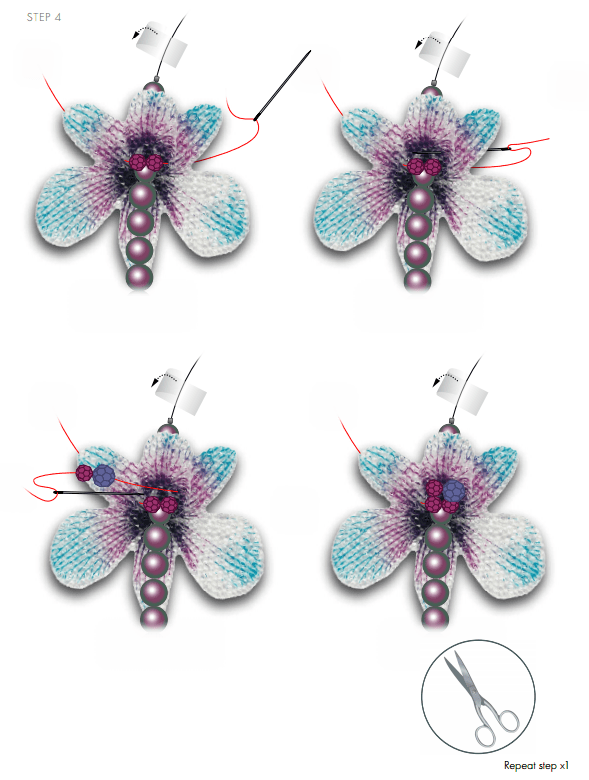
STEP 4: Sew one Swarovski Bead art. 5000 8mm Purple Velvet and three Swarovski Beads art. 5000 6mm Amethyst into the middle of the flowers to give the flowers a 3-dimensional form.
STEP 5: Thread end of tiger tail through a cord ending and back through the crimping tube and 3 of the Swarovski Crystal Pearls. Crimp the crimping tube and cut off the extra tiger tail. Repeat for the other end of necklace.
STEP 6: Cut two 50cm long pieces of grosgrain ribbon.
STEP 7: Fold the ribbon inwards a little and secure using the nylon thread. Fold the two edges inwards again and sew them together as well. See illustrations for clarification. Repeat with the other ribbon as well. Glue the prepared ribbon ends into the cord endings.
STEP 8: Stitch the bud prepared in the second step onto one of the ribbons.