Free Swarovski Crystal Jewelry Designs and Instructions – Let’s Get Crafty!

Swarovski Crystal Craft Ideas Celebrating 120 Years of Swarovski

Swarovski is celebrating 120 years of pure brilliance and we can join in their magical world with these special sparkling design ideas!

In this free craft ideas issue, you’ll find beautiful jewelry design ideas along with step-by-step instructions for you to create gorgeous accessories for all types of occasions. Crystals are one of today’s most versatile and attractive means for transforming accessories into one-of-a-kind pieces, so take a look through these ideas and above all, have fun creating and dreaming up new possibilities of brilliance!

Here are a few beauties to swoon over!

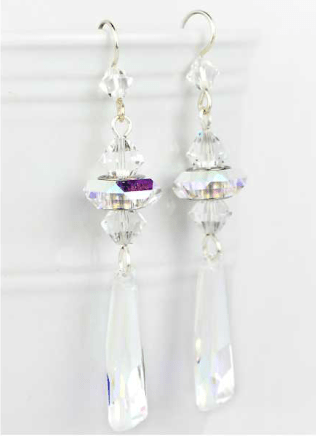
DIY Swarovski Crystal Earrings

“A Perfect Match”

The new Swarovski Crystalacite Pendants add sophistication and glamour to your designs, as well as being a perfect on trend style.

DIY Swarovski Crystal Heart Necklace Bridal designs and instructions

“I Do!”

Say “I do” to this lovely style heart shape necklace. This romantic design utilizes the new 5748 Arrow Bead in unique ways to create a larger heart center, complimented by the 5743 Wild Hear Bead. The White Patina Effect has a dreamy timeless quality, similar to that of Venetian glass in that it creates a sense of movement withing the crystal where there is always something new to catch your eye!

DIY Swarovski Crystal Dangle Earrings Design and Instructions

“Worth The Wait”

These multi tiered Swarovski Crystal and Pearl dangle earrings combine many on-trend elements together into one fanciful design. Stacking different sizes of the 5541 and 5542 Dome beads creates a nice layout for incorporating layered chain, which is then highlighted by crystals and pearls. What I like most about this design is that it has a free flowing nature to it and I feel like once I put them on, all I’d wanna do is dance!

Swarovski Love Bead

I hope you’re inspired to make some of these sparkling designs and feel free to post pictures of your beautiful creations!

Get Your Crafty Kicks On This 4th of July & Celebrate CHUCKS “GLORY DAYS”

DIY 4th of July Chuck Taylor Swarovski Crystal Shoes

Add a little twinkle to your toes with a pair of statement sneakers. Finish off your high-tops with eye-catching Swarovski crystals sewn on to patriotic red, white and blue for some extra Fourth of July sparkle. And when Independence Day celebrations are over, wear them to make every day a dazzle day!

DIY Swarovski Crystal Chuck Taylor shoes with Swarovski Crystals

Swarovski crystals

Swarovski 3288 – 8mm 42 pieces Crystal Sew-on Stones

Swarovski 3288 – 10mm 3 pieces Crystal Sew-on Stones

Supplies & Tools

White sewing thread, red and blue fabric paint. Carboard, 3x3cm Paint brush, a pencil, a ruler, scissors and a sewing needle.

DIY Swarovski Crystal Chuck Taylor Shoes design and instructions

DIY Swarovski Crystal Chuck Taylor Shoes design and instructions page 2

DIY Swarovski Crystal Chuck Taylor Shoes design and instructions page 3

DIY Swarovski Crystal Chuck Taylor Shoes design and instructions page 4

DIY Swarovski Crystal Chuck Taylor Shoes design and instructions page 5

DIY Swarovski Crystal Chuck Taylor Shoes design and instructions banner

STEP 1: Use our pattern or draw a 2cm star onto a cardboard as shown in our illustrations with this step.

STEP 2: Use the cardboard star template and a pencil to draw stars all around one of the shoes. Draw horizontal lines around the other shoe with a pencil to make 1.5cm wide stripes.

STEP 3: Paint the horizontal stripes on the one shoe in red and the background around the stars of the other shoe in blue.

STEP 4: Tie a double knot onto a sewing thread and sew Swarovski Sew-on Stones 3288 8mm Crystal on top of the red stripes. (Do not pierce through to the inside of the shoe with the needle and thread). Repeat the steps with the horizontal rows and the stars as shown in the illustration and material list.

Swarovski_5741 Heart Bead Light_Siam

Create A Star-Studded Bracelet That Will Have You Shining Extra Bright This 4th of July!

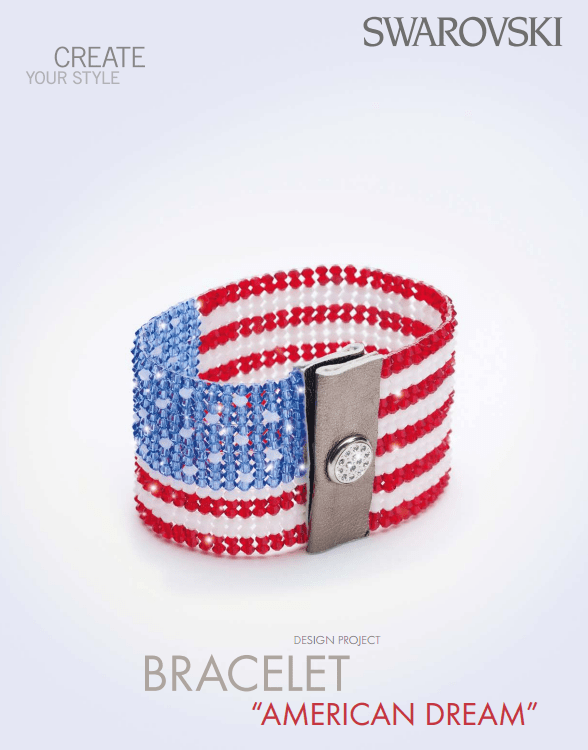
DIY American Dream Swarovski Crystal Bracelet

Wrap your wrist in a simple-to-make, all-American Star-Spangled Banner bracelet made of woven Swarovski crystals. Now get ready for the fireworks, celebrate good times and have a blast making this star-studded design!

DIY American Dream Swarovski Crystal Flag Bracelet

Swarovski Crystals

Snap Fastener 1780/114 082 1pc. 11mm Silver/Crystal 001 (contact us for details)

Swarovski Xilion Bicone Beads 5328-3mm Light Siam (422 pieces)

Swarovski Xilion Bicone Beads 5328-3mm Sapphire (358 pieces)

Swarovski Xilion Bicone Beads 5328-3mm White Alabaster (288 pieces)

Supplies and Tools

Supplies: Adhesive tape, white Leather, 12x7cm, metallic silver Leather glue (Güttermann creative HT2) Nylon thread, 2m, 0.3mm, transparent Nylon thread, 3m, 0.15mm, transparent.

Tools: Bead weaving loom, Crystal Swarovski Applicator Hand Tool, Fine needle (no.12) Lighter and scissors.

Level of design: INTERMEDIATE. Take a look at the bottom for text instructions.

DIY American Dream Swarovski Crystal Bracelet Instructions Step 1

DIY American Dream Swarovski Crystal Bracelet Instructions Step 2

DIY American Dream Swarovski Crystal Bracelet Instructions Step 3

DIY American Dream Swarovski Crystal Bracelet Instructions Step 4

DIY American Dream Swarovski Crystal Bracelet Instructions Step 5

DIY American Dream Swarovski Crystal Bracelet Instructions Step 6

DIY American Dream Swarovski Crystal Bracelet Instructions Step 7

DIY American Dream Swarovski Crystal Bracelet Instructions Step 9

DIY American Dream Swarovski Crystal Bracelet Instructions Step 10

DIY American Dream Swarovski Crystal Bracelet Instructions Step 11

DIY American Dream Swarovski Crystal Bracelet Instructions Step by Step Instructions

STEP 1: Cut 2m of 0.3mm nylon thread. Tie a single knot onto one end of the bead weaving loom and thread it through the loom as shown in our illustrations with this step until you have 6 horizontal rows. Attach the other end to the loom with tape.

STEP 2: Cut 1m of 0.15mm nylon thread. Tie a single knot onto the end and slide on two Swarovski Bead art. 5328 3mm in Light Siam and two White Alabaster alternating. Repeat 3 times and end with two Light Siam beads. Slide the string underneath all the horizontal strings as shown in the illustration.

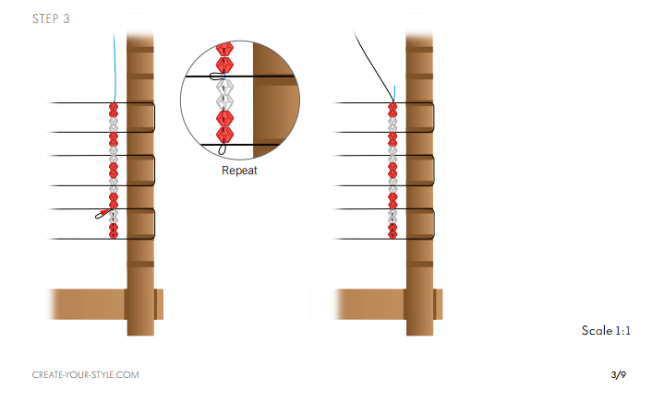
STEP 3: Insert the nylon thread back through the beads and each time over the horizontal string until the end. This will produce clusters of 4 beads and then 3 beads.

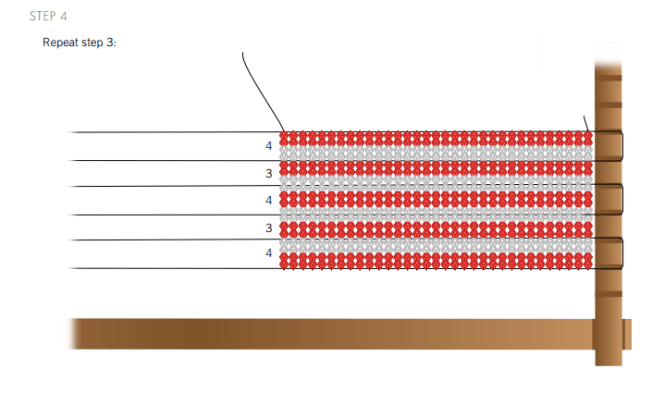
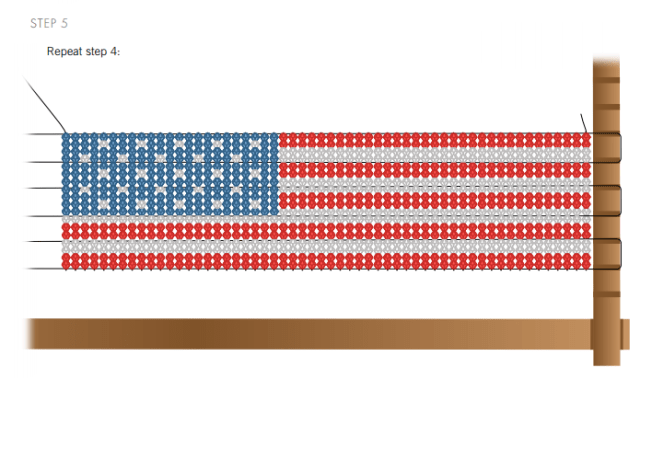
STEP 4: Repeat steps 2 & 3 to get 32 more vertical strings onto the loom.

STEP 5: Repeat step 2 & 3, but string on two Swarovski Bead art. 5328 3mm in Light Siam, two White Alabaster, two Light Siam and only one White Alabaster. Then string on 11 3mm Sapphire Beads. Repeat the pattern in this step once more. Continue to string on the same number of Light Siam and White Alabaster beads as done in this step and then refer to the illustrations for the random order of the Sapphire and White Alabaster beads to create the “stars”.

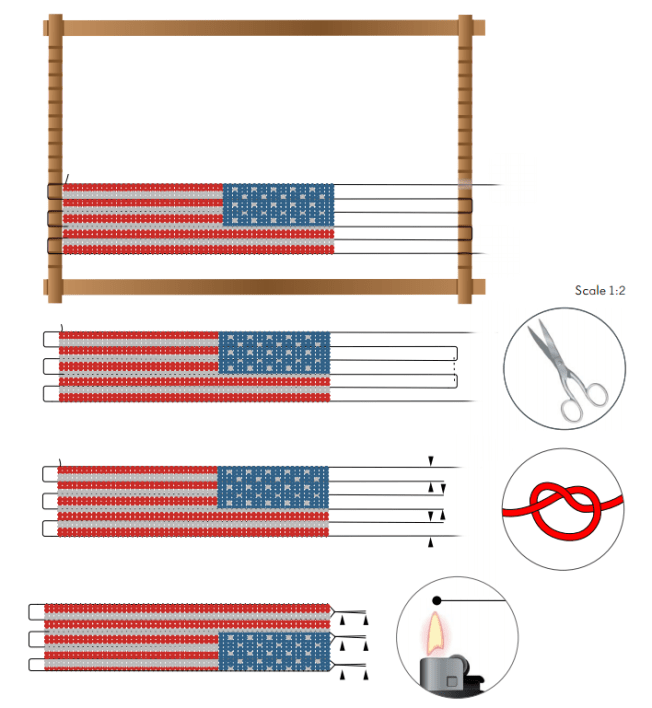
STEP 6: Remove the entire bracelet off the loom. Cut the two joined ends on one side to get six open ends. Tie a knot with the ends and melt the ends closer to knots as depicted in the illustration.

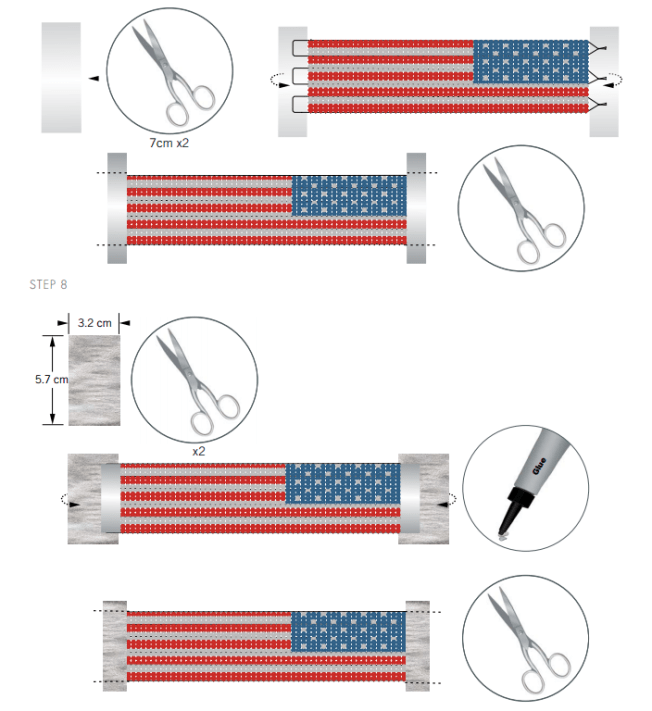
STEP 7: Cut two pieces of 7cm tape and place the tape under the nylon thread ends on both sides. Wrap the tape onto the thread ends and cut off the excess tape.

STEP 8: Cut two pieces of 5.7×3.2cm long metallic leather and glue them onto the bracelet ends so that they are folded into half. Cut off any excess leather.

STEP 9: Put the upper and lower dies into the Crystal Applicator Hand Tool that go with the Swarovski Snap Fastener art. 1780/114 082 082 001 11mm. Place the Swarovski Snap Fastener Silver/Crystal into the lower die of the Crystal Applicator Hand tool and place the back part of the Snap Fastener onto the upper die of the applicator. Put the metallic leather part of the bracelet in between the applicator tool and apply the snap fastener.

STEP 10: Change the upper and lower die of the applicator and insert the other pair of dies.

STEP 11: Insert the top and lower part of the Swarovski Snap Fastener into the applicator as done in step 9 and attach it onto the other side of the metallic leather.

Swarovski_5741 Heart Bead Light_Siam

Come With Us On A Dazzling Adventure To The Bead and Button Show!

Bead and Button Trade Show 2015 Rainbows of Light Swarovski Crystals wholesale to the public

Wow! What a whirlwind adventure at the 2015 Bead and Button Show!

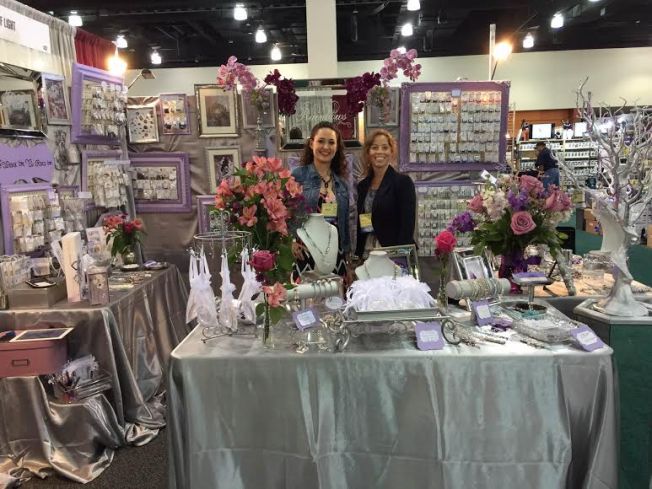
As you all know this was my very first trade show and it was a fabulous experience!

I grew up helping my parents with their booth at arts and craft shows around the Southwest (I was such a youngster in this biz, I spent my youth with a baby bottle in one hand and a crystal in the other) Needless to say, it’s in my blood and I feel at home meeting and helping all of our wonderful customers in person.
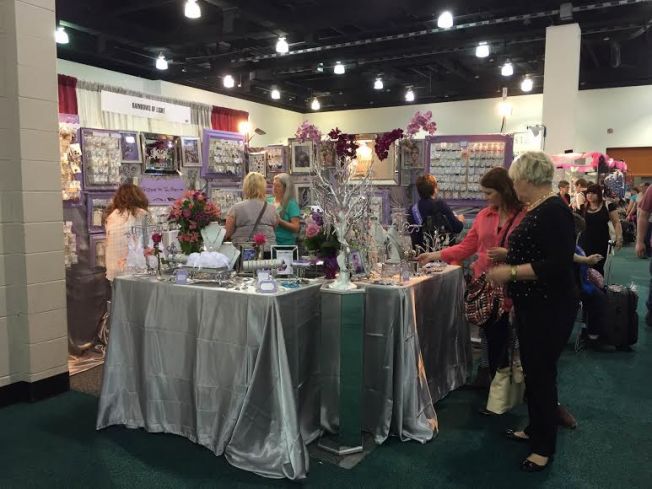
Bead and Button Trade Show 2015 Rainbows of Light Swarovski Crystals happy customers

I want to shout it from the roof tops…THANK YOU to our FANTASTIC customers!! I want to sincerely thank each and everyone of you who stopped by, called in or emailed me words of support. Your feedback was overwhelmingly positive and it meant the world to me!! Everyone loved the sparkly booth and seeing your smiling faces in person made it all worthwhile!
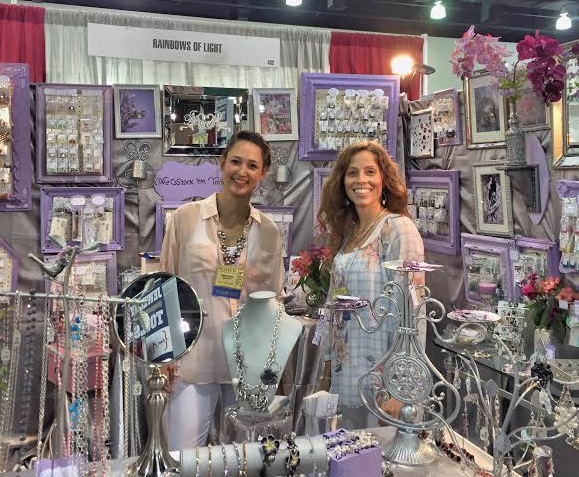
Bead and Button Trade Show 2015 Rainbows of Light

My soon-to-be sister in law Breanna from Crystal Princess and I had a ball together! We were catching up and laughing together the whole trip. She was a huge help, bringing beautiful jewelry and working with customers giving top-notch service with her gorgeous beaming smile!

She has been making custom handmade jewelry for many years now  and has extensive knowledge with all of Swarovski’s products, which was a major plus. Who knows, maybe one day she could work for us full time…now that would be a dream come true!
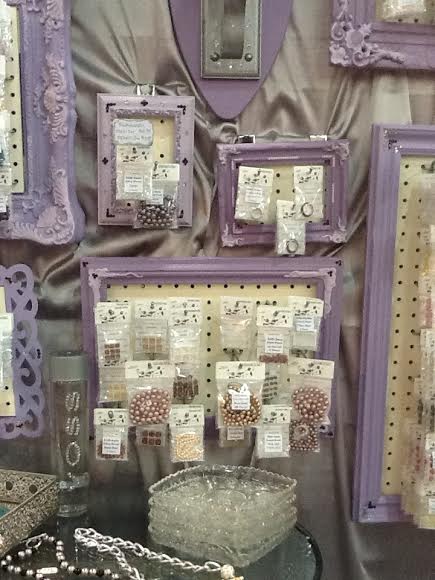
Bead and Button Trade Show 2015 Rainbows of Light Swarovski Crystals color combination

People loved how they could see all of the crystals hanging up instead of sifting through trays on a table. They also loved that many frames were organized by complimentary color combinations and not just by one style, that way they could create jewelry in their favorite color palette by incorporating unique styles  they had never thought of before.

Bead and Button Trade Show 2015 Rainbows of Light Swarovski Crystals Flowers

Look at this beautiful surprise I received from my super duper, always supportive, absolute best hubby in the whole world!! He’s also the most hilarious, best friend and co-owner anyone could ever ask for!!

As I was preparing for the show, I was watching a lot of Ted Talks (I find them endlessly fascinating & learn so much). I watch one entitled “The Key to Success? Grit” Afterwards, I excitedly told Mike, that’s me, I have so much Grit! From then on, my new nickname has been “Lil’ Grit” Needless to say, I was dying laughing when the flower delivery man came to the booth asking for “Mrs. Lil’ Grit”…oh boy, too funny. Time certainly flies when you’re having fun and after 18 years together, it just keeps getting better!
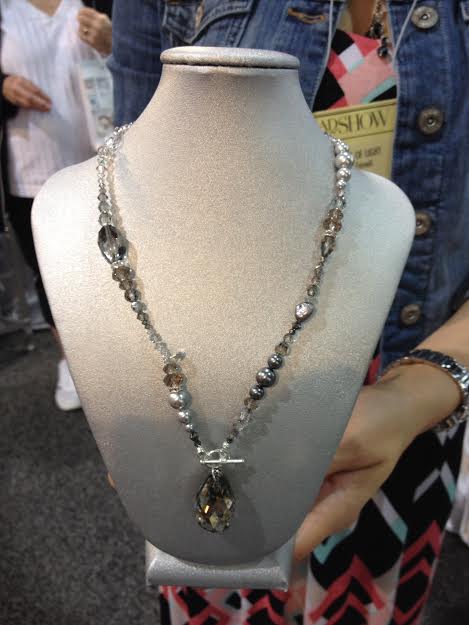
Bead and Button Trade Show 2015 Rainbows of Light Swarovski Crystals patina necklace

This necklace sure received a lot of oohas and aahs. I made it using the Swarovski 6106-38mm Pearshape Pendant in the new Black Patina finish. It captured the attention of many until it was joyfully bought by Gene, our very friendly AirBnB host.
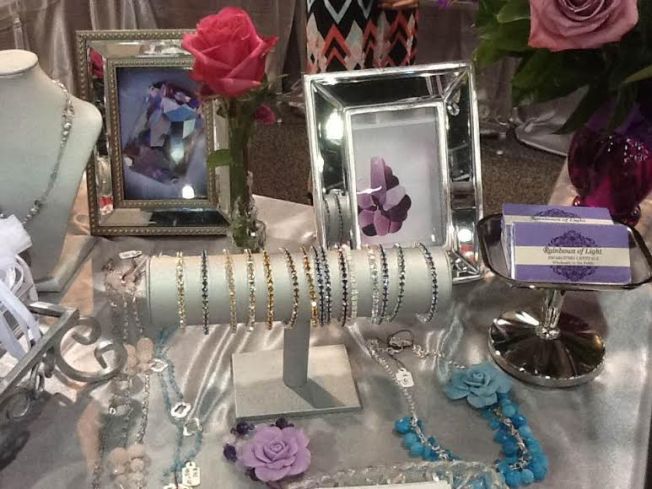
Bead and Button Trade Show 2015 Rainbows of Light Swarovski Crystals Stretch Bracelets

The new Swarovski Crystal Stretch Bracelets were a smashing hit! From young to old and from bead store owners to beginners, these little sparkling beauties were all the rage! They are certainly eye catching. I would definitely recommend them to re-sellers and jewelry enthusiasts alike. They make perfect gifts as well because they are 7 inches and stretch to fit most wrists sizes.

Looking back on the months of preparation; hand painting and crystalizing all of the lavender frames, repackaging crystals in new and improved bags, making jewelry, printing business cards, arranging the display and on and on (the details are excruciating to think about). 35 hours in the car, 19 hours of set up and 6 hours of breakdown… Yowzahhas, now that’s a lot of Grit! But It sure is fun to go from dull…

Bead and Button Trade Show 2015 Rainbows of Light Swarovski Crystals

To Dazzling!

Rainbows of Light

Thanks again for all of your love & support, I take it to heart and sincerely appreciate it!

Swarovski Violet Heart Bead