Unknown's avatar

Create These “Groovy Skulls” Earrings ~ DIY Design and Instructions!

free-diy-swarovski-crystal-skull-earrings-halloween-earring-inspiration-and-instructions

Free DIY “Groovy Skulls” Earring Design and Instructions

It’s Halloween time, so dress for divine darkness with the mysterious Swarovski Sparkling Skulls earrings. This charismatic combination of Crystal Pearls and Crystal Skull Beads in Crystal Silver Night 2X will make you the belle of the monster ball!

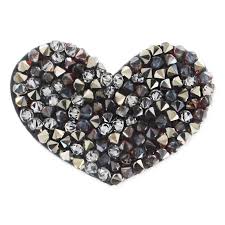
These easy to make Swarovski Crystal Skull and Pearl Hoop earrings are a fun design to create and wear, especially around this spooky time of year! This DIY earring design and project combines many deep Black, Hematite and Iridescent coatings that perfectly represent the Halloween mood. The front and center Swarovski Crystal Skull Bead captivates your attention, that emphasizes high precision faceting in a 3D look, creating detailed drama and mystery.

Although these Skull earrings are ideal for celebrating Halloween, they also pair well with the edgy jewelry fashion trend, accentuating a dark, rock glam style!

See the Step by Step Directions below in picture and written form.

free-diy-swarovski-crystal-skull-earrings-halloween-earring-design-inspiration-and-instructions

Swarovski Crystal Beads & Pearls Used to Make these Skull Earrings

Swarovski Crystal Skull Beads 5750-13mm Crystal Silver Night 2X – 2 pieces

(or choose from your favorite colored Skull Beads)

Swarovski Crystal Pearls 5810-3mm Dark Grey Pearl – 6 pieces

Swarovski Crystal Pearls 5810-3mm Crystal Iridescent Purple Pearl – 4 pieces

Swarovski Crystal Pearls 5810-3mm Mystic Black Pearl – 16 pieces

Swarovski Crystal Pearls 5810-4mm Dark Grey Pearl – 10 pieces

Swarovski Crystal Pearls 5810-4mm Crystal Iridescent Purple Pearl – 6 pieces

Swarovski Crystal Pearls 5810-4mm Mystic Black Pearl – 34 pieces

Swarovski Crystal Pearls 5810-5mm Dark Grey Pearl – 4 pieces

Swarovski Crystal Pearls 5810-5mm Mystic Black Pearl – 4 pieces

Swarovski Crystal Pearls 5810-6mm Crystal Iridescent Purple Pearl – 2 pieces

Swarovski Crystal Pearls 5810-6mm Mystic Black Pearl – 4 pieces

Supplies

2 Silver Ear posts

2 , 4mm Silver Jump rings

Two part adhesive glue

Wire silver, 0.8 mm, 60 cm

Tools

Drinking glass,

6 cm Flat nose pliers

Round nose pliers

Ruler

Side cutter

Toothpick

free-diy-swarovski-crystal-skull-earrings-halloween-earring-design-inspiration-and-instructions-from-rainbows-of-light

free-diy-swarovski-crystal-skull-earrings-halloween-earring-design-inspiration-and-instructions-from-rainbows-of-light-step-2

free-diy-swarovski-crystal-skull-earrings-halloween-earring-design-inspiration-and-instructions-from-rainbows-of-light-step-3

free-diy-swarovski-crystal-skull-earrings-halloween-earring-design-inspiration-and-instructions-from-rainbows-of-light-step-4

free-diy-swarovski-crystal-skull-earrings-halloween-earring-design-inspiration-and-instructions-from-rainbows-of-light-step-5

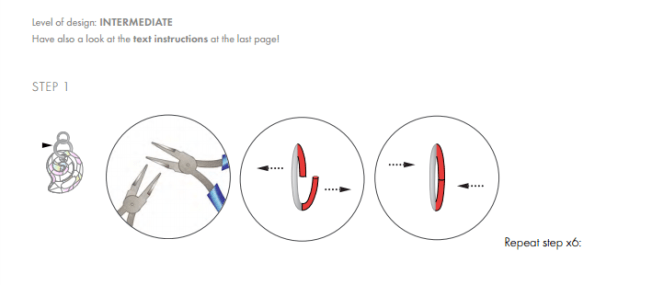
STEP 1: Cut a 60 cm long wire and make a loop at one of the ends of the wire. Form the wire into a circle shape using a drinking glass that is approximately 6cm.

STEP 2: Turn the loop formed on the wire to a 90˚ angle. Start inserting the Swarovski crystals from the material list onto the wire. After you insert the Swarovski Bead art. 5750 Crystal Silver Night 2x, place some glue underneath the bead using a toothpick and let it dry for 2 hours. Proceed with the remaining Swarovski crystals as shown.

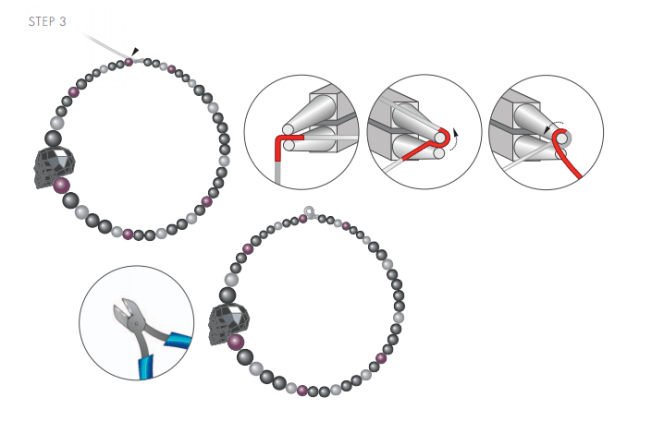
STEP 3: Insert the other end of the wire through the loop and turn a loop on this end as well.

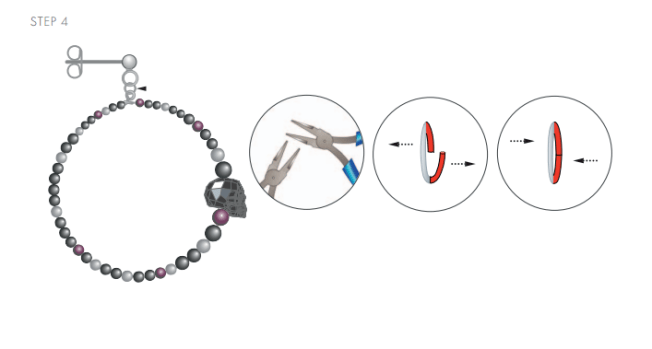
STEP 4: Attach the ear post to the top loop of the earring using a 4 mm jump ring. Repeat steps 1–4 to make the second earring.

swarovski_crystal_heart_beads_5741-crystal_silver_night

swarovski_authorized_reseller

We are an Authorized Reseller of Swarovski Crystals

At Rainbows of Light we only sell Genuine Swarovski Crystals Wholesale to the Public, offering you thousands of shapes, colors and sizes to choose from. We have no tax or surcharges and always provide Free U.S. Shipping on all orders over $100.00. This Guarantees you receive the best prices anywhere on all your favorite Swarovski Crystals!
We can order anything Swarovski makes within the components division – even if it’s not listed on our website rainbowsoflight.com. Please contact us for anything you’re interested in, as we are ALWAYS happy to help!
Harmony and Kashi
Keep Smiling & Keep Shining!
Harmony and Wonder Girl, Kashi

Unknown's avatar

DIY This Stylish Mosaic Bangle Featuring the New Swarovski Triangle Flatbacks!

free-diy-swarovski-crystal-bangle-bracelet-design-and-instructions-how-to-apply-crystals-to-a-silver-bangle-bracelet-rainbows-of-light

Free DIY Swarovski Crystal “Mosaic Tile Bangle” Design and Instructions

This sparkling Swarovski Crystal bangle features Rhinestones from the new Fall/Winter 2017-18 Triangle Flatback Family. The New Swarovski Crystal Triangle Flat backs are available in the styles 2738 Alpha, 2739 Beta and 2740 Gamma.

These new Swarovski Triangle Flatback additions are ideal for creating geometric patterns that fit seamlessly together. Geometric shapes and repeating patterns are a very popular trend for jewelry and fashion lovers. They are lead free and lightweight, which is especially nice when applying them to clothing. Whatever your craft or jewelry project may be, these new Triangle Crystals will give

free-diy-swarovski-crystal-bangle-bracelet-design-and-instructions-how-to-apply-crystals-to-a-silver-bangle

Swarovski crystals

Product Group Article No. Amount Size Color Color Code
Alpha Flat Backs 2738 9 pcs 12x6mm Crystal F 001
Beta Flat Backs 2739 9 pcs 7×6.5mm Crystal Silver Night 001 SINI
Gamma Flat Backs 2740 9 pcs 10x10mm Crystal Silver Night 001 SINI

Supplies:

1 ½” Bangle

Two Part Epoxy Glue (my favorite to work with is E6000 – it dries clear and is available at any craft or hard wear store)

Alcohol wipes

free-diy-swarovski-crystal-bangle-bracelet-design-and-instructions-how-to-apply-crystals-to-a-silver-bangle-bracelet

Instructions

Step 1:       Clean the bangle with alcohol wipes.

Step 2:       Find the center of the bangle and place a drop of glue in 3 places to create the first mosaic tile.  Using one each of the triangle flat backs to create a mosaic square.  Continue to create squares to the right and left side of the bangle until covered completely.

I know these are pretty simple instructions, but there’s not much to it. You can play around with your favorite color combinations and pattern to create your own desired look.

free-diy-swarovski-crystal-bangle-bracelet-design-and-instructions-how-to-apply-crystals-to-a-silver-bangle-bracelet-rainbows-of-light-com-2

Hope you like this both stylish and easy DIY Swarovski Crystal design.

swarovski_authorized_reseller

Rainbows of Light has been a wholesale dealer for over 35 years. We are officially an Authorized Reseller of SWAROVSKI Crystals, ensuring you that you are receiving genuine Swarovski Crystals at the best wholesale prices around! 

Please contact me with any questions, as I am always more than happy to help!

Harmony and Kashi

Keep Smiling and Keep Shining!

Swarovski Crystal Rocks

Unknown's avatar

DIY Multi-Strand Bracelet Highlighting Peacock Colors Using the New Crystal Rainbow Dark Effect

free-diy-swarovski-crystal-rainbow-dark-bracelet-design-and-instructions

Free Crystal DIY Multi-Strand Bracelet Featuring the New Fall/Winter Swaorvski Innovations. It features gorgeous color combinations in an array of peacock type hues that are especially on trend in the cooler months.

With the cooler Fall weather in the air, it’s been exciting looking forward to all of the new activities Autumn has to offer. Mike, Kashi and I enjoyed one of our favorite traditions, leaf peeping! Here in Colorado there is no shortage of one of my favorites trees, Aspens. We set off early in the morning, driving up through Estes Park and on to a quintessential drive called the Peak to Peak highway. It’s absolutely gorgeous and both Kashi and I have our heads and toungs hanging out the window the whole time 😉

kashi-and-harmony-fall-hiking-2016

Hiking through the woods and seeing all of the rich golden colors, truly makes my heart soar. I always feel at home in nature and it brings more peaceful, loving energy into my heart. It inspires me in many ways and I feel refreshed and alive. It also helps me to feel more creative and I love to pour that refreshing sense of awe and gratitude into making new types of jewelry for not only myself, but gifts for my friends and family.

As we transition into the cooler months, our fashion and jewelry styles change and we begin to embrace the darker tones. With this years’ new coating from Swarovski, the Crystal Rainbow Dark 2X, is such a gorgeous blend of peacock colors, showcasing purple, green and yellow hues set on a black background. It will certainly be a new staple when making crystal jewelry designs that stand out as being unique and captivating.

6106 Pear-shaped Pendant

Swarovski Innovations Fall Winter 2017/18

The Crystal Rainbow Dark effect is almost as if Swarovski took the most popular coating, the Crystal AB and placed it on a black backdrop. It’s quite a brilliant idea and leave it to Swarovski for making it spectacular. It resembles an oil mark splashed onto a Crystal, which is very innovative and fits perfectly with the overall trend of people wanting to express themselves in novel ways and wear truly unique pieces.

Swarovski Crystals used in this jewelry project:

Swarovski 5328-6mm Xilion Bicone Beads in Crystal Rainbow Dark 2X ~ 70 Pieces

Swarovski 5040-6mm Rondelle Beads in Crystal Rainbow Dark 2X ~ 47 Pieces

Swarovski 5051-8x6mm Mini Oval Beads in Amethyst ~ 204 Pieces

Swarovski 5051-10x8mm Mini Oval Beads in Emerald ~ 4 Pieces

Swarovski 5728-12mm Scarab Beads in Amethyst ~ 4 Pieces

Swarovski 5514-8×8.5mm Pendulum Beads in Emerald ~ 8 Pieces

Swarovski 5045-6mm New Rondelle Beads in Emerald ~ 8 Pieces

Swarovski 5045-4mm New Rondelle Beads in Emerald ~ 2 Pieces

Supplies:

2  Beaded 5-1 End Bars 

TierraCast® 94-3056-18 or similar end bars

4      6mm round copper jump ring

10    2mm crimp beads

10    3mm crimp covers

1      copper lobster clasp

10”   beading wire

Instructions 

Step 1:       Cut beading wire into 5 10” pieces. Using one piece of beading wire slide on one crimp bead and crimp to the #1 loop on the beaded end bar.  Attach crimp cover.  Slide on one 5328 6mm, one 5045 6mm, one 5328 6mm, one 5040 6mm, one 5328 6mm, one 5514 8×5.5mm, one 5328 6mm, one 5040 6mm, one 5328 6mm, one 5051 8x6mm, one 5328 6mm, one 5040 6mm, one 5328 6mm, one 5514 8×5.5mm, three 5040 6mm, one 5514 8×5.5mm, one 5328 6mm, one 5040 6mm, one 5328 6mm, one 5051 8x6mm, one 5328 6mm, one 5040 6mm, one 5328 6mm, one 5514 8×5.5mm, one 5328 6mm, one 5040 6mm, one 5328 6mm, one 5045 6mm, one 5328 6mm, and one 5045 4mm.  Now slide on one crimp bead and crimp to #1 loop on the other beaded end bar.  Attach crimp cover.

Step 2:       Using one piece of beading wire slide on one crimp bead and crimp to the #2 loop on the beaded end bar.  Attach crimp cover.  Slide on one 5045 6mm, one 5040 6mm, one 5328 6mm, one 5051 8x6mm, one 5328 6mm, one 5040 6mm, one 5328 6mm, one 5051 10x8mm, one 5328 6mm, one 5040 6mm, one 5328 6mm, one 5728 12mm, one 5328 6mm, one 5040 6mm, one 5328 6mm, one 5728 12mm, one 5328 6mm, one 5040 6mm, one 5328 6mm, one 5051 10x8mm, one 5328 6mm, one 5040 6mm, one 5328 6mm, one 5051 8x6mm, one 5328 6mm, one 5040 6mm, and one 5045 6mm.  Now slide on one crimp bead and crimp to #2 loop on the other beaded end bar.  Attach crimp cover.

Step 3:       Using one piece of beading wire slide on one crimp bead and crimp to the #3 loop on the beaded end bar.  Attach crimp cover.  Slide on three 5328 6mm, three 5040 6mm, three 5328 6mm, three 5040 6mm, three 5328 6mm, three 5040 6mm, three 5328 6mm, three 5040 6mm, three 5328 6mm, three 5040 6mm, and three 5328 6mm.  Now slide on one crimp bead and crimp to #3 loop on the other beaded end bar.  Attach crimp cover.

Step 4:       Repeat Step 3 using the #4 holes and repeat Step 2 using the #5 holes.

Step 5:       Attach 3 jump rings to create a small chain at one end of the beaded end bar.  Using one jump ring attach the lobster clasp to the other end. 

swarovski_crystal_heart_bead_5741-crystal_paradise_shine

Hope you love creating new jewelry using the Crystal Rainbow Dark 2X Effect!

Harmony and Kashi

Keep Smiling and Keep Shining!

swarovski_authorized_reseller

Unknown's avatar

DIY Made Simple ~ Learn How Easy It Is To Crystallize This Gorgeous Marble Cocktail Ring!

swarovski-crystal-how-to-make-a-sparkling-coctail-ring

Free DIY Sparkling Marble Ring Design and Instructions

Celebrate the raw and earthy splendor of fall’s jewelry designs with timeless pieces that have meaning, as well as natural beauty. The “Sparkling Marble” ring is a modern heirloom—all you need is modeling clay and crystals. Easy!

This on trend style of cocktail ring embellished with Swarovski Crystals is oh so fashionable! You can create this crystallized look around any type of natural stone or gemstone. Gemstone jewelry is very stylish and adding touches of Swarovski crystals to them, elevates your designs in a brilliant way! Get creative and set crystals around any type of jewelry, whether is necklaces, bracelets, or earrings. Working with Ceralun, which is Swarovski’s ceramic epoxy clay specifically designed to set Swarovski Crystals, is very easy and fun to use, leaving your DIY designs looking professional and beautiful!

SWAROVSKI CRYSTALS Used in this jewelry design:

Swarovski Crystal 1028-8pp Crystal (Foiled) Round Stones (pointed back) 170 Pieces

Ceralun in Walnut Color

SUPPLIES and TOOLS

1 Marbled gemstone, brown (or any color you like)

1 Ring with disc, rose gold color

Tweezers, or a Crystal Katana

Weighing Scale

diy-swarovski-crystal-cocktail-ring-with-step-by-step-instructions

diy-swarovski-crystal-cocktail-ring-with-step-by-step-instructions-step-1

diy-swarovski-crystal-cocktail-ring-with-step-by-step-instructions-step-2

diy-swarovski-crystal-cocktail-ring-design-with-step-by-step-instructions

STEP 1: Follow the Swarovski Ceralun instructions to prepare the Ceralun. Glue the gemstone with Ceralun onto the disc of ring.

STEP 2: Apply Ceralun at the edge of gemstone and place Swarovski Round Stones 1028 PP8 around the edge using tweezers or a Crystal Katana.

Hope you’re inspired to make this design and hope it gets your creative juices flowing to add sparkling touches to other jewelry designs!

swarovski_5741-blush_rose__17139-1423175570-300-300

Harmony and Kashi

Keep Smiling & Keep Shining!

swarovski_authorized_reseller

Unknown's avatar

“Gone to the Beach” DIY Swarovski Crystal Necklace Design & Instructions

DIY Free Swarovski Crystal Necklace Design and Instructions

“Gone to the Beach” Necklace Inspiration from SWAROVSKI’s Create Your Style

Create this DIY Swarovski Crystal Necklace Design with Instructions, that Incorporates the New Crystal Innovations.

Celebrate a sun-kissed summer with boho jewelry. This necklace is made using shell-like Mother of Pearl with Sea Snail Pendants and Jelly Fish Fancy Stones from Swarovski. Make and wear it with a sparkling megawatt smile!

Here are the Swarovski Crystals used in this necklace design:

Swarovski Crystal Fancy Stones 4195 – 14mm Cyrstal 3 pieces (please contact me for details)

Swarovski Crystal Fancy Stones 4195-22mm Crystal 2 pieces (please contact me for details)

Swarovski Settings 4195/S 1PH2OH  14mm Rhodium 3 pieces (please contact me for details)

Swarovski Settings 4195/S 1PH2OH 22mm Rhodium 2 pieces (please contact me for details)

Swarovski Crystal Beads 5000 – 3mm Crystal AB 52 pieces

Swarovski Crystal Pendants 6731 – 14mm Crystal AB 7 pieces

Supplies & Tools

Supplies

Chain, 10cm, 5x7mm, silver

Cord, 42cm, Ø 6mm, beige

2x Cord endings, Ø 6mm, silver

4x Head pins, 6cm, silver

8x Jump rings, 4mm, silver

7x Jump rings, 6mm, silver 1x Jump ring, 7mm, silver

4x Mother of pearl cockle pendants, 24mm, white

12x Mother of pearl disc pendants, 25mm, white

1x Spring ring, 7mm, silver Wire, 1m, 0.7mm, silver

Tools

Flat nose pliers

Round nose pliers

Scissors

Side cutter

Toothpick

Tweezers

There are step by step instructions after the picture instructions.

DIY Free Swarovski Crystal Necklace Design and Instructions Step 1

DIY Free Swarovski Crystal Necklace Design and Instructions Step 2

DIY Free Swarovski Crystal Necklace Design and Instructions Step 3

DIY Free Swarovski Crystal Necklace Design and Instructions Step 4

DIY Free Swarovski Crystal Necklace Design and Instructions Step 5

DIY Free Swarovski Crystal Necklace Design and Instructions Step 6

DIY Free Swarovski Crystal Necklace Design and Instructions Step 6.5

DIY Free Swarovski Crystal Necklace Design and Instructions Step 7

DIY Free Swarovski Crystal Necklace Design and Instructions Step 8

DIY Free Swarovski Crystal Necklace Design and Instructions beach style

STEP 1: Insert a 4mm jump ring and Swarovski Pendant art. 6731 14mm Crystal AB onto a 6mm jump ring. Repeat this process six more times, but on the last one just use the 6mm jump ring.

STEP 2: Cut 14 6cm long pieces of wire and make a loop at one end to form eye pins.

STEP 3: Insert Swarovski Fancy Stones art. 4195 Crystal F 14mm and 22mm into the Swarovski setting. Gently close prongs using tweezers. Thread the Swarovski Fancy Stones onto a head pin and form a loop at the other end. Cut off excess wire. Repeat this step four more times, but thread the last one onto an eye pin as shown in our illustrations with this step.

STEP 4: Insert the disk pendant and the 4mm jump ring including Swarovski Pendant into the loop of one of the eye pins made in step 2. Thread 4 Swarovski Bead art. 5000 3mm Crystal AB onto the eye pin and then add the shell pendant. Make a loop at the top of the shell pendant as shown.

STEP 5: Attach another eye pin and Swarovski Pendant onto the loop make at the top of the shell pendant in the previous step. Insert 4 more Swarovski Beads and the disk pendants. Repeat this step one more time – see illustrations for clarification.

STEP 6: Insert the Swarovski Fancy Stone art. 4195 14mm into the top most loop of the piece from step 5. Repeat steps 4-6 three more times to get three more similar pieces but of different structure. See illustrations for clarification.

STEP 7: Cut a 10cm long chain and a 42cm long cord. Glue the cord ends into the cord endings. Attach one of them to a spring ring and the second one to a 7mm jump ring.

STEP 8: Attach all the four pieces from steps 4-6 to the chain leaving a spare of 4cm to act as an extension. Attach the last Swarovski Pendant to the last link of this extension.

Have fun making this beautiful Swarovski Crystal jewelry design!

Harmony and Kashi

Keep Smiling & Keep Shining!

Swarovski_5741-Crystal_AB_Heart Bead