Unknown's avatar

See Why This Sparkling Halloween Mask is the Cat’s Meow!

happy-halloween

It’s that fun time of year where rich fall colors delight our senses, pumpkins line the doorsteps and that eerie feeling of something spooky is just around the corner…. HALLOWEEN!

Halloween will be here before you know it, as as we thoroughly enjoy our spiced lattes (down to the last delicious drop), it’s fun to ponder… what shall I be this year?

besties

I haven’t decided what I’ll be this year, but my best friend Lauren (here we are having a ball at her wedding) is going as a kitty cat and asked me to add some Swarovski Crystals to her cat mask. Well, she certainly came to the the right person for that job (I’ve got crystals coming outta my ears, no not literally, that would just be ridiculous  😉 BUT, I do leave a trail of sparkles everywhere I go (I swear, every week the vacuum consumes more crystals than Kashi hair!)…so honestly, how can a bestie refuse?

besties-forever

I had a lot of fun embellishing her cat mask with Swarovski Crystal Flat back Rhinestones and I thought it would be fun to show you what I created and give you the step by step instructions on how to create something similar for yourself, or for your bestie  🙂

free-diy-diresctions-on-adding-swarovski-crystals-to-halloween-mask-design-and-instructions

Steps to Embellish Your Halloween Mask with Swarovski Crystals

Here is what you will need to add Swarovski Crystals to a furry mask. (please note: the mask will need to be furry to be able to affix the Hot Fix Rhinestones, if it is not furry, then you will need to glue them on using an epoxy glue, my favorite being the E6000 glue). Below are the Crystal shapes that I used, but there are numerous different styles of Swarovski Flat backs to choose from to get your creative juices flowing.

Swarovski Crystals

Swarovski Crystal Round Xirius Flat Back Rhinestones 2078-12ss Crystal Hot Fix

Swarovski Crystal Round Xirius Flat Back Rhinestones 2078-16ss Crystal Hot Fix

Swarovski Crystal Round Xirius Flat Back Rhinestones 2078-20ss Crystal Hot Fix

Swarovski Crystal Leaf Flat Back Rhinestones 2797-8mm Crystal Hot Fix

Swarovski Crystal Bow Tie Flat Back Rhinestone 2858-12mm Bowtie Crystal Hot Fix

Supplies

1 Furry Cat Mask (I couldn’t find the exact one she sent me, but here are some options to choose from)

Crystal Katana Tool

Bejewler Pro Hot Fix Tool

free-diy-diresctions-on-adding-swarovski-crystals-to-halloween-mask

I started with a plain black cat mask (I guess I was so excited to start adding the Swarovski crystals, that I forgot to take a picture of the plain mask, but hey, I’m sure you can use your wild imagination  😉

Starting with one side of the top of the eye, I used the crystal Katana to pick up the crystals and place them where I wanted them (I have found that this method is MUCH easier than using tweezers). Next, I used the Bejewler Hot Fix Tool to secure the crystals in place which only take a few seconds for each stone.

One great tip that I have found to work very well, is to use one size smaller tip on the bejewler tool than your stones, this way the hot tip won’t come into contact with the underside of your project, so that there is no way it can inadvertently heat up or ruin any part of your project. Pass that tip along to your Bejewler friends – they’ll love ya for it!

free-diy-diresctions-on-gluing-swarovski-crystals-to-halloween-mask

Before you know it, your plain black cat mask is looking like the Cat’s Meow!

I decided my bestie’s kitty mask just had to be as regal as she is, so I added a little crown on the top, accentuating the bottom with the beautiful shaped Leaf Flatback.

Last but certainly not least, for the final touch, I added the Bow Tie Flatback as her adorable little noes accent. I think it’s as cute as a button!

free-diy-diresctions-on-embellishing-swarovski-crystals-to-halloween-mask

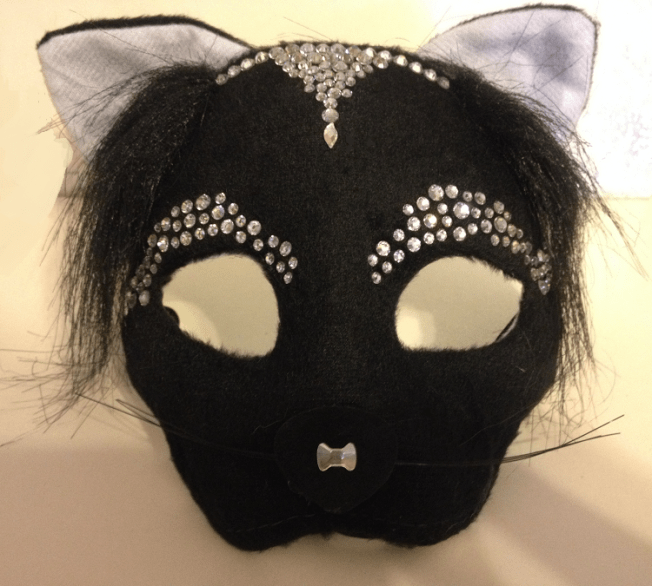
So there you have it, the final embellished kitty mask and it only took a couple of hours. I sent it off to Lauren, she absolutely LOVED it and can’t wait to show it off!

I hope this project inspires you to create something fabulous & sparkly this Halloween! Please post and share pictures with me of you, your friends’ or kiddos Halloween costumes this year, I would LOVE to see them!

swarovski_authorized_reseller

Please contact me with any questions you may have, as it is my pleasure working with you! We are an official SWAROVSKI Authorized Reseller which guarantees you are receiving genuine Swarovski Crystals at low wholesale prices.  

Harmony and Kashi

Keep Smiling and Keep Shining!

 swarovski_crystal_heart_bead_5741-crystal_paradise_shine

Unknown's avatar

Colorful Crystal Bikini Design & Instructions ~ DIY Summer Fashion!

Free Swarovski Crystal Instructions on how to crystalize a bikini

DIY Colorful Polka Dots Bikini

Go girlie and get the ’70s vibe with this pretty crocheted polka-dot bikini sprinkled with sunshine, thanks to Yellow Opal Flat Back Hotfix from Swarovski. Now lose the phone, head for the beach, and chill!

Adding Swarovski Crystals to your bathing suit is super simple with the Hot Fix Rhinestones. Simply place the stones where you want them and iron them on, it’s as easy as that! You can also use a Bejeweler Pro Hot Fix applicator to apply the stones individually. You can use the colors in this project or customize it with your favorite colors. Click here to choose from a beautiful selection of colors and sizes:

Swarovski Crystal Flatbacks in Hot Fix

Free Swarovski Crystal Instructions on how to add crystals to a bikini bathing suit step by step instructions

SWAROVSKI Crystals Used in this Project

Swarovski Crystal Flatbacks 2078 16ss Aquamarine Hotfix 26 pieces

Swarovski Crystal Flatbacks 2078 16ss Black Diamond Hotfix 26 pieces

Swarovski Crystal Flatbacks 2078 16ss Rose Peach Hotfix 26 pieces

Swarovski Crystal Flatbacks 2078 16ss Yellow Opal Hotfix 26 pieces

Free Swarovski Crystal Instructions on how to add crystals to a bikini bathing suit step 1

Free Swarovski Crystal Instructions on how to add crystals to a bikini bathing suit step 2

Free Swarovski Crystal Instructions on how to add crystals to a bikini bathing suit

STEP 1: Place Swarovski Flat Backs Hotfix art. 2078 onto the bikini. Place a transfer film on top of the Swarovski Crystals and iron the transfer film to adhere the crystals onto the bikini. Gently pull the transfer film back. If any of the crystals do not stick, replace transfer film and iron once more.

Swarovski Crystal Heart Bead Blush Rose

Harmony and Kashi

Keep Smiling & Keep Shining!

Unknown's avatar

DIY Nail Art ~ How To Glue Swarovski Crystals To Nails

DIY applying Swarovski Crystals to Nails How To tutorial wholesale Flatbacks

Swarovski Create Your Style Nail Design

Nail art is a beautiful way to express your own personal style and it’s fun to create a special look for all kinds of occasions. Here is a lovely DIY Swarovski Crystal nail design and instructions for a bride or the bridal party.

Gluing Swarovski Crystal to your nails is fun, easy and creates beautiful, eye-catching results. Below are step-by-step instructions on how to apply crystals to your nails using two different methods.

Looking for more designs to choose from? Visit our Pintrest Page for more Swarovski Crystal Nail Art Design Inspirations!

Level of Crystal Nail Art Design: BEGINNER

Swarovski Crystals used in this Nail Art Design

2088-5ss Swarovski Crystal Flatback Rhinestones in Clear Crystal

Supplies

Nail/Gel Polish, nude (Additional supplies depending on application technique)

Tools

Tweezers,

Wax stick/toothpick/Crystal Katana

Additional supplies depending on application technique

DIY applying Swarovski Crystals to Nails How To tutorial wholesale Crystal Flatbacks nail art design instructions

DIY applying Swarovski Crystals to Nails How To tutorial wholesale Crystal Flatbacks nail art design

APPLICATION POSSIBILITIES

STEP 1: Add a small amount of nail glue to a toothpick and place on the polished nail where you want to add the crystal.

STEP 2: Pick up the Swarovski Flatback No Hotfix with a wax stick, tweezers, or the Crystal Katana and apply to the glue on the nail. Continue to apply glue and crystals to create the design of your choice.

STEP 3: Use a thin detailing brush to apply a small amount of top coat around the base of the crystals to seal.

SETTING WITH GEL POLISH

STEP 1: After applying the gel color of your choice, apply the gel top coat.

STEP 2: Pick up crystals with a wax stick, tweezers or the Crystal Katana tool and apply to the uncured top coat in the pattern of your choice.

STEP 3: Cure the nail under the UV light to set the top coat and Swarovski crystals.

STEP 4: Dip a small detail brush into the top coat and seal the edges of the crystals. Cure under the UV light. Follow gel polish instructions to complete manicure.

Swarovski Crystal Heart Bead Blush Rose

I would LOVE to see your nail art designs using Swarovski Crystals! Please share the love by posting pictures here or on Rainbows of Light’s Facebook Page so we can all Ooooooo & Awwww over your beautiful creations!

Harmony and Kashi

Thanks for stopping by!

Wonder Girl Kashi & I sincerely appreciate it!

Keep Smiling & Keep Shining!

Unknown's avatar

Quick & Easy DIY Project: Add Swarovski Crystals to Your Sports Pants!

DIY Apply Swarovski Crystals to pants

DIY Instructions on Applying Swarovski Crystals to Sports Pants

Take a pair of sport pants and give them a dash of attitude with Swarovski crystals in new Graphite and Yellow Opal, then sparkle while you sweat!

The sports fashion trend has exploded in popularity in the last few years and it continues to have a huge influence  in the fashion industry, with many feeling like it is here to stay for a very long time.

The popular buzzword “athleisure” perfectly describes this sports fashion movement, where more people are craving healthier lifestyles and incorporating a more functional style into their wardrobes. People are wanting an everyday type of comfort that is also stylish and fashionable. It’s the idea that sportswear should be a chic s everything else in your closet.

Adding a touch of Swarovski Crystal sparkle to your sports wardrobe is easy and it’s always much more fun to work out looking and feeling your very best!

Below are the visual and Step by Step instructions on how to apply Swarovski Crystal Rhinestones to your sports pants.

DIY Intructions on Appling Swarovski Crystals to pants step by step instructions

Swarovski Crystal Flatbacks Used in this project are listed below, or choose your favorite colors to customize your pants.

2078-20ss Swarovski Crystal Fltabacks Hotfix Yellow Opal (31 pieces)

2078-34ss Swarovski Crystal Flatbacks Hotfix Graphite (35 pieces)

Supplies and Tools:

Supplies: Pants

Tools:  Iron, Pins, Quad paper, Scissors, Transfer film, Transfer sheet and Tweezers

DIY Apply Swarovski Crystals to pants step 1

DIY Intructions on Appling Swarovski Crystals to pants step 2

DIY Intructions on Appling Swarovski Crystals to pants step 3

DIY Design Project Applying Swarovski Crystals to pants

STEP 1: Place a transfer sheet over the quad paper and start placing the Swarovski Flat Backs Hotfix art. 2078 SS20 Yellow Opal into the squares on the quad paper leaving two squares empty in-between each Swarovski Crystal as shown. Place a transfer film on top of the Swarovski Crystal row and pull it back to get all the Swarovski Crystals onto it. Mark the area on the pants where you want to place the crystals with pins. Place the transfer film with Swarovski Crystals onto the pinned area as shown.

STEP 2: Iron the transfer film with Swarovski Crystals onto the pants and then pull the transfer film back slowly, making sure all the Swarovski Crystals are in place. (If some do not stick to the pants, re-iron until they do.) Repeat these two steps for other Swarovski Crystal stripes.

Swarovski_Crystal_Heart_Bead_5741-Crystal_Silver_Night

Swarovski_Authorized_Reseller

Harmony and Kashi

Keep Smiling and Keep Shinning!

Harmony and Wonder Girl, Kashi

Unknown's avatar

Blinded By The Bling!

Blinged Helmet 6

I blinged out my helmet in style with non other than SWAROVSKI Crystals!

I decided that if I’m going to have to wear a helmet, it might as well be a fashion statement just as much as a safety measure!

Harmony Blue Bird Day

I’ve been snowboarding for about 20 years now and I absolutely LOVE it! It’s big kid fun,  keeps me young and let’s face it, the only thing this Arizona born and bred girl looks forward to in the winter.

Blinged Helmet 7

Living in Colorado is an adventure in and of itself. People here are incredibly adventurous and love the outdoors – myself included! We need to wear helmets for all kinds of activities, so why not spice them up a bit and get excited to put them on!

Swarovski Crystal Flatbacks Wholesale to the Public

SWAROVSKI Flatbacks Are Gorgeous!

Swarovski Crystal Flatbacks are so fun and versatile, with endless shapes and colors to choose from, all your designs will be unique and fabulous!

Blinged Helmet 4

 I found a few super large Flatback Stones and combined them with medium and smaller rhinestones to create my design. The first two large Crystals are the 2035 -40mm and 30mm Chessboard Flatbacks. Their faceting structure is just as it describes and produces and amazing array of sparkles. I added two 20mm Chessboard Flatbacks to the sides as well as the 2520 Cosmic Flatbacks at an angle and filled in with a few 2088-20ss Round Xilion  Flatbacks and 2711 Triangle Flatbacks (which are the Hot Fix kind, meaning they have the glue pre-applied to the back, but I just used the E6000 glue instead and it worked great. You can find E6000 glue at most hardware or craft stores).

Swarovski Crystal Rocks    Swarovski Crystal Rocks in Jewelry

I also used a piece of the Swarovski Crystal Rocks in the shape of a heart and glued this like normal. The Crystal Rocks product is an amazing creation that takes halved Bicone Beads clustered together on one giant piece where you can cut shapes out of and glue them on to pretty much any surface. You can glue it into jewelry molds and it’s great for embellishing costumes, dresses or any type of fabric for fashion or home decor. It’s as versatile as your imagination. If  you’re interested in working with this product, please contact me for details.

Blinged Helmet 2

I also used the Swarovski Crystal 2808 Heartshaped Flatback, the 2753 Edelweiss Flatback, the 2708 Molecule Flatback, and the 2072 Dome Flatback.

If you, your children, friends or family who don’t like wearing helmets, well here’s the best way to making wearing them extremely fun! I can’t wait to wear my new blinged out helmet on my next snowboarding trip!

Blinged Helmet 3

As you can see, SWAROVSKI Crystals give off the most brilliant sparkle in the world!

I hope I don’t blind anyone with all this bling!

Kashi Snowbird

Kashi says, your SWAROVSKI’s so bright…I gotta wear shades 😉

Keep smiling and keep shining!

Swarovski_5741-Crystal_Antique_Pink