Unknown's avatar

Make Mom Feel Extra Special with this Sparkling Mother’s Day Gift Inspiration

Moms special day

Mom’s special day is quickly approaching!

What are you creating for your mom this Mother’s Day? Here is a sparkling design inspiration to spark your creativity.

Show your mother how much she means to you by saying it in crystal: embellish an expression of love with her favorite color of Swarovski crystals on a smooth white background, making this sparkling bangle a thoroughly modern memento of a very special day — one that your mum will keep forever.

DIY Mothers day sparkling bracelet design inspiration

diy-mothers-day-sparkling-bracelet-design-inspiration-header.png

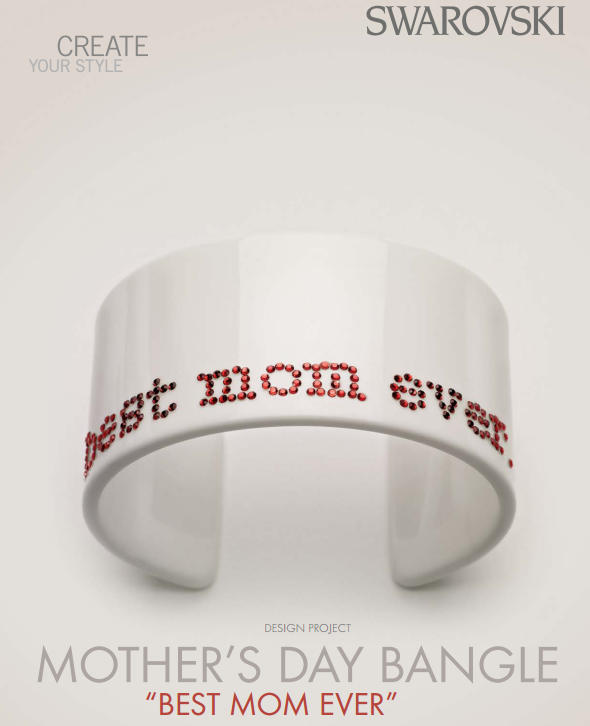
Use Swarovski Crystal 2088 Flatbacks in whatever size you like to use (here is a helpful stone size chart). This bangle was created using the 3ss, but if this is too small for your liking, other popular sizes include the 5ss, 10ss and 12ss which all give nice detail.

The supplies and tools that you will need include: a white bangle, glue (E 6000 is popular or a two part epoxy), a paper tooth pick, transfer film, 12x4cm transfer sheet and tweezers.

DIY Mothers day sparkling bracelet design inspiration Step 1

DIY Mothers day sparkling bracelet design inspiration Step 2

DIY Mothers day sparkling bracelet design inspiration Step 2b

DIY Mothers day sparkling bracelet design inspiration Step 3

DIY Mothers day sparkling bracelet design inspiration Step 4

DIY Mothers day sparkling bracelet design inspiration Step 6

DIY Mothers day sparkling bracelet design inspiration Step 7

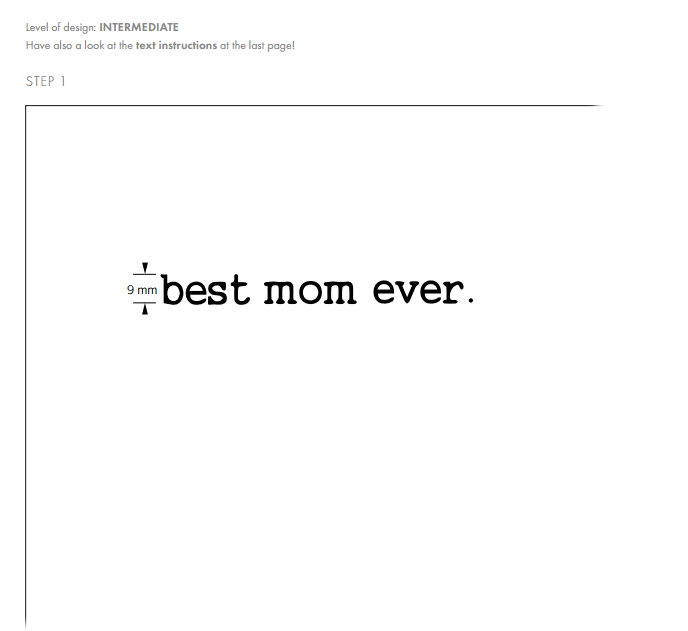
STEP 1: Print out the pattern in a 1:1 ratio where the height of the text is 9mm.

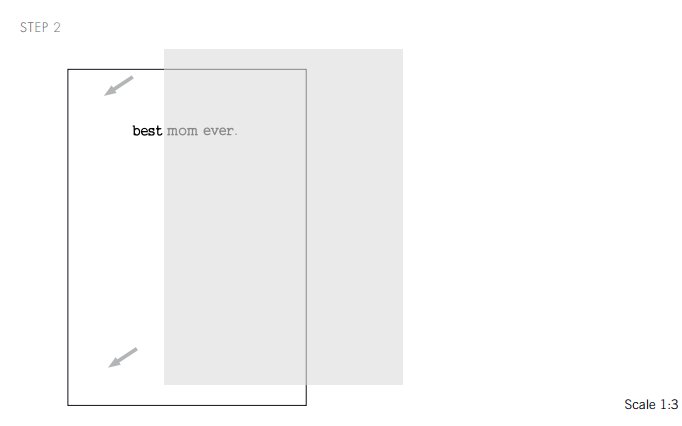
STEP 2: Place the transfer sheet over the pattern. Using tweezers or a glue stick, place the Swarovski Flat Back No Hotfix (this bangle used style 2000 SS03 Indian Siam) over the text.

STEP 3: Place the transfer film over the text and pull the transfer film back to get all the crystals on the film as shown in our illustrations with this step.

STEP 4: Apply two part adhesive glue onto the Swarovski Flat back No Hotfix (style 2000 SS03 Indian Siam) with a toothpick.

STEP 5: Affix the transfer film onto the bangle and press the stones gently onto the bangle. Let it cure for the length of the time indicated on the glue package before removing the transfer film.

Give this gift with joy, knowing you made it not only with your hands, but more importantly, with your heart!

Swarovski_5741-Light_Siam Hear Bead

A Mother’s Love is Forever.

Unknown's avatar

Bring to Light Cherished Moments Captured in Time with This Treasured DIY Design!

DIY Swarovski Crystal Watch Free Design and Instructions

DIY Swarovski Crystal and Pearl Vintage Watch Bracelet Design and Instructions

I love this treasured idea of turning back time and creating a unique watch and sparkling piece of specialized jewelry that has meaning to you every time you look at it! Bring to light cherished moments and memories with a beloved vintage style black-and-white photograph complimented by Swarovski crystals!

Here is what you will need for this precious project and instructions are below:

 Swarovski Crystals and Pearls

Swarovski Crystal 5328 4mm Xilion Bicone Beads 33 pieces of Crystal Iridescent Green 001 IRIG

Swarovski Crystal 5328 4mm Xilion Bicone Beads 33 pieces of Metallic Sunshine 001 METSH

Swarovski Crystal 5810 4mm Pearls 62 pieces of Light Grey Pearls 001 616

Swarovski Crystal 5810 4mm Pearls 31 pieces of White Pearls 001 650

Supplies and Tools

Jewelry elastic cord, transparent, 0.5mm, 2.5m, two part adhesive glue and a watch

Tools

A beading needle and scissors

diy-swarovski-crystal-and-pearl-watch-free-design-and-instructions-step-1.png

diy-swarovski-crystal-and-pearl-watch-free-design-and-instructions-step-3.png

diy-swarovski-crystal-and-pearl-watch-free-design-and-instructions-step-5.png

diy-swarovski-crystal-and-pearl-watch-free-design-and-instructions-step-6.png

STEP 1: Remove the watch strap and the glass on top of the dial. Insert your desired photograph and replace the glass.

STEP 2: Cut 50cm of elastic cord, fold it in half and secure it onto the spring bar of the watch with a double knot. Using a beading needle, insert 31 Swarovski Crystal Pearl art. 5810 4mm Crystal Light Grey Pearl onto the elastic cords, removing one of the cord ends halfway through. (See illustrations for clarification.)

STEP 3: Go through the spring bar at the other end of the watch face with the beaded elastic cord. Insert the cord back through the Swarovski Pearls towards the half way point. Tie a knot as shown in our illustrations with this step.

STEP 4: Put some glue on the knot and thread both the ends of the elastic cord back through three Swarovski Pearls on each side. Cut off the leftover cord ends.

STEP 5: Repeat steps 2–4 four more times to make the other beaded cords for the watch. The second cord from left will be with the 33 Swarovski Bead art. 5000 4mm Crystal Metallic Sunshine. The third cord consists of 31 Swarovski Pearl art. 5810 4mm Crystal White Pearl. The fourth cord consists of 33 Swarovski Bead art. 5000 4mm Crystal Iridescent Green and the last cord will be 31 Swarovski Pearl art. 5810 4mm Crystal Light Grey Pearls.

Swarovski_5741-Hear Bead Crystal_Antique_Pink

This would be a particularly exceptional Mother’s Day or Birthday gift for that special loved one in your life!

I would love to see a picture of your unique watch when you make it!

Unknown's avatar

DIY Swarovski Crystal Bracelet Tutorial

Swarovski_Fancy_Stone_BraceletThis special Ultra Suede bracelet embellished with Swarovski Fancy Stone article 4439 and brilliant Swarovski Rivets will add sparkle to your life!

Create customized jewelry pieces with castings created exclusively for Swarovski crystals.

Perfectly on trend, this rocker chic DIY bracelet tutorial teaches you how easy it is to create one-of-a-kind jewelry that truly shines!

Crystal_Applicator_Hand_Tool_DIY_with_Swarovski_Elements

Create Beautiful Hand Made Jewelry using the Crystal Applicator Hand Tool and Rivet Die Set!

Swarovski_Crystal_Bracelet_DIY_Hand_Held_Rivet_Tool

This simple, glamour-rock bracelet is unique and can be specially made by you!

Swarovski Black Heart Bead

I hope that you are inspired to create this or your own unique jewelry using Swarovski crystals!

Please contact me any questions or for details on the casting components.

Unknown's avatar

Wire Wrapping Video Tutorial and Swarovski Crystal Jewelry Inspirations

Swarovski Square Beads Wire Wrapped

Swarovski Crystal 4439 Square Beads Wire Wrapped Earrings in Crystal Lilac Shadow

Today I wanted to celebrate one of the oldest jewelry making techniques in history – wire wrapping!

Wire wrapping is a skillful art form, or craft used in creating beautiful handmade jewelry.

Swarovski Crystal Silver Night Baroque Earrings wire wrapped

Swarovski Crystal 6090 Baroque Pendant Wire Wrapped Earrings in Crystal Silver Night

I like the, shall I say the “simplicity” or “effortlessness” the wire wrapping look gives to jewelry. I don’t mean to say the process is simple or effortless because there can be many complexities in wire wrapping. But because there is no soldering or heating of the wire, the end design gives a whimsical and natural look that I love.

Swarovski Crystal wire wrapped earrings

Swarovski Crystal Beaded and Wire Wrapped Earrings

Examples of wire wrapping and beading techniques date back thousands of years ago from the Sumerian Dynasty and Ancient Rome. In this day-in-age where the DIY market has exploded in popularity, wire wrapped jewelry is a wonderful technique that can be learned and all kinds of people can create beautiful and unique designs for themselves and as gifts.

Swarovski crystal and silver wire wrapped earrings

Wire Wrapped Earrings Featuring Swarovski Crystal 5000 Round Beads in Dark Sapphire 

People love to harness their desire and create something new and unique themselves. There’s a deep satisfaction that comes from learning, doing and creating something beautiful and that’s why I wanted to celebrate wire wrapping as a fabulous way to add your own special touch to a unique piece of jewelry.

Watch this Basic Wire Wrapping video Tutorial with Swarovski Crystal and Beadalon

I hope you enjoy this video tutorial and have been inspired by these beautiful handmade pieces of jewelry, wrapped in wire – of course!

Swarovski Crystal Heart

Unknown's avatar

DIY Swarovski Crystal Charm Bracelet Design and Instructions

Swarovski_Summer_Bracelet_Free_Design_and_InstructionsBracelet Design Inspiration ~ Summer Grace Charm Bracelet made with SWAROVSKI ELEMENTS

DIY Swarovski Crystal Charm Bracelet Design and Instructions below.

I was sitting in the middle seat of an airplane the other day chatting with the people next to me and the gentleman to my left complimented me on my Swarovski crystal bracelets which grabbed the attention of the young lady to my right.

She perked up and said enthusiastically, oh yes gorgeous, I love Swarovski crystals!

It’s certainly wonderful to meet people who love and admire Swarovski Crystal Beads as much as I do. They were very impressed that I had made the jewelry myself, which I have to admit, felt really great that they appreciated my designs so much. It got me thinking about the status of the Swarovski brand. I suppose the age old saying “you get what you pay for” really applies to crystals. Yes, Swarovski is a higher end product because of its superior quality, clarity and faceting structure, yet it remains affordable to many people, of whom especially value excellence. People appreciate and are always drawn to exceptional products.

DIY-Jewelry-Ring-box

People have also truly embraced the idea that they can do many things themselves. The DIY market has exploded in popularity recently and it’s because when you make something yourself, there is an added benefit of feeling talented, skillful and capable of achieving things on your own.

Self sufficiency, now that is universally a very powerful feeling!

There is a genuine sense of pride when you take the rains and accomplish things yourself! You automatically infuse more value into what you have done, you appreciate it more and the enthusiasm that comes from creating something beautiful is poured into your next project, the next and the next. You come to the realization that you yourself are creating a continuous cycle of creativity, joy and self expression that is fun and immensely rewarding!

DIY_Swarovski_Crystal_Bracelet_Design_and_Instructions

In the spirit of “Do It Yourself” here is a beautiful Swarovski Crystal Charm bracelet waiting to be made by you!

Swarovski_Summer_Charm_Bracelet_Design_and_Instructions

SWAROVSKI ELEMENTS

Sew-on Stones 3265-26×21 mm Crystal Silver Shade

Swarovski Beads
Art. 5000-4 mm Mint AlabasterArt. 5301-8 mm Pacific OpalArt. 5601-8 mmViolet Opal,

Swarovski Pendants
Art. 6401-8 mm Light RosePacific Opal, Art. 6401-12 mm Light RoseArt. 6650-22 mm Crystal Silver Shade Squaredelles Art. 5920-4mm Silver Crystal, or you can use; Squaredelles Art. 5920-4mm Gun Metal Crystal Or Squaredelles Art. 5920-8mm Silver Crystal

Materials

Toggle 18 mm, Silver, Jump Ring ø 5 mm, Silver Jump Ring ø 8 mm, Swarovski 5940 Silver Head Pins

Swarovski_Summer_Charm_Bracelet_Free_Design_and_Instructions_Steps_1_and_2_

Swarovski_Summer_Charm_Bracelet_Free_Design_and_Instructions_Steps_3,_4_and_5_

Swarovski_Summer_Charm_Bracelet_Free_Design_and_Instructions_Steps_6_and_7_

Swarovski_Summer_Charm_Bracelet_Free_Design_and_Instructions_Step_8

Swarovski Elements

Have a sparkling summer!