Unknown's avatar

Hey Chicago Whaddya Say, the Cubs Are Gonna Win Today! Go Cubs Go!

9626523-mlb-nlcs-los-angeles-dodgers-chicago-cubs-1-850x560

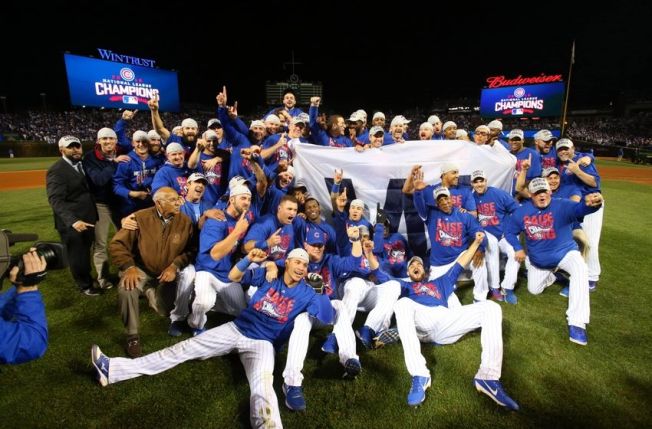
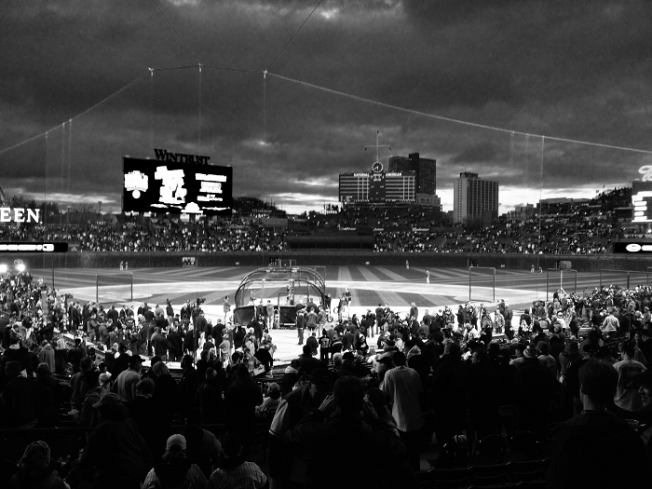
What an exciting World Series baseball game between the Chicago Cubs and the Cleveland Indians! WOW! I’ve never seen a more fun, nail-biter of a game! Thankfully our beloved Cubbies FINALLY after 108 years, became champions once again!

Although I’m from Arizona, my hubby Mike has been a die-hard Cubbies fan for his whole life. So if my Hubby’s a Cubbie, I’m a Cubbie 🙂

His dreams came true when his brother, who lives in Chicago, called him up last week and said, I have tickets to the World Series games 4 & 5, do you wanna go? Well…it took 0.2 seconds for him to say YES!!!

I was so excited for him! He was going to be staying at his brother & sister-in-law’s house and I thought, how fun would it be to bling out some little Cubs shirts for his 18 month old niece! I quickly got to work and here’s what I made…P.S. I love them so much!

diy-instructions-on-how-to-glue-swarovski-crystals-to-shirt

I printed out the Cubs logo and cut out the area that I wanted to add my Swarovski Crystals. Bling-Bling-Baby!

diy-swarovski-crystals-to-shirt-cubs-emblem

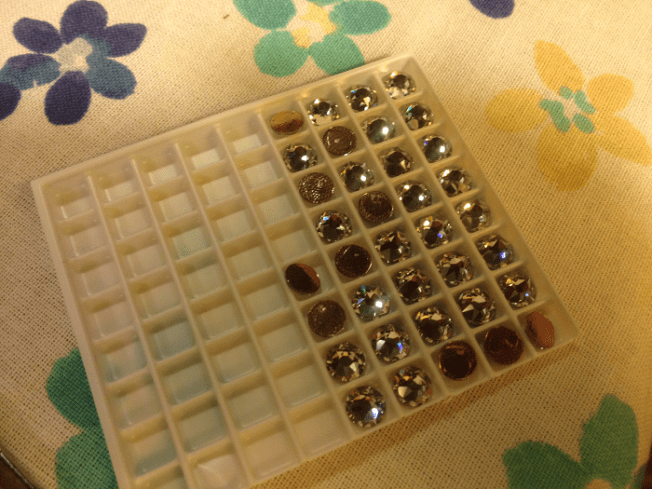
I used the Swarovski 2078-30ss Crystal Hot Fix Flat Back stones on this one, which was a perfect size for making two rows of crystals for the big C.

diy-swarovski-crystal-cubs-shirt-instructions

After placing the crystals in the C, I started heating up my iron. I used a pieces of thin parchment-like paper and softly laid it on top of the stones. Then I pressed the iron down on the C. I pressed hard and held it there for several minutes. I kept doing this process for several more minutes. I checked the stones one by one, to make sure they were secure and if I found a loose one, I used the Bejeweler Pro Hot Fix Tool to secure it in place.

diy-swarovski-crystal-flat-backs-to-shirt-for-cubs

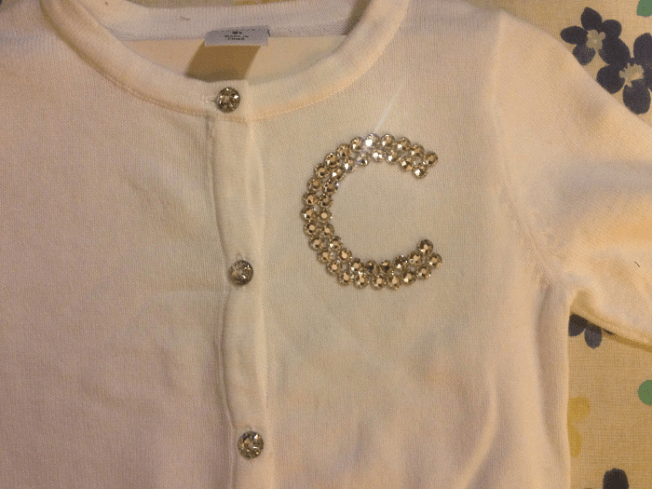
So CUTE! I love how the clear crystals match the clear crystal buttons on this little sweater.

I didn’t stop there….my next one was an iconic picture with much more detail. Drum roll please….

holy-cow-sparkling-shirt-diy-cubs

Well… Holy Cow, it’s Harry Caray!

What a fun guy he was and it was fun to pay tribute to him and his iconic over-sized glasses! I used the 2078-12ss Swarovski Crystal Flatbacks for the details of his eyes, smile chin and hair and the rest I used the 2078-30ss Swarovski Crystal Hot Fix Flatback Rhinestones. These are the sizes that I liked best, but Swarovski offers a large variety of sizes,colors and styles for all of your crystal projects. Plus, you can’t beat our wholesale prices on all your favorite Swarovski Crystals!

diy-swarovski-crystals-to-shirt-holy-cow-cubs

I’m not done yet! Third times a charm, right?! We needed all the luck we could get! I had one more pink T-shirt I wanted to bling out, so I went with a classic Cubs logo for the last one and I made an extra girly, extra sparkly one!

diy-blinged-out-cubs-shirt

Go Cubs Go!

I used the same C cut out as the first one, but this time I used the Swarovski 2078-30ss Crystal AB Hot Fix Flat Back Rhinestones for the extra brilliance. It shines pinks, blues and yellow sparkles! I used the 2078-16ss Swarovski Crystal AB Hot Fix Flat Back Rhinestones for the UBS.

I had so much fun making these sparkling Swarovski Crystal shirts for our sweet little niece, everyone loved how they turned out and I’m sure she will be wearing one of them for the victory parade today!

chicago-cubs-champions

Yay Cubbies!

cubs-world-champs

swarovski_authorized_reseller

At Rainbows of Light we only sell Genuine Swarovski Crystals Wholesale to the Public, offering you thousands of shapes, colors and sizes to choose from. We have no tax or surcharges and always provide Free U.S. Shipping on all orders over $100.00. This Guarantees you receive the best prices anywhere on all your favorite Swarovski Crystals!
We can order anything Swarovski makes within the components division – even if it’s not listed on our website rainbowsoflight.com. Please contact us for anything you’re interested in, as we are ALWAYS happy to help!
Harmony and Kashi
Keep Smiling & Keep Shining!
swarovski_crystal-heart-beads


Unknown's avatar

Create These “Groovy Skulls” Earrings ~ DIY Design and Instructions!

free-diy-swarovski-crystal-skull-earrings-halloween-earring-inspiration-and-instructions

Free DIY “Groovy Skulls” Earring Design and Instructions

It’s Halloween time, so dress for divine darkness with the mysterious Swarovski Sparkling Skulls earrings. This charismatic combination of Crystal Pearls and Crystal Skull Beads in Crystal Silver Night 2X will make you the belle of the monster ball!

These easy to make Swarovski Crystal Skull and Pearl Hoop earrings are a fun design to create and wear, especially around this spooky time of year! This DIY earring design and project combines many deep Black, Hematite and Iridescent coatings that perfectly represent the Halloween mood. The front and center Swarovski Crystal Skull Bead captivates your attention, that emphasizes high precision faceting in a 3D look, creating detailed drama and mystery.

Although these Skull earrings are ideal for celebrating Halloween, they also pair well with the edgy jewelry fashion trend, accentuating a dark, rock glam style!

See the Step by Step Directions below in picture and written form.

free-diy-swarovski-crystal-skull-earrings-halloween-earring-design-inspiration-and-instructions

Swarovski Crystal Beads & Pearls Used to Make these Skull Earrings

Swarovski Crystal Skull Beads 5750-13mm Crystal Silver Night 2X – 2 pieces

(or choose from your favorite colored Skull Beads)

Swarovski Crystal Pearls 5810-3mm Dark Grey Pearl – 6 pieces

Swarovski Crystal Pearls 5810-3mm Crystal Iridescent Purple Pearl – 4 pieces

Swarovski Crystal Pearls 5810-3mm Mystic Black Pearl – 16 pieces

Swarovski Crystal Pearls 5810-4mm Dark Grey Pearl – 10 pieces

Swarovski Crystal Pearls 5810-4mm Crystal Iridescent Purple Pearl – 6 pieces

Swarovski Crystal Pearls 5810-4mm Mystic Black Pearl – 34 pieces

Swarovski Crystal Pearls 5810-5mm Dark Grey Pearl – 4 pieces

Swarovski Crystal Pearls 5810-5mm Mystic Black Pearl – 4 pieces

Swarovski Crystal Pearls 5810-6mm Crystal Iridescent Purple Pearl – 2 pieces

Swarovski Crystal Pearls 5810-6mm Mystic Black Pearl – 4 pieces

Supplies

2 Silver Ear posts

2 , 4mm Silver Jump rings

Two part adhesive glue

Wire silver, 0.8 mm, 60 cm

Tools

Drinking glass,

6 cm Flat nose pliers

Round nose pliers

Ruler

Side cutter

Toothpick

free-diy-swarovski-crystal-skull-earrings-halloween-earring-design-inspiration-and-instructions-from-rainbows-of-light

free-diy-swarovski-crystal-skull-earrings-halloween-earring-design-inspiration-and-instructions-from-rainbows-of-light-step-2

free-diy-swarovski-crystal-skull-earrings-halloween-earring-design-inspiration-and-instructions-from-rainbows-of-light-step-3

free-diy-swarovski-crystal-skull-earrings-halloween-earring-design-inspiration-and-instructions-from-rainbows-of-light-step-4

free-diy-swarovski-crystal-skull-earrings-halloween-earring-design-inspiration-and-instructions-from-rainbows-of-light-step-5

STEP 1: Cut a 60 cm long wire and make a loop at one of the ends of the wire. Form the wire into a circle shape using a drinking glass that is approximately 6cm.

STEP 2: Turn the loop formed on the wire to a 90˚ angle. Start inserting the Swarovski crystals from the material list onto the wire. After you insert the Swarovski Bead art. 5750 Crystal Silver Night 2x, place some glue underneath the bead using a toothpick and let it dry for 2 hours. Proceed with the remaining Swarovski crystals as shown.

STEP 3: Insert the other end of the wire through the loop and turn a loop on this end as well.

STEP 4: Attach the ear post to the top loop of the earring using a 4 mm jump ring. Repeat steps 1–4 to make the second earring.

swarovski_crystal_heart_beads_5741-crystal_silver_night

swarovski_authorized_reseller

We are an Authorized Reseller of Swarovski Crystals

At Rainbows of Light we only sell Genuine Swarovski Crystals Wholesale to the Public, offering you thousands of shapes, colors and sizes to choose from. We have no tax or surcharges and always provide Free U.S. Shipping on all orders over $100.00. This Guarantees you receive the best prices anywhere on all your favorite Swarovski Crystals!
We can order anything Swarovski makes within the components division – even if it’s not listed on our website rainbowsoflight.com. Please contact us for anything you’re interested in, as we are ALWAYS happy to help!
Harmony and Kashi
Keep Smiling & Keep Shining!
Harmony and Wonder Girl, Kashi

Unknown's avatar

DIY This Stylish Mosaic Bangle Featuring the New Swarovski Triangle Flatbacks!

free-diy-swarovski-crystal-bangle-bracelet-design-and-instructions-how-to-apply-crystals-to-a-silver-bangle-bracelet-rainbows-of-light

Free DIY Swarovski Crystal “Mosaic Tile Bangle” Design and Instructions

This sparkling Swarovski Crystal bangle features Rhinestones from the new Fall/Winter 2017-18 Triangle Flatback Family. The New Swarovski Crystal Triangle Flat backs are available in the styles 2738 Alpha, 2739 Beta and 2740 Gamma.

These new Swarovski Triangle Flatback additions are ideal for creating geometric patterns that fit seamlessly together. Geometric shapes and repeating patterns are a very popular trend for jewelry and fashion lovers. They are lead free and lightweight, which is especially nice when applying them to clothing. Whatever your craft or jewelry project may be, these new Triangle Crystals will give

free-diy-swarovski-crystal-bangle-bracelet-design-and-instructions-how-to-apply-crystals-to-a-silver-bangle

Swarovski crystals

Product Group Article No. Amount Size Color Color Code
Alpha Flat Backs 2738 9 pcs 12x6mm Crystal F 001
Beta Flat Backs 2739 9 pcs 7×6.5mm Crystal Silver Night 001 SINI
Gamma Flat Backs 2740 9 pcs 10x10mm Crystal Silver Night 001 SINI

Supplies:

1 ½” Bangle

Two Part Epoxy Glue (my favorite to work with is E6000 – it dries clear and is available at any craft or hard wear store)

Alcohol wipes

free-diy-swarovski-crystal-bangle-bracelet-design-and-instructions-how-to-apply-crystals-to-a-silver-bangle-bracelet

Instructions

Step 1:       Clean the bangle with alcohol wipes.

Step 2:       Find the center of the bangle and place a drop of glue in 3 places to create the first mosaic tile.  Using one each of the triangle flat backs to create a mosaic square.  Continue to create squares to the right and left side of the bangle until covered completely.

I know these are pretty simple instructions, but there’s not much to it. You can play around with your favorite color combinations and pattern to create your own desired look.

free-diy-swarovski-crystal-bangle-bracelet-design-and-instructions-how-to-apply-crystals-to-a-silver-bangle-bracelet-rainbows-of-light-com-2

Hope you like this both stylish and easy DIY Swarovski Crystal design.

swarovski_authorized_reseller

Rainbows of Light has been a wholesale dealer for over 35 years. We are officially an Authorized Reseller of SWAROVSKI Crystals, ensuring you that you are receiving genuine Swarovski Crystals at the best wholesale prices around! 

Please contact me with any questions, as I am always more than happy to help!

Harmony and Kashi

Keep Smiling and Keep Shining!

Swarovski Crystal Rocks

Unknown's avatar

See Why This Sparkling Halloween Mask is the Cat’s Meow!

happy-halloween

It’s that fun time of year where rich fall colors delight our senses, pumpkins line the doorsteps and that eerie feeling of something spooky is just around the corner…. HALLOWEEN!

Halloween will be here before you know it, as as we thoroughly enjoy our spiced lattes (down to the last delicious drop), it’s fun to ponder… what shall I be this year?

besties

I haven’t decided what I’ll be this year, but my best friend Lauren (here we are having a ball at her wedding) is going as a kitty cat and asked me to add some Swarovski Crystals to her cat mask. Well, she certainly came to the the right person for that job (I’ve got crystals coming outta my ears, no not literally, that would just be ridiculous  😉 BUT, I do leave a trail of sparkles everywhere I go (I swear, every week the vacuum consumes more crystals than Kashi hair!)…so honestly, how can a bestie refuse?

besties-forever

I had a lot of fun embellishing her cat mask with Swarovski Crystal Flat back Rhinestones and I thought it would be fun to show you what I created and give you the step by step instructions on how to create something similar for yourself, or for your bestie  🙂

free-diy-diresctions-on-adding-swarovski-crystals-to-halloween-mask-design-and-instructions

Steps to Embellish Your Halloween Mask with Swarovski Crystals

Here is what you will need to add Swarovski Crystals to a furry mask. (please note: the mask will need to be furry to be able to affix the Hot Fix Rhinestones, if it is not furry, then you will need to glue them on using an epoxy glue, my favorite being the E6000 glue). Below are the Crystal shapes that I used, but there are numerous different styles of Swarovski Flat backs to choose from to get your creative juices flowing.

Swarovski Crystals

Swarovski Crystal Round Xirius Flat Back Rhinestones 2078-12ss Crystal Hot Fix

Swarovski Crystal Round Xirius Flat Back Rhinestones 2078-16ss Crystal Hot Fix

Swarovski Crystal Round Xirius Flat Back Rhinestones 2078-20ss Crystal Hot Fix

Swarovski Crystal Leaf Flat Back Rhinestones 2797-8mm Crystal Hot Fix

Swarovski Crystal Bow Tie Flat Back Rhinestone 2858-12mm Bowtie Crystal Hot Fix

Supplies

1 Furry Cat Mask (I couldn’t find the exact one she sent me, but here are some options to choose from)

Crystal Katana Tool

Bejewler Pro Hot Fix Tool

free-diy-diresctions-on-adding-swarovski-crystals-to-halloween-mask

I started with a plain black cat mask (I guess I was so excited to start adding the Swarovski crystals, that I forgot to take a picture of the plain mask, but hey, I’m sure you can use your wild imagination  😉

Starting with one side of the top of the eye, I used the crystal Katana to pick up the crystals and place them where I wanted them (I have found that this method is MUCH easier than using tweezers). Next, I used the Bejewler Hot Fix Tool to secure the crystals in place which only take a few seconds for each stone.

One great tip that I have found to work very well, is to use one size smaller tip on the bejewler tool than your stones, this way the hot tip won’t come into contact with the underside of your project, so that there is no way it can inadvertently heat up or ruin any part of your project. Pass that tip along to your Bejewler friends – they’ll love ya for it!

free-diy-diresctions-on-gluing-swarovski-crystals-to-halloween-mask

Before you know it, your plain black cat mask is looking like the Cat’s Meow!

I decided my bestie’s kitty mask just had to be as regal as she is, so I added a little crown on the top, accentuating the bottom with the beautiful shaped Leaf Flatback.

Last but certainly not least, for the final touch, I added the Bow Tie Flatback as her adorable little noes accent. I think it’s as cute as a button!

free-diy-diresctions-on-embellishing-swarovski-crystals-to-halloween-mask

So there you have it, the final embellished kitty mask and it only took a couple of hours. I sent it off to Lauren, she absolutely LOVED it and can’t wait to show it off!

I hope this project inspires you to create something fabulous & sparkly this Halloween! Please post and share pictures with me of you, your friends’ or kiddos Halloween costumes this year, I would LOVE to see them!

swarovski_authorized_reseller

Please contact me with any questions you may have, as it is my pleasure working with you! We are an official SWAROVSKI Authorized Reseller which guarantees you are receiving genuine Swarovski Crystals at low wholesale prices.  

Harmony and Kashi

Keep Smiling and Keep Shining!

 swarovski_crystal_heart_bead_5741-crystal_paradise_shine

Unknown's avatar

DIY Multi-Strand Bracelet Highlighting Peacock Colors Using the New Crystal Rainbow Dark Effect

free-diy-swarovski-crystal-rainbow-dark-bracelet-design-and-instructions

Free Crystal DIY Multi-Strand Bracelet Featuring the New Fall/Winter Swaorvski Innovations. It features gorgeous color combinations in an array of peacock type hues that are especially on trend in the cooler months.

With the cooler Fall weather in the air, it’s been exciting looking forward to all of the new activities Autumn has to offer. Mike, Kashi and I enjoyed one of our favorite traditions, leaf peeping! Here in Colorado there is no shortage of one of my favorites trees, Aspens. We set off early in the morning, driving up through Estes Park and on to a quintessential drive called the Peak to Peak highway. It’s absolutely gorgeous and both Kashi and I have our heads and toungs hanging out the window the whole time 😉

kashi-and-harmony-fall-hiking-2016

Hiking through the woods and seeing all of the rich golden colors, truly makes my heart soar. I always feel at home in nature and it brings more peaceful, loving energy into my heart. It inspires me in many ways and I feel refreshed and alive. It also helps me to feel more creative and I love to pour that refreshing sense of awe and gratitude into making new types of jewelry for not only myself, but gifts for my friends and family.

As we transition into the cooler months, our fashion and jewelry styles change and we begin to embrace the darker tones. With this years’ new coating from Swarovski, the Crystal Rainbow Dark 2X, is such a gorgeous blend of peacock colors, showcasing purple, green and yellow hues set on a black background. It will certainly be a new staple when making crystal jewelry designs that stand out as being unique and captivating.

6106 Pear-shaped Pendant

Swarovski Innovations Fall Winter 2017/18

The Crystal Rainbow Dark effect is almost as if Swarovski took the most popular coating, the Crystal AB and placed it on a black backdrop. It’s quite a brilliant idea and leave it to Swarovski for making it spectacular. It resembles an oil mark splashed onto a Crystal, which is very innovative and fits perfectly with the overall trend of people wanting to express themselves in novel ways and wear truly unique pieces.

Swarovski Crystals used in this jewelry project:

Swarovski 5328-6mm Xilion Bicone Beads in Crystal Rainbow Dark 2X ~ 70 Pieces

Swarovski 5040-6mm Rondelle Beads in Crystal Rainbow Dark 2X ~ 47 Pieces

Swarovski 5051-8x6mm Mini Oval Beads in Amethyst ~ 204 Pieces

Swarovski 5051-10x8mm Mini Oval Beads in Emerald ~ 4 Pieces

Swarovski 5728-12mm Scarab Beads in Amethyst ~ 4 Pieces

Swarovski 5514-8×8.5mm Pendulum Beads in Emerald ~ 8 Pieces

Swarovski 5045-6mm New Rondelle Beads in Emerald ~ 8 Pieces

Swarovski 5045-4mm New Rondelle Beads in Emerald ~ 2 Pieces

Supplies:

2  Beaded 5-1 End Bars 

TierraCast® 94-3056-18 or similar end bars

4      6mm round copper jump ring

10    2mm crimp beads

10    3mm crimp covers

1      copper lobster clasp

10”   beading wire

Instructions 

Step 1:       Cut beading wire into 5 10” pieces. Using one piece of beading wire slide on one crimp bead and crimp to the #1 loop on the beaded end bar.  Attach crimp cover.  Slide on one 5328 6mm, one 5045 6mm, one 5328 6mm, one 5040 6mm, one 5328 6mm, one 5514 8×5.5mm, one 5328 6mm, one 5040 6mm, one 5328 6mm, one 5051 8x6mm, one 5328 6mm, one 5040 6mm, one 5328 6mm, one 5514 8×5.5mm, three 5040 6mm, one 5514 8×5.5mm, one 5328 6mm, one 5040 6mm, one 5328 6mm, one 5051 8x6mm, one 5328 6mm, one 5040 6mm, one 5328 6mm, one 5514 8×5.5mm, one 5328 6mm, one 5040 6mm, one 5328 6mm, one 5045 6mm, one 5328 6mm, and one 5045 4mm.  Now slide on one crimp bead and crimp to #1 loop on the other beaded end bar.  Attach crimp cover.

Step 2:       Using one piece of beading wire slide on one crimp bead and crimp to the #2 loop on the beaded end bar.  Attach crimp cover.  Slide on one 5045 6mm, one 5040 6mm, one 5328 6mm, one 5051 8x6mm, one 5328 6mm, one 5040 6mm, one 5328 6mm, one 5051 10x8mm, one 5328 6mm, one 5040 6mm, one 5328 6mm, one 5728 12mm, one 5328 6mm, one 5040 6mm, one 5328 6mm, one 5728 12mm, one 5328 6mm, one 5040 6mm, one 5328 6mm, one 5051 10x8mm, one 5328 6mm, one 5040 6mm, one 5328 6mm, one 5051 8x6mm, one 5328 6mm, one 5040 6mm, and one 5045 6mm.  Now slide on one crimp bead and crimp to #2 loop on the other beaded end bar.  Attach crimp cover.

Step 3:       Using one piece of beading wire slide on one crimp bead and crimp to the #3 loop on the beaded end bar.  Attach crimp cover.  Slide on three 5328 6mm, three 5040 6mm, three 5328 6mm, three 5040 6mm, three 5328 6mm, three 5040 6mm, three 5328 6mm, three 5040 6mm, three 5328 6mm, three 5040 6mm, and three 5328 6mm.  Now slide on one crimp bead and crimp to #3 loop on the other beaded end bar.  Attach crimp cover.

Step 4:       Repeat Step 3 using the #4 holes and repeat Step 2 using the #5 holes.

Step 5:       Attach 3 jump rings to create a small chain at one end of the beaded end bar.  Using one jump ring attach the lobster clasp to the other end. 

swarovski_crystal_heart_bead_5741-crystal_paradise_shine

Hope you love creating new jewelry using the Crystal Rainbow Dark 2X Effect!

Harmony and Kashi

Keep Smiling and Keep Shining!

swarovski_authorized_reseller