Unknown's avatar

DIY Quick & Easy Christmas Decorations Or Ornaments For The Gift Giving Season!

Swarovski Crystal DIY Ornaments Nastalgic Moments

The Holidays are quickly approaching and with this busy time of year, it can become overwhelming quickly! Let’s all stay calm and b-r-e-a-t-h-e. This  is a special time of year for a reason. It gives us the opportunity to fill our hearts with extra love and gratitude for all of the positivity in our life. It’s a beautiful time to open our hearts and graciously give thanks to everyone in our life who mean so much to us.

Sometimes it’s hard to find the right gift to give someone or you may not know what to make. Well here is some great inspiration for you! For those who celebrate Christmas, making a special sparkling ornament or decoration is always a wonderful gift! Each year they will pull it out, think of you and be filled with joy! A gift that keeps on giving is ALWAYS a win, win!

These DIY Swarovski Crystal Christmas decorations or ornaments are very easy to make and will be enjoyed for years to come!

Let’s get started!

DIY Swarovski Crystal Ornaments Nostalgic Moments Home page

Swarovski Crystals you will need for this project are listed below, but have fun and personalize it with your own favorite Swarovski Crystal styles and colors!

5000-_AB

Swarovski Crystal Round Beads 5000-14mm

6106-Crystal_Paradise_Shine

Swarovski Crystal 6106 Pearshape Pendants

Tools & Supplies

Supplies 1x Cookie cutter tree, silver, 11 x 8 cm Ribbon satin, dark red, 3 mm, 60 cm Tools Scissors

DIY Swarovski Crystal Ornaments Nostalgic Moments Step 1

DIY Swarovski Crystal Ornaments Nostalgic Moments Step 2

DIY Swarovski Crystal Ornaments Nostalgic Moments Step 3

DIY Swarovski Crystal Ornaments Nostalgic Moments Home

Swarovski Wild Heart Crystal Pendant

Swarovski Crystal 6240-14mm  Wild Heart Pendant

Tools & Supplies

Supplies 1x Cookie cutter angel, silver, 11 x 8 cm Ribbon satin, dark red, 3 mm, 60 cm Tools Scissors

DIY Swarovski Crystal Ornaments Nostalgic Moments Heart Crystal Step 1

DIY Swarovski Crystal Ornaments Nostalgic Moments Heart Crystal Step 2

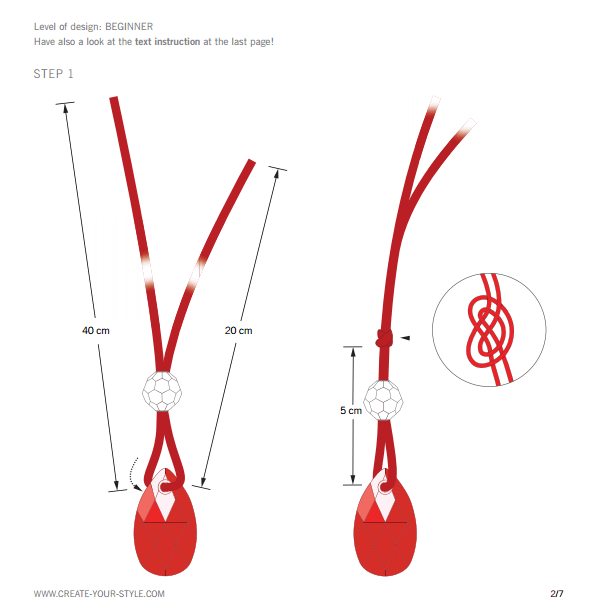
Version 1 STEP 1: Thread a satin ribbon through a Swarovski Bead article 5000 14 mm Crystal, a Swarovski Pendant article 6106 38 mm Crystal Red Magma and then back through the Bead again. One end of the ribbon should be 20 cm long and the length of the other end should be around 40 cm. Tie a knot leaving a gap of 5cm as shown in the illustrations.

STEP 2: Thread the ribbon ends through the tree shaped cookie cutter and tie a double knot. Form a 7 cm loop in the ribbon and thread the ribbon under the previous knot.

STEP 3: Tie a knot as shown in the illustrations and repeat one more time to tie another knot in the same place.

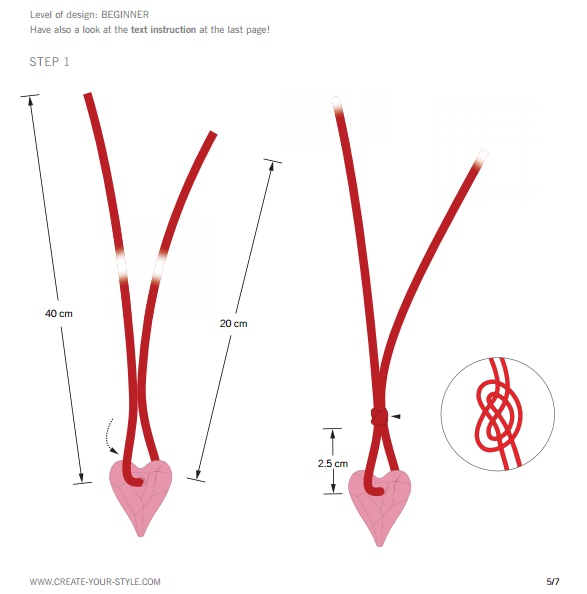
Version 2 STEP 1: Thread a satin ribbon through a Swarovski Pendant article 6240 18 mm Wild Heart Pendant Crystal Antique Pink. Leaving one end 40 cm long and the other end 20 cm long, tie a knot leaving a gap of 2.5 cm.

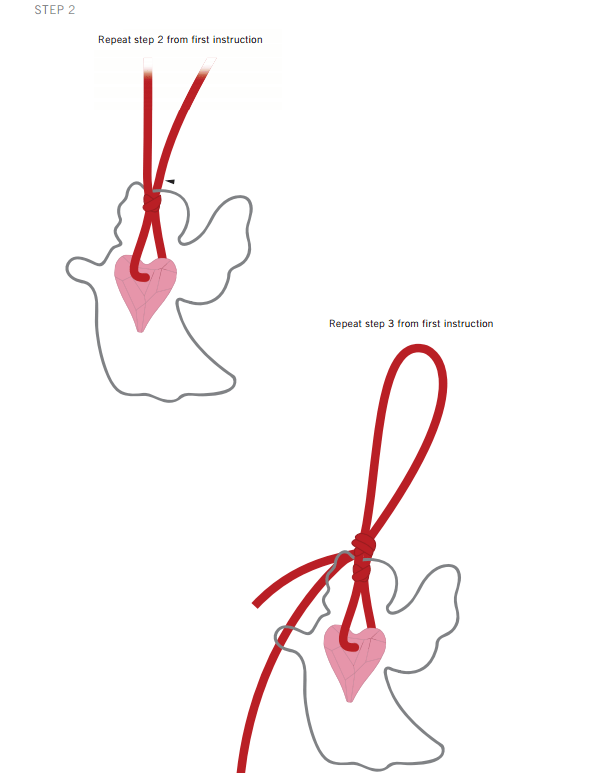
STEP 2: Repeat step 2 from the first instruction using an angle cookie cutter. Form a 7 cm loop in the ribbon and thread the ribbon end under the previous knot.

STEP3: Repeat step 3 from the first instruction and tie the knots to secure the ribbon and pendant.

Hope you have fun with this crystal project, creating gifts and decorations for all to enjoy!

Swarovski_5741-Light_Siam Heart Bead

Unknown's avatar

Design Your Own “Sparkle On” Jumper ~ DIY Design and Instructions!

DIY Sparkle on shirt embellished with Swarovski Crystal Flatback Rhinestones

DIY Embellishing Sweatshirt Jumper  with Swarovski Crystals “Sparkle On”

Raise your cool factor with a look straight off the sidewalks of Paris, London and Milan’s Fashion Weeks. Sparkle up a plain jumper with a few cleverly placed Swarovski Flat Backs, and be dazzling!

DIY Sparkle on shirt embellished with Swarovski Crystal Flatback Rhinestones jet black

Swarovski Crystal Flatback Design with Step-by-Step Instructions

Swarovski Crystals you will need for this design project:

Swarovski Crystal 2078 Flat Backs Jet Black Hot Fix Stones from Rainbows of Light wholesale

2038-5ss Hot Fix Flat Back Rhinestones In Jet Black

Supplies & Tools

Supplies:Fusible interlining, 22×15 cm, white Jumper, grey Lycra,22×15 cm, off white Sewing yarn, black

Tools: Iron Sewing machine Sheet of paper, A4 Transfer fi lm,17 x 12 cm Transfer sheet

This design project is for beginners and take a look at the text instructions at the bottom.

DIY Sparkle on shirt embellished with Swarovski Crystal Flatback Rhinestones jet black step by step instructions

DIY Sparkle on shirt embellished with Swarovski Crystal Flatback Rhinestones jet black step by step instructions 2

DIY Sparkle on shirt embellished with Swarovski Crystal Flatback Rhinestones jet black step by step instructions 2b

DIY Sparkle on shirt embellished with Swarovski Crystal Flatback Rhinestones jet black step by step instructions 3

DIY Sparkle on shirt embellished with Swarovski Crystal Flatback Rhinestones jet black step by step instructions 3b

DIY Sparkle on shirt embellished with Swarovski Crystal Flatback Rhinestones jet black step by step instructions 4

DIY Sparkle on shirt embellished with Swarovski Crystal Flatback Rhinestones jet black step by step instructions 4b

DIY Sparkle on shirt embellished with Swarovski Crystal Flatback Rhinestones jet black step by step instructions 5

DIY Sparkle on shirt embellished with Swarovski Crystal Flatback Rhinestones jet black step by step instructions 6

DIY Sparkle on shirt embellished with Swarovski Crystal Flatback Rhinestones jet black step by step instructions 7

DIY Sparkle on shirt embellished with Swarovski Crystal Flatback Rhinestones jet black step by step instructions jumper

Step-by-Step Instructions

STEP 1: Print and cut out the text pattern shown in the illustration.

STEP 2: Create a “dialog box” of similar sizing as the pattern or simply print it out to correct size and stick the text pattern created in the previous step on it. Place the pattern onto a fabric piece and cut out the shape. Repeat this step with the fusible interlining piece.

STEP 3: Place the interlining in between the T-shirt and the fabric and iron to secure.

STEP 4: Place the transfer sheet over the pattern. Place the Swarovski Flat Backs No Hotfix over the pattern exactly over the text using tweezers.

STEP 5: Place the transfer film over the text and pull the transfer film back to get all the crystals on to it as shown in our illustrations with this step.

STEP 6: Stick the transfer film onto the T-shirt and iron it with hot iron so the hotfix glue on the back of the stones adheres to the fabric. Press the iron firmly down on top of the transfer for about 30 seconds.

STEP 7: Let the transfer cool and then remove the film slowly. If some of the stones do not stick to the fabric repeat this step until all the stones are securely affixed to the fabric.

Swarovski_Crystal_5741_Heart-Beads_Jet

Have fun adding sparkles to your wardrobe!

Unknown's avatar

DIY Face Gems ~ Applying Swarovski Crystals to Your Face Is Oh So Fun!

halloween-pumpkin

(Picture compliments of Wavy.com)

What to be, what to be for Halloween this year?? I didn’t plan my costume out in advance this year, so on the day of I found myself rummaging through our costume/party box full of fun wigs, funky sunglasses & all kinds of comical pieces, one of my favorites being a bright pink cowboy hat. I had just worn the pink cowboy hat, so alas I was uninspired.

Just then a light bulb went off in my mind!

lightbulb-vectoroptics-net

Ah ha! CRYSTALS! I looooove crystals & have them everywhere, so why don’t I embellish my face!

Harmony Halloween 2015

It was so fun, really easy and I always love getting creative!

If I had more time, I would have added a lot more. Who knows maybe next year I’ll be a crystal princess and go all out!

Harmony Halloween 2 2015

I couldn’t find body glue anywhere, so I used eyelash glue and it worked really well. Just a little dab will do ya. I put a tiny dab of glue on my face and used the Crystal Katana to pick up the crystals and apply them to the glue. I pressed down for a few seconds and then it was on to the next. It was that simple!

I was inspired by this gorgeous picture!

Swarovski Crystals on face

(Picture compliments of Toni Malt)

I applied different colors and sizes of the Swarovski Crystal 2088 Flatbacks to the areas that I wanted sparkle.

Swarovski Crystal Flatbacks Amethyst

I started with the 2088-20ss Amethyst and 16ss Amethyst Swarovski Rhinestones.

Swarovski Crystal Flatback Rhinestones Clear Crystal Wholesale from Rainbows of Light  Swarovski Crystal Flatbacks Crystal AB

I used the 2088-16ss Crystal and 2088-12ss Crystal and Crystal AB for the detailed fill in work.

Swarovski Flatback Rhinestones 2520 Rectangle  Swarovski_5741-Blush_Rose_Heart-Beads

I also used a couple pieces of the Swarovski Crystal Flatbacks 2520-10x8mm Cosmic Style as well as the 2808-6mm Heart Flatback Rhinestone (super cute heart, one of my faves!)

Swarovski Crystal Sew on Stones 3223 Nevette stones from Rainbows of Light

I found some of these cute Swarovski Crystal 3223-12mm Nevette Sew On Stones and threw a few of these on. They have a flat back which worked well and I just love this shape. I wanted to add different shapes and colors to make it as unique as possible.

2494 Swarovski Crystal Starlette Flatback Rhinestone from Rainbows of Light  2540 Curvey Swarovski Crystal Flatback

For some dramatic accents I applied the Swarovski Crystal 2494-10mm Starlet Flatbacks as well as the 2540-7mm Curvey Flatback in the beautiful coating of Crystal Paradise Shine.

2709 Swarovski Crystal Rhombus Flatback wholesale from Rainbows of Light

Last but certainly not least, I used the 2709-13mm Rhombus Swarovski Crystal Flatback for the center.

Harmony and Kashi Halloween

Here’s Kashi & I getting ready for trick-or-treaters!

I hope everyone had a fun Halloween! I’d love to see you or your kiddo’s/doggies costumes!

Swarovski_5741-Fuchsia Love bead

Unknown's avatar

Mani Magic ~ How to Rock This Stylish Trend & Apply Swarovski Crystals As Nail Art!

The Swarovski S/S 2016 Launch Event at the Andaz Hotel West Hollywood, CA on Wednesday September 7th, 2015. (Sean Twomey/2me Studios)

The Swarovski S/S 2016 Launch Event at the Andaz Hotel West Hollywood, CA on Wednesday September 7th, 2015. (Sean Twomey/2me Studios)  Manicures provided by OPI. Photo Credit: Sean Twomey/2me

One of the hottest fashion trends is nail art. It has exploded in popularity in the last couple of years and for good reason. Not only is it a stylish way to be creative, most importantly, it’s FUN!

The Swarovski S/S 2016 Launch Event at the Andaz Hotel West Hollywood, CA on Wednesday September 7th, 2015. (Sean Twomey/2me Studios)

The Swarovski S/S 2016 Launch Event at the Andaz Hotel West Hollywood, CA on Wednesday September 7th, 2015. (Sean Twomey/2me Studios) Design by On Aura Tout Vu. Photo Credit: Sean Twomey/2me

Everyone loves to express their own unique style and nail art is a fabulous way to be creative and do just that! There are endless options to create distinctive looks, whether it’s to match your special outfit, get in the mood for different Holidays or just freshen up your everyday look, painting and accessorizing your nails is a perfect way to enhance your individual style!

The Swarovski S/S 2016 Launch Event at the Andaz Hotel West Hollywood, CA on Wednesday September 7th, 2015. (Sean Twomey/2me Studios)

The Swarovski S/S 2016 Launch Event at the Andaz Hotel West Hollywood, CA on Wednesday September 7th, 2015. (Sean Twomey/2me Studios) Manicures provided by OPI. Photo Credit: Sean Twomey/2me

To upgrade your design even further, adding Swarovski Crystal Flat backs to your nails is extremely popular and you can see why, it’s chic and glamorous to enrich your nails with a touch of sparkle.

Swarovski flatbacks

 The smaller crystal sizes are ideal for nail art, such as the 2088-10ss and 2088-12ss. The clear Crystal is especially popular, as it looks very similar to a diamond and the Crystal AB is another favorite, due to the array of yellow, pink and blue rainbow style sparkles. There are also many unique styles to choose from to create a truly personalized design.

Crystal_Katana

Applying the crystals is very simple when using this amazing tool called the Crystal Katana.

Watch this instructional video on how to apply Swarovski Crystals to your nails. CREATE YOUR STYLE Nail Ambassador demonstrates how to use Swarovski crystals to turn your nails into your newest, most sparkling accessory! Learn the tips and tricks to adding sparkling crystals to your nails on classic nail enamel using nail glue or setting the crystals in the top coat of a gel manicure for long lasting glam!

The best part about this fashion statement is you can go as simple…

nail art

or as decadent as your heart desires!

nail art with Swarovski Crystals

Feel free to post pictures of your own sparkling nail art, I would LOOOVE to see them!!

Keep Smiling and Keep Sparkling!

Swarovski_5741-Blush_Rose_Heart-Beads

Unknown's avatar

DIY Swarovski’s Spooky, Sparkling Halloween Mask

Swarovski Crystal Halloween Mask DIY Steps and instruction

This inky-black mask, studded with Swarovski Crystal Sew-On Stones in tones as dark as night, elevates the humble Halloween costume to a whole new level of glamour and mystery.

Swarovski Crystal Halloween Mask DIY Steps and instruction craft project

Swarovski Crystals

Article Product Group Article No. Amount Size Color Color Code

Sew-on Stones 3223 24 pieces 12 x 6 mm Crystal Silver Night F 001 SINI

Sew-on Stones 3230 2 pieces 12 x 7 mm Crystal Satin F 001 SAT

Sew-on Stones 3230 16 pieces 12 x 7 mm Crystal Silver Night F 001 SINI

Sew-on Stones 3230 7 pieces 12 x 7 mm Jet 280

Sew-on Stones 3254 2 pieces 20 mm Jet 280

Sew-on Stones 3256 4 pieces 14.8 x 5 mm Crystal Silver Shade F 001 SSHA

Sew-on Stones 3256 8 pieces 14.8 x 5 mm Jet 280

Sew-on Stones 3267 2 pieces 18 x 10 mm Crystal Silver Night F 001 SINI (contact us for details)

Beads 5000 22 pieces 4 mm Purple Velvet 277

Beads 5000 10 pieces 6 mm Purple Velvet 277

Beads 5328 28 pieces 4 mm Purple Velvet 277

Supplies & Tools Supplies

Nylon thread, transparent, 0.25 mm, 3 m Ribbon satin, black, 15 mm, 1.1 m Rubber, black, 32 x 18 cm Sewing silk, black, 1 m Tools Cutter Double sided tape Lighter Pins Scissors Sewing needle Sheet of paper, A4

Swarovski Crystal Halloween Mask DIY Steps and instruction step 1

Swarovski Crystal Halloween Mask DIY Steps and instruction step 2

Swarovski Crystal Halloween Mask DIY Steps and instruction step 3

Swarovski Crystal Halloween Mask DIY Steps and instruction step 4

Swarovski Crystal Halloween Mask DIY Steps and instruction step 5

Swarovski Crystal Halloween Mask DIY Steps and instruction design project

STEP 1: Print and cut out the pattern of the mask in its original size.

STEP 2: Stick the pattern with double sided tape onto a piece of rubber and cut out the mask shape.

STEP 3: Sew on all Swarovski Beads and Sew-on Stones mentioned in the material list onto the mask as shown in the illustrations.

STEP 4: Cut two 50 cm long satin ribbon pieces. Thread these through both the sides of the mask and sew them together individually at each end.

STEP 5: Cut off both ends of the ribbon and burn them a little bit with a lighter to secure any loose threads.

Swarovski_Crystal_5741_Heart-Beads_Jet

Hope you have a spooky, sparkling Halloween!!