Unknown's avatar

DIY Fashionably Warm Swarovski Crystal Mittens! The Perfect Sparkling Gift To Warm Hands & Hearts!

DIY Mittens with Swarovski Crystal embellishments

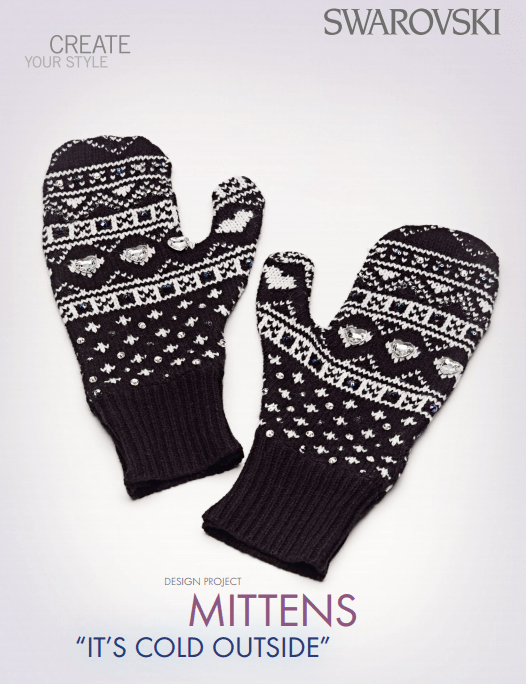
Baby it’s cold outside!

The magical holiday season is in full swing, snow outside and its getting cozy inside.
It’s the perfect magic atmosphere to get creative and prepare your Christmas, Hanukkah, or New Years presents for your loved ones. Making gifts you know they will wear and love is always extra special! Here is a fun project that is both practical and beautiful for all those people in your life who like to be warm and fashionable!

Take an old knitted jumper and turn it into gorgeous mittens. It’s a combination of different DIY techniques with cutting, sewing and stitching. They are the perfect sparkling gift to warm their hands… and their heart!

DIY Mittens with Swarovski Crystal embellishments instructions

Below are the SWAROVSKI Crystals along with the supplies and tools you will need for this project. Let your creativity be your guide by incorporating your favorite colors and styles into your personalized style!

SWAROVSKI Crystals

Swarovski Crystal 3188 Light Chrome

Swarovski Crystal 3188-4mm Lochrose Sew On Stones Crystal Light Chrome 56 pieces (contact me for details)

Swarovski Crystal 3188 Crystal Scarabeaus Green

Swarovski Crystal 3188-5mm Lochrose Sew-on Stones Crystal Scarabeaus Green 24 pieces (contact me for details)

Swarovski Crystal 3188 Clear

Swarovski Crystal 3188-5mm Lochrose Sew-on Stones Clear Crystal  24 pieces

Swarovski 3259-Crystal

Swarovski Crystal 3259-12mm Heart Sew-on Stones 6 pieces of Clear Crystal.

Supplies and Tools

Supplies: 5mm Nylon thread,0.5mm, transparent, Jumper/sweater (recycle an old one)

Tools: Pencil, Scissors, Sewing machine, Sewing needle

DIY Mittens with Swarovski Crystal embellishments free instructions 1

DIY Mittens with Swarovski Crystal embellishments free instructions 2

DIY Mittens with Swarovski Crystal embellishments free instructions 3

DIY Mittens with Swarovski Crystal embellishments free instructions 3b

 DIY Mittens with Swarovski Crystal embellishments free instructions 4

Step-by-Step Instructions

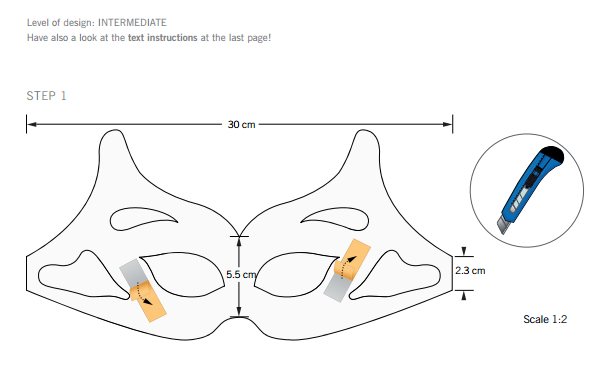
STEP 1: Trace the outline of your hand on a piece of tracing paper and cut the pattern out; repeat for the other hand or just mirror the first one. Place the pattern over an old jumper or sweater and cut out the shape adding 5mm to the edge of the border. See the illustrations for clarification of this step.

STEP 2: Place the front-sides on top of each other and sew the mitten together. Turn the sewn mitten right side out. Repeat for the other mitten.

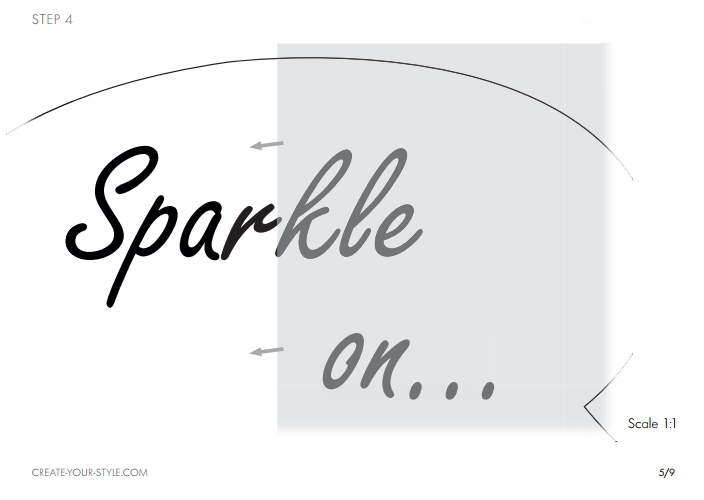
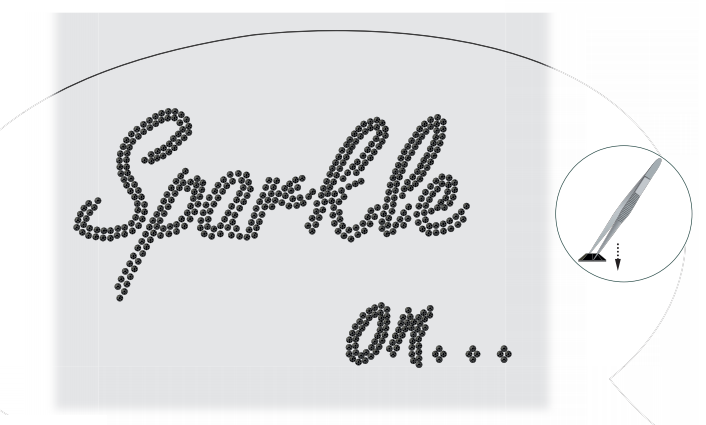
STEP 3: Sew all the Swarovski Crystals on the material list onto the mittens as depicted in our illustrations with this step.

Keep cozy creating these warm and sparkly mittens!

Swarovski Crystal Black Heart

Unknown's avatar

DIY Quick & Easy Christmas Decorations Or Ornaments For The Gift Giving Season!

Swarovski Crystal DIY Ornaments Nastalgic Moments

The Holidays are quickly approaching and with this busy time of year, it can become overwhelming quickly! Let’s all stay calm and b-r-e-a-t-h-e. This  is a special time of year for a reason. It gives us the opportunity to fill our hearts with extra love and gratitude for all of the positivity in our life. It’s a beautiful time to open our hearts and graciously give thanks to everyone in our life who mean so much to us.

Sometimes it’s hard to find the right gift to give someone or you may not know what to make. Well here is some great inspiration for you! For those who celebrate Christmas, making a special sparkling ornament or decoration is always a wonderful gift! Each year they will pull it out, think of you and be filled with joy! A gift that keeps on giving is ALWAYS a win, win!

These DIY Swarovski Crystal Christmas decorations or ornaments are very easy to make and will be enjoyed for years to come!

Let’s get started!

DIY Swarovski Crystal Ornaments Nostalgic Moments Home page

Swarovski Crystals you will need for this project are listed below, but have fun and personalize it with your own favorite Swarovski Crystal styles and colors!

5000-_AB

Swarovski Crystal Round Beads 5000-14mm

6106-Crystal_Paradise_Shine

Swarovski Crystal 6106 Pearshape Pendants

Tools & Supplies

Supplies 1x Cookie cutter tree, silver, 11 x 8 cm Ribbon satin, dark red, 3 mm, 60 cm Tools Scissors

DIY Swarovski Crystal Ornaments Nostalgic Moments Step 1

DIY Swarovski Crystal Ornaments Nostalgic Moments Step 2

DIY Swarovski Crystal Ornaments Nostalgic Moments Step 3

DIY Swarovski Crystal Ornaments Nostalgic Moments Home

Swarovski Wild Heart Crystal Pendant

Swarovski Crystal 6240-14mm  Wild Heart Pendant

Tools & Supplies

Supplies 1x Cookie cutter angel, silver, 11 x 8 cm Ribbon satin, dark red, 3 mm, 60 cm Tools Scissors

DIY Swarovski Crystal Ornaments Nostalgic Moments Heart Crystal Step 1

DIY Swarovski Crystal Ornaments Nostalgic Moments Heart Crystal Step 2

Version 1 STEP 1: Thread a satin ribbon through a Swarovski Bead article 5000 14 mm Crystal, a Swarovski Pendant article 6106 38 mm Crystal Red Magma and then back through the Bead again. One end of the ribbon should be 20 cm long and the length of the other end should be around 40 cm. Tie a knot leaving a gap of 5cm as shown in the illustrations.

STEP 2: Thread the ribbon ends through the tree shaped cookie cutter and tie a double knot. Form a 7 cm loop in the ribbon and thread the ribbon under the previous knot.

STEP 3: Tie a knot as shown in the illustrations and repeat one more time to tie another knot in the same place.

Version 2 STEP 1: Thread a satin ribbon through a Swarovski Pendant article 6240 18 mm Wild Heart Pendant Crystal Antique Pink. Leaving one end 40 cm long and the other end 20 cm long, tie a knot leaving a gap of 2.5 cm.

STEP 2: Repeat step 2 from the first instruction using an angle cookie cutter. Form a 7 cm loop in the ribbon and thread the ribbon end under the previous knot.

STEP3: Repeat step 3 from the first instruction and tie the knots to secure the ribbon and pendant.

Hope you have fun with this crystal project, creating gifts and decorations for all to enjoy!

Swarovski_5741-Light_Siam Heart Bead

Unknown's avatar

Design Your Own “Sparkle On” Jumper ~ DIY Design and Instructions!

DIY Sparkle on shirt embellished with Swarovski Crystal Flatback Rhinestones

DIY Embellishing Sweatshirt Jumper  with Swarovski Crystals “Sparkle On”

Raise your cool factor with a look straight off the sidewalks of Paris, London and Milan’s Fashion Weeks. Sparkle up a plain jumper with a few cleverly placed Swarovski Flat Backs, and be dazzling!

DIY Sparkle on shirt embellished with Swarovski Crystal Flatback Rhinestones jet black

Swarovski Crystal Flatback Design with Step-by-Step Instructions

Swarovski Crystals you will need for this design project:

Swarovski Crystal 2078 Flat Backs Jet Black Hot Fix Stones from Rainbows of Light wholesale

2038-5ss Hot Fix Flat Back Rhinestones In Jet Black

Supplies & Tools

Supplies:Fusible interlining, 22×15 cm, white Jumper, grey Lycra,22×15 cm, off white Sewing yarn, black

Tools: Iron Sewing machine Sheet of paper, A4 Transfer fi lm,17 x 12 cm Transfer sheet

This design project is for beginners and take a look at the text instructions at the bottom.

DIY Sparkle on shirt embellished with Swarovski Crystal Flatback Rhinestones jet black step by step instructions

DIY Sparkle on shirt embellished with Swarovski Crystal Flatback Rhinestones jet black step by step instructions 2

DIY Sparkle on shirt embellished with Swarovski Crystal Flatback Rhinestones jet black step by step instructions 2b

DIY Sparkle on shirt embellished with Swarovski Crystal Flatback Rhinestones jet black step by step instructions 3

DIY Sparkle on shirt embellished with Swarovski Crystal Flatback Rhinestones jet black step by step instructions 3b

DIY Sparkle on shirt embellished with Swarovski Crystal Flatback Rhinestones jet black step by step instructions 4

DIY Sparkle on shirt embellished with Swarovski Crystal Flatback Rhinestones jet black step by step instructions 4b

DIY Sparkle on shirt embellished with Swarovski Crystal Flatback Rhinestones jet black step by step instructions 5

DIY Sparkle on shirt embellished with Swarovski Crystal Flatback Rhinestones jet black step by step instructions 6

DIY Sparkle on shirt embellished with Swarovski Crystal Flatback Rhinestones jet black step by step instructions 7

DIY Sparkle on shirt embellished with Swarovski Crystal Flatback Rhinestones jet black step by step instructions jumper

Step-by-Step Instructions

STEP 1: Print and cut out the text pattern shown in the illustration.

STEP 2: Create a “dialog box” of similar sizing as the pattern or simply print it out to correct size and stick the text pattern created in the previous step on it. Place the pattern onto a fabric piece and cut out the shape. Repeat this step with the fusible interlining piece.

STEP 3: Place the interlining in between the T-shirt and the fabric and iron to secure.

STEP 4: Place the transfer sheet over the pattern. Place the Swarovski Flat Backs No Hotfix over the pattern exactly over the text using tweezers.

STEP 5: Place the transfer film over the text and pull the transfer film back to get all the crystals on to it as shown in our illustrations with this step.

STEP 6: Stick the transfer film onto the T-shirt and iron it with hot iron so the hotfix glue on the back of the stones adheres to the fabric. Press the iron firmly down on top of the transfer for about 30 seconds.

STEP 7: Let the transfer cool and then remove the film slowly. If some of the stones do not stick to the fabric repeat this step until all the stones are securely affixed to the fabric.

Swarovski_Crystal_5741_Heart-Beads_Jet

Have fun adding sparkles to your wardrobe!

Unknown's avatar

DIY Swarovski’s Spooky, Sparkling Halloween Mask

Swarovski Crystal Halloween Mask DIY Steps and instruction

This inky-black mask, studded with Swarovski Crystal Sew-On Stones in tones as dark as night, elevates the humble Halloween costume to a whole new level of glamour and mystery.

Swarovski Crystal Halloween Mask DIY Steps and instruction craft project

Swarovski Crystals

Article Product Group Article No. Amount Size Color Color Code

Sew-on Stones 3223 24 pieces 12 x 6 mm Crystal Silver Night F 001 SINI

Sew-on Stones 3230 2 pieces 12 x 7 mm Crystal Satin F 001 SAT

Sew-on Stones 3230 16 pieces 12 x 7 mm Crystal Silver Night F 001 SINI

Sew-on Stones 3230 7 pieces 12 x 7 mm Jet 280

Sew-on Stones 3254 2 pieces 20 mm Jet 280

Sew-on Stones 3256 4 pieces 14.8 x 5 mm Crystal Silver Shade F 001 SSHA

Sew-on Stones 3256 8 pieces 14.8 x 5 mm Jet 280

Sew-on Stones 3267 2 pieces 18 x 10 mm Crystal Silver Night F 001 SINI (contact us for details)

Beads 5000 22 pieces 4 mm Purple Velvet 277

Beads 5000 10 pieces 6 mm Purple Velvet 277

Beads 5328 28 pieces 4 mm Purple Velvet 277

Supplies & Tools Supplies

Nylon thread, transparent, 0.25 mm, 3 m Ribbon satin, black, 15 mm, 1.1 m Rubber, black, 32 x 18 cm Sewing silk, black, 1 m Tools Cutter Double sided tape Lighter Pins Scissors Sewing needle Sheet of paper, A4

Swarovski Crystal Halloween Mask DIY Steps and instruction step 1

Swarovski Crystal Halloween Mask DIY Steps and instruction step 2

Swarovski Crystal Halloween Mask DIY Steps and instruction step 3

Swarovski Crystal Halloween Mask DIY Steps and instruction step 4

Swarovski Crystal Halloween Mask DIY Steps and instruction step 5

Swarovski Crystal Halloween Mask DIY Steps and instruction design project

STEP 1: Print and cut out the pattern of the mask in its original size.

STEP 2: Stick the pattern with double sided tape onto a piece of rubber and cut out the mask shape.

STEP 3: Sew on all Swarovski Beads and Sew-on Stones mentioned in the material list onto the mask as shown in the illustrations.

STEP 4: Cut two 50 cm long satin ribbon pieces. Thread these through both the sides of the mask and sew them together individually at each end.

STEP 5: Cut off both ends of the ribbon and burn them a little bit with a lighter to secure any loose threads.

Swarovski_Crystal_5741_Heart-Beads_Jet

Hope you have a spooky, sparkling Halloween!!

Unknown's avatar

DIY Design Project ~ Sparkling Little Black Dress

Swarovski Crystal Little Black Dress DIY

DIY Sparkling Little Black Dress

“You’re never over-dressed or under-dressed in a little black dress.” Karl Lagerfeld knows a thing or two about style, so who are we to disagree? This glamorous LBD fits the description perfectly: with Swarovski crystals snaking down from neckline to hem, it’s flattering and endlessly versatile, taking you from desk to drinks, or dinner to dancing.

The Swarovski Crystal Beads and Sew-On Stones used to make this dress are just a few styles to choose from the virtual endless shapes, sizes and colors that you can use to create your own personalize style.

DIY Swarovski Crystal Little Black Dress Design and Instructions Step header

Swarovski Crystals used in this design:

3256-14×8.5mm Galactic Sew-On Stone in Jet (18 pieces)

Swarovski Crystal 3256 Sew On Stone Jet Black

Swarovski 5328-3mm Xilion Bicone Beads Crystal Metallic Light Gold 2x

5328_Crystal_Metallic_Light_Gold_2X

Swarovski 5328-3mm Xilion Bicone Beads Jet

Swarovski_Crystal_5328_Xilion_Bicone_Beads_Jet

Swarovski 5328-4mm Xilion Bicone Beads Crystal Metallic Light Gold 2x

5328_Crystal_Metallic_Light_Gold_2X

Swarovski Crystal 5378-14mm Cross Beads Jet

Swarovski Crystal 5378 Cross Beads Jet Black

Supplies and Tools:

Supplies include a black dress, and a black button hole silk.

Tools include a beading needle and scissors.

Level of design: Beginner

DIY Swarovski Crystal Little Black Dress Design and Instructions Step 1

Cut 1mm long black button silk. Sew all the Swarovski crystals in the material list onto the black dress as shown in the illustrations with this step

DIY Swarovski Crystal Little Black Dress Design and Instructions Step 2

Other popular effects include:

Crystal Silver Night                                           Crystal Light Chrome

Swarovski Crystal Beads 5328_Crystal_Silver_Night  Swarovski_5328_Crystal_Light_Chrome_Xilion_Bicone_Beads

Swarovski_Crystal_5741_Heart-Beads_Jet

Keep smiling and keep sparkling!