Unknown's avatar

SWAROVSKI Crystal Design Contest, Enter to Win Free Sparkles!

Swarovski Crystal 2015 Design Contest Win Crystals

Here is an excellent chance to show off your creativity, beading and jewelry making skills!

SWAROVSKI Create Your Style is hosting a Fall 2015 Trend Design Contest!

Contest period starts July, 1st 2015 and ends on August 15th, 2015.

Swarovski Crystal 2015 Design Contest Win Swarovski Crystals

Here’s your chance to win free SWAROVSKI Crystals!

Swarovski Crystal 2015 Design Contest Win Crystals Now

Prizes will be rewarded by an expert jury. The criteria for judging will be based upon the creative use of the various use of Swarovski Crystals – focusing on innovations – incorporated into the design.

Swarovski Crystal 2015 Design Contest Win Swarovski Crystals Upload

Create an inspiring design using the Swarovski Fall/Winter Trend themes and innovations and enter your design into the Create Your Style Facebook contest.

Get more details about the Official Contest Rules in the “Terms and Conditions

two hearts cuff bracelet

Have a look at the Create Your Style eBook and get inspired by sparkling summer designs created with Swarovski Crystals!

Who’s going to enter  the design contest? I would love to see your designs!!

Swarovski_Heart_Bead_5741-Crystal_Paradise_Shine

Unknown's avatar

Create A Star-Studded Bracelet That Will Have You Shining Extra Bright This 4th of July!

DIY American Dream Swarovski Crystal Bracelet

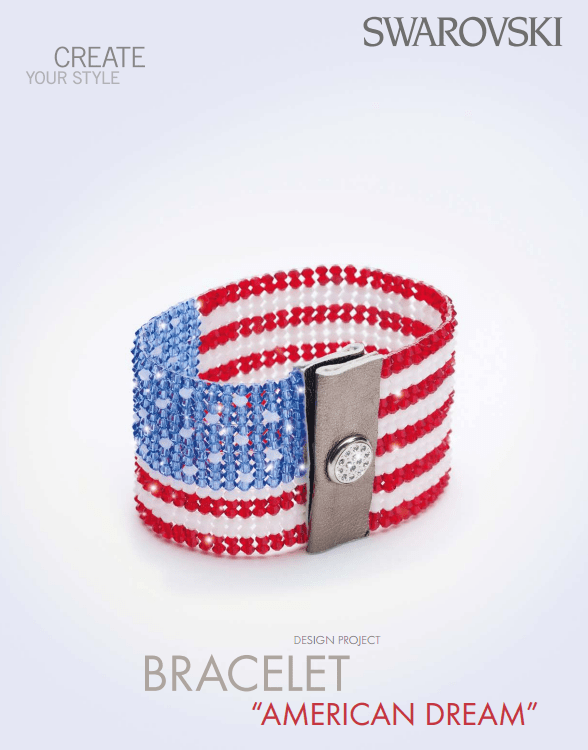
Wrap your wrist in a simple-to-make, all-American Star-Spangled Banner bracelet made of woven Swarovski crystals. Now get ready for the fireworks, celebrate good times and have a blast making this star-studded design!

DIY American Dream Swarovski Crystal Flag Bracelet

Swarovski Crystals

Snap Fastener 1780/114 082 1pc. 11mm Silver/Crystal 001 (contact us for details)

Swarovski Xilion Bicone Beads 5328-3mm Light Siam (422 pieces)

Swarovski Xilion Bicone Beads 5328-3mm Sapphire (358 pieces)

Swarovski Xilion Bicone Beads 5328-3mm White Alabaster (288 pieces)

Supplies and Tools

Supplies: Adhesive tape, white Leather, 12x7cm, metallic silver Leather glue (Güttermann creative HT2) Nylon thread, 2m, 0.3mm, transparent Nylon thread, 3m, 0.15mm, transparent.

Tools: Bead weaving loom, Crystal Swarovski Applicator Hand Tool, Fine needle (no.12) Lighter and scissors.

Level of design: INTERMEDIATE. Take a look at the bottom for text instructions.

DIY American Dream Swarovski Crystal Bracelet Instructions Step 1

DIY American Dream Swarovski Crystal Bracelet Instructions Step 2

DIY American Dream Swarovski Crystal Bracelet Instructions Step 3

DIY American Dream Swarovski Crystal Bracelet Instructions Step 4

DIY American Dream Swarovski Crystal Bracelet Instructions Step 5

DIY American Dream Swarovski Crystal Bracelet Instructions Step 6

DIY American Dream Swarovski Crystal Bracelet Instructions Step 7

DIY American Dream Swarovski Crystal Bracelet Instructions Step 9

DIY American Dream Swarovski Crystal Bracelet Instructions Step 10

DIY American Dream Swarovski Crystal Bracelet Instructions Step 11

DIY American Dream Swarovski Crystal Bracelet Instructions Step by Step Instructions

STEP 1: Cut 2m of 0.3mm nylon thread. Tie a single knot onto one end of the bead weaving loom and thread it through the loom as shown in our illustrations with this step until you have 6 horizontal rows. Attach the other end to the loom with tape.

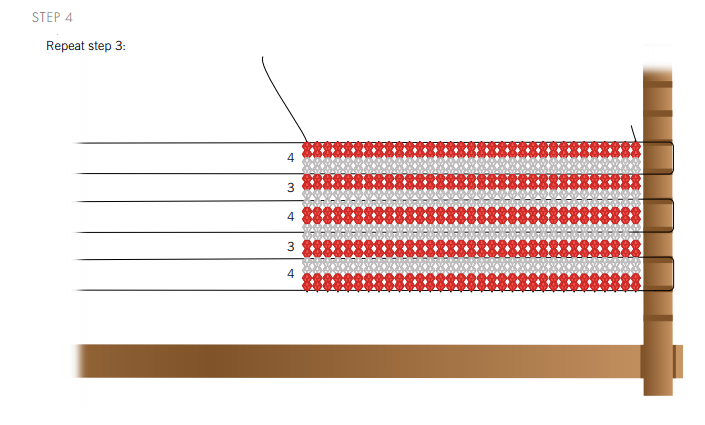
STEP 2: Cut 1m of 0.15mm nylon thread. Tie a single knot onto the end and slide on two Swarovski Bead art. 5328 3mm in Light Siam and two White Alabaster alternating. Repeat 3 times and end with two Light Siam beads. Slide the string underneath all the horizontal strings as shown in the illustration.

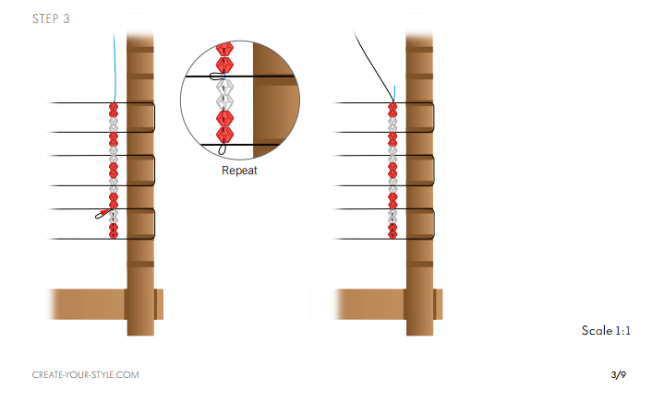
STEP 3: Insert the nylon thread back through the beads and each time over the horizontal string until the end. This will produce clusters of 4 beads and then 3 beads.

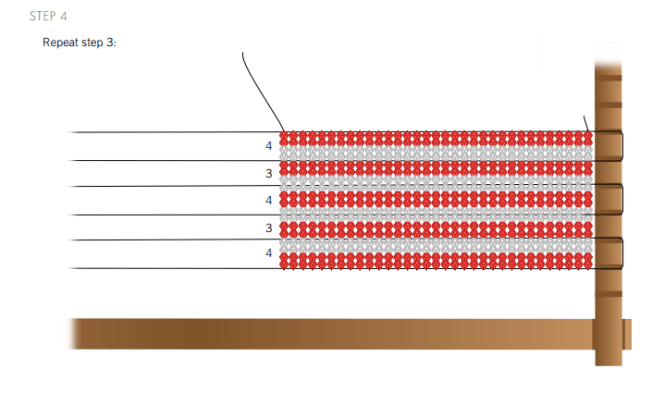
STEP 4: Repeat steps 2 & 3 to get 32 more vertical strings onto the loom.

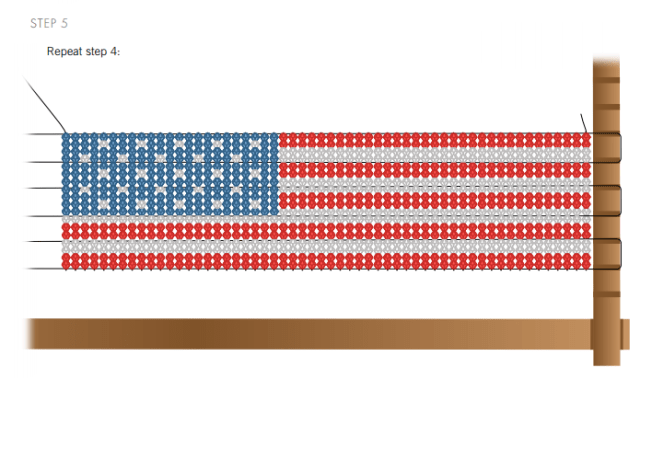
STEP 5: Repeat step 2 & 3, but string on two Swarovski Bead art. 5328 3mm in Light Siam, two White Alabaster, two Light Siam and only one White Alabaster. Then string on 11 3mm Sapphire Beads. Repeat the pattern in this step once more. Continue to string on the same number of Light Siam and White Alabaster beads as done in this step and then refer to the illustrations for the random order of the Sapphire and White Alabaster beads to create the “stars”.

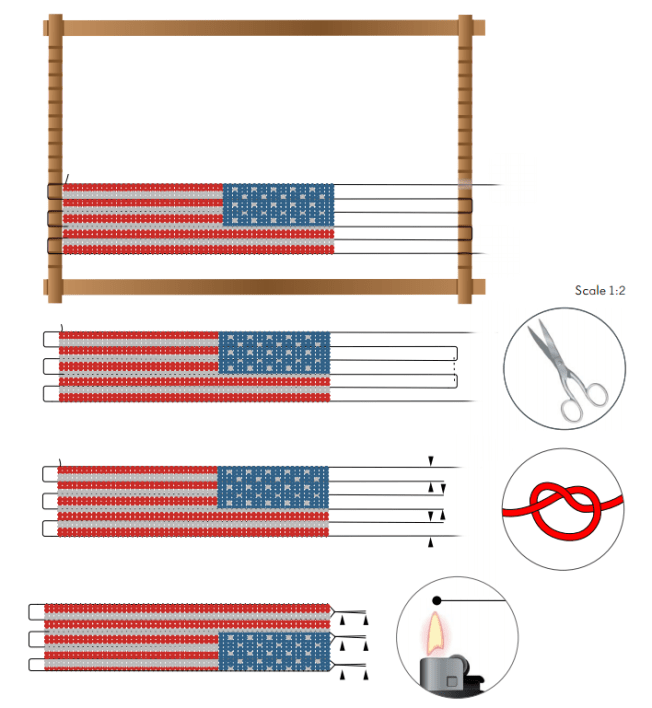
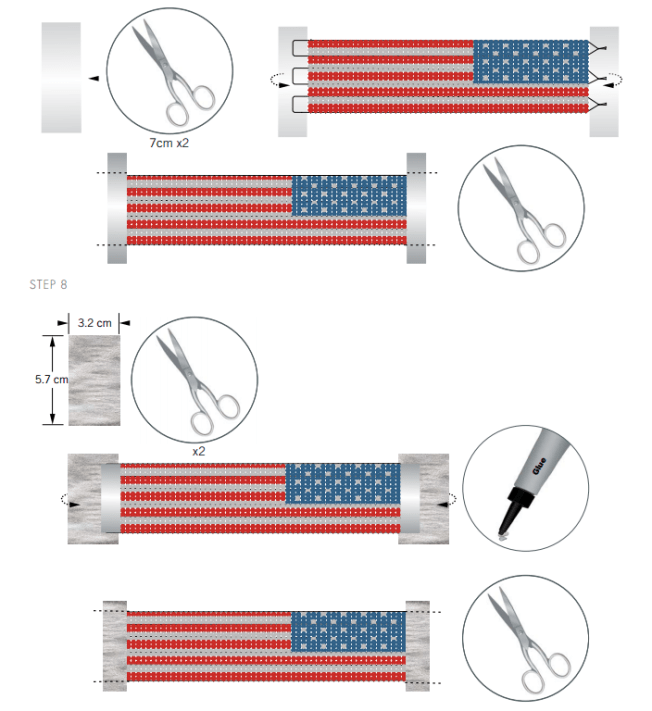
STEP 6: Remove the entire bracelet off the loom. Cut the two joined ends on one side to get six open ends. Tie a knot with the ends and melt the ends closer to knots as depicted in the illustration.

STEP 7: Cut two pieces of 7cm tape and place the tape under the nylon thread ends on both sides. Wrap the tape onto the thread ends and cut off the excess tape.

STEP 8: Cut two pieces of 5.7×3.2cm long metallic leather and glue them onto the bracelet ends so that they are folded into half. Cut off any excess leather.

STEP 9: Put the upper and lower dies into the Crystal Applicator Hand Tool that go with the Swarovski Snap Fastener art. 1780/114 082 082 001 11mm. Place the Swarovski Snap Fastener Silver/Crystal into the lower die of the Crystal Applicator Hand tool and place the back part of the Snap Fastener onto the upper die of the applicator. Put the metallic leather part of the bracelet in between the applicator tool and apply the snap fastener.

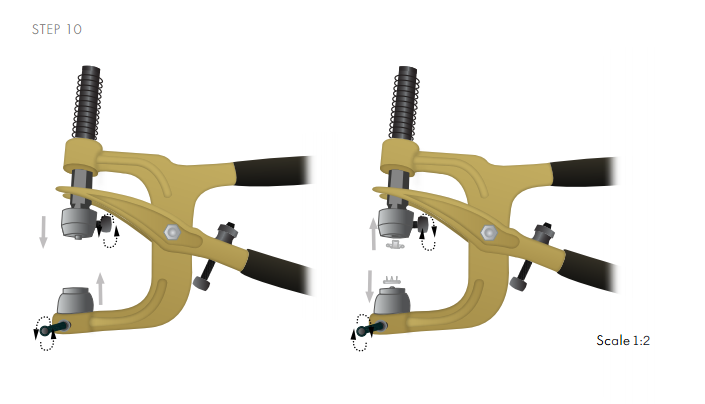
STEP 10: Change the upper and lower die of the applicator and insert the other pair of dies.

STEP 11: Insert the top and lower part of the Swarovski Snap Fastener into the applicator as done in step 9 and attach it onto the other side of the metallic leather.

Swarovski_5741 Heart Bead Light_Siam

Unknown's avatar

Sparkle as You Walk Down the Aisle with These Stunning DIY Embellished Shoes!

Wedding bouquet

Gorgeous bridal bouquet from Style Me Pretty

Once in a blue moon, in the middle of an ordinary life, love comes along and catapults you into a fairy tale. Make the most of it! Sparkle with Swarovski crystals as you walk down the aisle. Twinkle as you dance the night away and shine as you hug your guests.

DIY Swarovski Crystal Wedding Shoes

These beautifully DIY Swarovski embellished shoes will complement your wedding dress as you take the first steps of your married life.

DIY Swarovski Crystal Wedding Shoes banner

Please contact us for items not listed on line, we can certainly order them for you and the setting are very inexpensive.

Article Product Group Article No. Amount Size Color Color Code

Swarovski Crystal Fancy Stones 4200 Navette 14pcs. 11x3mm Crystal 001

Swarovski Crystal Fancy Stones 4228 Xilion Navette 16pcs. 15x7mm White Opal 234

Swarovski Crystal Fancy Stones 4230 Lemon 2pcs. 19x12mm Crystal 001

Swarovski Crystal Fancy Stones 4328 Xilion Pear 16pcs. 8×4.8mm Crystal 001

Swarovski Crystal Fancy Stones 4328 Xilion Pear 16pcs. 10x6mm Crystal 001

Settings 4200/S 1PH2OH 14pcs. 11x3mm Rhodium

Settings 4228/S 1PH2OH 16pcs. 15x7mm Rhodium

Settings 4230/S 1PH2OH 2pcs. 19x12mm Rhodium

Settings 4328/S 16pcs. 8×4.8mm Rhodium

Settings 4328/S 16pcs. 10x6mm Rhodium Ceralun (A+B) Sys.# 5011395 White SP 300

DIY Swarovski Crystal Wedding Shoes Step 1

DIY Swarovski Crystal Wedding Shoes Step 2

DIY Swarovski Crystal Wedding Shoes Step 3

DIY Swarovski Crystal Elegant Wedding Shoes

STEP 1: Place Swarovski Fancy Stone art. 4228 15x7mm White Opal into the Swarovski Settings art. 4228/S 1PH2OH 15x7mm Rhodium and gently close the prongs over the stone using tweezers. Repeat the step with all other Swarovski Crystals in the material list.

STEP 2: Mix the Swarovski Ceralun® according to the package instructions. Affix the Swarovski Settings with Swarovski Fancy stones onto the shoe using the Swarovski Ceralun®. Please note that you have to glue one half of the shoe first, let it dry and then glue the other half as shown in our illustrations with this step.

STEP 3: Repeat the steps 1-2 to create the other wedding shoe.

Have fun creating these stunning shoes!

Swarovski Love Bead

Unknown's avatar

Bring to Light Cherished Moments Captured in Time with This Treasured DIY Design!

DIY Swarovski Crystal Watch Free Design and Instructions

DIY Swarovski Crystal and Pearl Vintage Watch Bracelet Design and Instructions

I love this treasured idea of turning back time and creating a unique watch and sparkling piece of specialized jewelry that has meaning to you every time you look at it! Bring to light cherished moments and memories with a beloved vintage style black-and-white photograph complimented by Swarovski crystals!

Here is what you will need for this precious project and instructions are below:

 Swarovski Crystals and Pearls

Swarovski Crystal 5328 4mm Xilion Bicone Beads 33 pieces of Crystal Iridescent Green 001 IRIG

Swarovski Crystal 5328 4mm Xilion Bicone Beads 33 pieces of Metallic Sunshine 001 METSH

Swarovski Crystal 5810 4mm Pearls 62 pieces of Light Grey Pearls 001 616

Swarovski Crystal 5810 4mm Pearls 31 pieces of White Pearls 001 650

Supplies and Tools

Jewelry elastic cord, transparent, 0.5mm, 2.5m, two part adhesive glue and a watch

Tools

A beading needle and scissors

diy-swarovski-crystal-and-pearl-watch-free-design-and-instructions-step-1.png

diy-swarovski-crystal-and-pearl-watch-free-design-and-instructions-step-3.png

diy-swarovski-crystal-and-pearl-watch-free-design-and-instructions-step-5.png

diy-swarovski-crystal-and-pearl-watch-free-design-and-instructions-step-6.png

STEP 1: Remove the watch strap and the glass on top of the dial. Insert your desired photograph and replace the glass.

STEP 2: Cut 50cm of elastic cord, fold it in half and secure it onto the spring bar of the watch with a double knot. Using a beading needle, insert 31 Swarovski Crystal Pearl art. 5810 4mm Crystal Light Grey Pearl onto the elastic cords, removing one of the cord ends halfway through. (See illustrations for clarification.)

STEP 3: Go through the spring bar at the other end of the watch face with the beaded elastic cord. Insert the cord back through the Swarovski Pearls towards the half way point. Tie a knot as shown in our illustrations with this step.

STEP 4: Put some glue on the knot and thread both the ends of the elastic cord back through three Swarovski Pearls on each side. Cut off the leftover cord ends.

STEP 5: Repeat steps 2–4 four more times to make the other beaded cords for the watch. The second cord from left will be with the 33 Swarovski Bead art. 5000 4mm Crystal Metallic Sunshine. The third cord consists of 31 Swarovski Pearl art. 5810 4mm Crystal White Pearl. The fourth cord consists of 33 Swarovski Bead art. 5000 4mm Crystal Iridescent Green and the last cord will be 31 Swarovski Pearl art. 5810 4mm Crystal Light Grey Pearls.

Swarovski_5741-Hear Bead Crystal_Antique_Pink

This would be a particularly exceptional Mother’s Day or Birthday gift for that special loved one in your life!

I would love to see a picture of your unique watch when you make it!