Unknown's avatar

DIY Swarovski’s Spooky, Sparkling Halloween Mask

Swarovski Crystal Halloween Mask DIY Steps and instruction

This inky-black mask, studded with Swarovski Crystal Sew-On Stones in tones as dark as night, elevates the humble Halloween costume to a whole new level of glamour and mystery.

Swarovski Crystal Halloween Mask DIY Steps and instruction craft project

Swarovski Crystals

Article Product Group Article No. Amount Size Color Color Code

Sew-on Stones 3223 24 pieces 12 x 6 mm Crystal Silver Night F 001 SINI

Sew-on Stones 3230 2 pieces 12 x 7 mm Crystal Satin F 001 SAT

Sew-on Stones 3230 16 pieces 12 x 7 mm Crystal Silver Night F 001 SINI

Sew-on Stones 3230 7 pieces 12 x 7 mm Jet 280

Sew-on Stones 3254 2 pieces 20 mm Jet 280

Sew-on Stones 3256 4 pieces 14.8 x 5 mm Crystal Silver Shade F 001 SSHA

Sew-on Stones 3256 8 pieces 14.8 x 5 mm Jet 280

Sew-on Stones 3267 2 pieces 18 x 10 mm Crystal Silver Night F 001 SINI (contact us for details)

Beads 5000 22 pieces 4 mm Purple Velvet 277

Beads 5000 10 pieces 6 mm Purple Velvet 277

Beads 5328 28 pieces 4 mm Purple Velvet 277

Supplies & Tools Supplies

Nylon thread, transparent, 0.25 mm, 3 m Ribbon satin, black, 15 mm, 1.1 m Rubber, black, 32 x 18 cm Sewing silk, black, 1 m Tools Cutter Double sided tape Lighter Pins Scissors Sewing needle Sheet of paper, A4

Swarovski Crystal Halloween Mask DIY Steps and instruction step 1

Swarovski Crystal Halloween Mask DIY Steps and instruction step 2

Swarovski Crystal Halloween Mask DIY Steps and instruction step 3

Swarovski Crystal Halloween Mask DIY Steps and instruction step 4

Swarovski Crystal Halloween Mask DIY Steps and instruction step 5

Swarovski Crystal Halloween Mask DIY Steps and instruction design project

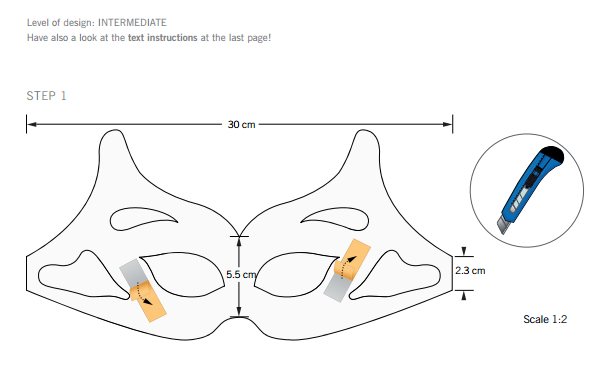
STEP 1: Print and cut out the pattern of the mask in its original size.

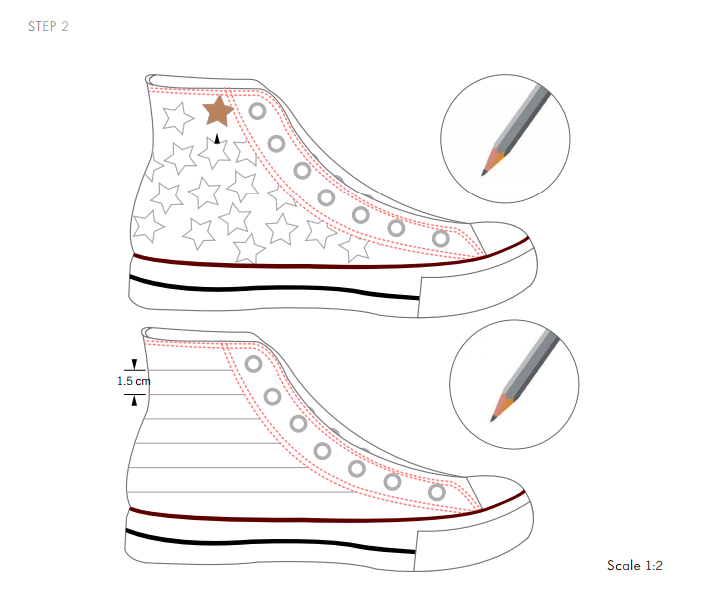
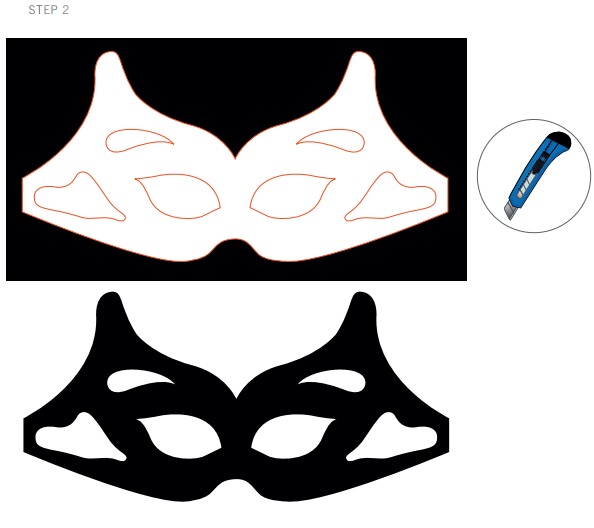
STEP 2: Stick the pattern with double sided tape onto a piece of rubber and cut out the mask shape.

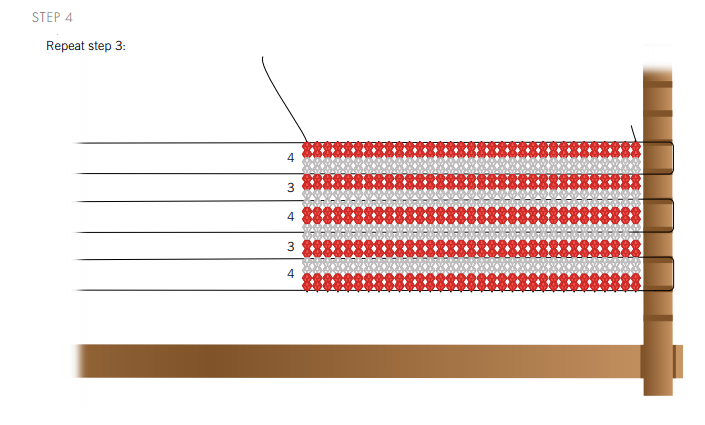
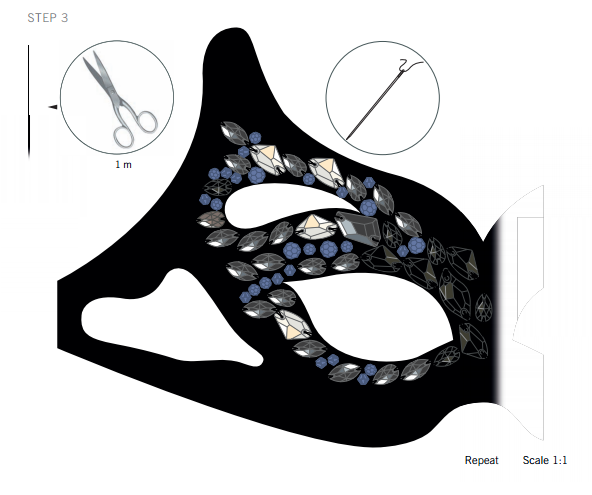
STEP 3: Sew on all Swarovski Beads and Sew-on Stones mentioned in the material list onto the mask as shown in the illustrations.

STEP 4: Cut two 50 cm long satin ribbon pieces. Thread these through both the sides of the mask and sew them together individually at each end.

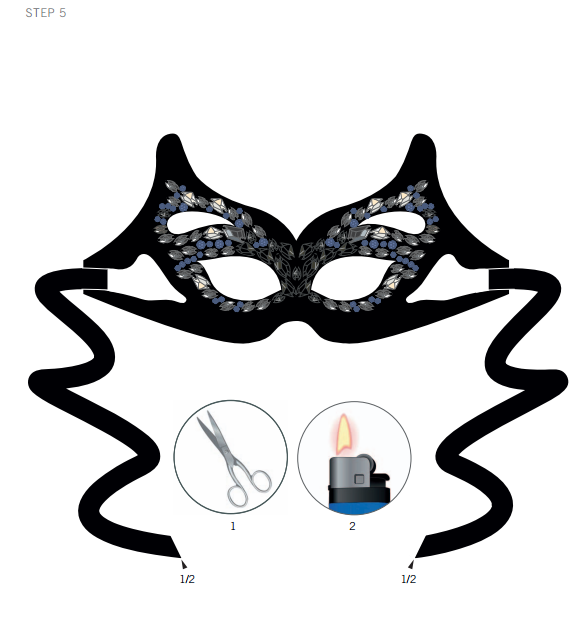
STEP 5: Cut off both ends of the ribbon and burn them a little bit with a lighter to secure any loose threads.

Swarovski_Crystal_5741_Heart-Beads_Jet

Hope you have a spooky, sparkling Halloween!!

Unknown's avatar

On the Brighter Side ~ See the Vibrant Color Trends this Fall & Winter with Matching Swarovski Crystals!

Pantone Fall Color Trends 2015 Chic Fashion

2015 Pantone Color Report: An Evolving Color Landscape

Here is this last section of the top 10 most popular fall and winter colors, where I focus on the warmest and most unique hues this color palette has to offer. I’m thrilled that there are some refreshingly cheerful colors to choose from this season! The colors that we choose to wear and surround ourselves with can have a substantial impact on our mood, so I love that it will now be “fashionably acceptable” to incorporate more vibrant and upbeat hues to uplift our spirits on some of those dreary winter days.

Cadmium Orange Pantone Fall Fashion Color Trends 2015

Pantone’s Top 10 Fall and Winter Color Report: Cadmium Orange

Cadmium Orange is a warm, welcoming and gorgeous hue that is somewhat subtle but holds enough drama for a new type of refreshing orange this Fall and Winter. It’s almost a peachy type of orange that evokes a sentiment of optimism, fun and fantasy. It’s both playful and sophisticated that is a lighter compliment to the more traditional deeper orange and copper type fall tones. It can also act as a valiant contrast to the darker blue and green tones popular in these cooler months ahead.

Cadmium Orange’s Complimentary Swarovski Crystal Color Tones Include:

Padparadscha                                                   Tangerine

Swarovsi_6010_Briolette_Pendants_Padparadscha   Swarovski_5328_BiconeBeads_Tangerine

Coral Pearls (Gemstone Color)

Swarovski Pearls 5810 Coral

Rose Peach  Rose Peach Pearls (which are actually more peachy in color than Rose)

Swarovski Crystals Rose Peach  Swarovski Pearls 5810_RosePeach

Cashmere Rose Pantone Fall Fashion Color Trends 2015

Pantone’s Top 10 Fall and Winter Color Report: Cashmere Rose

The Cashmere Rose is an absolute exquisite color! This feminine almost antique pink hue also has a gentle and elegant richness to it that sets it apart as one of my all-time favorite colors! It’s just a perfectly lovely and delightful hue that is graceful and timeless.

It’s a gorgeous color that pairs well with so many options. It’s an ideal color for making wedding jewelry, because it’s works perfectly for both bridesmaids in a wedding party, as well as guests of a wedding. It’s also an every day type of color as well because it’s just so darn beautiful! It’s simply a romantic tone that matches well with soft purple hues, dusty rose type of shades and cream or white colors as well. It’s divine, just divine!!

Cashmere Rose’s Complimentary Swarovski Crystal Color Tones Include:

Blush Rose                                        Crystal Antique Pink

Swarovski Crystal Beads Blush Rose  Swarovski Crystal Antique Pink Beads

Vintage Rose                                               Powdered Rose Pearls

Swarovski Crystals Vintage Rose  Swarovski Pearls Powdered Rose

Rose Satin                                               Light Rose Satin

Swarovski Crystal Beads Rose Satin   Swarovski Crystal Light Rose Satin

Amethyst Orchid Pantone Fall Fashion Color Trends 2015

Pantone’s Top 10 Fall and Winter Color Report: Amethyst Orchid

Indicative of our affection for color, Amethyst Orchid is the jewel in the crown. Intriguing and somewhat sensual, this enigmatic purple tone is an extraordinary hue that is unique, bold, creative and exciting!

Amethyst                                                    Lilac

  Swarovski Crystal Round Beads Amethyst   Swarovski Crystal Beads Lilac

Crystal Lilac Shadow                             Crystal Blackberry Pearl

Swarovski Crystal Lilac Shadow  Swarovski Blackberry Pearl

Amethyst

Swarovski BeCharmed Beads 80101_Amethyst

Swarovski_5741-Fuchsia Love bead

Have fun creating something beautiful and brilliant!

Keep smiling and keep sparkling!!

Unknown's avatar

Get Your Crafty Kicks On This 4th of July & Celebrate CHUCKS “GLORY DAYS”

DIY 4th of July Chuck Taylor Swarovski Crystal Shoes

Add a little twinkle to your toes with a pair of statement sneakers. Finish off your high-tops with eye-catching Swarovski crystals sewn on to patriotic red, white and blue for some extra Fourth of July sparkle. And when Independence Day celebrations are over, wear them to make every day a dazzle day!

DIY Swarovski Crystal Chuck Taylor shoes with Swarovski Crystals

Swarovski crystals

Swarovski 3288 – 8mm 42 pieces Crystal Sew-on Stones

Swarovski 3288 – 10mm 3 pieces Crystal Sew-on Stones

Supplies & Tools

White sewing thread, red and blue fabric paint. Carboard, 3x3cm Paint brush, a pencil, a ruler, scissors and a sewing needle.

DIY Swarovski Crystal Chuck Taylor Shoes design and instructions

DIY Swarovski Crystal Chuck Taylor Shoes design and instructions page 2

DIY Swarovski Crystal Chuck Taylor Shoes design and instructions page 3

DIY Swarovski Crystal Chuck Taylor Shoes design and instructions page 4

DIY Swarovski Crystal Chuck Taylor Shoes design and instructions page 5

DIY Swarovski Crystal Chuck Taylor Shoes design and instructions banner

STEP 1: Use our pattern or draw a 2cm star onto a cardboard as shown in our illustrations with this step.

STEP 2: Use the cardboard star template and a pencil to draw stars all around one of the shoes. Draw horizontal lines around the other shoe with a pencil to make 1.5cm wide stripes.

STEP 3: Paint the horizontal stripes on the one shoe in red and the background around the stars of the other shoe in blue.

STEP 4: Tie a double knot onto a sewing thread and sew Swarovski Sew-on Stones 3288 8mm Crystal on top of the red stripes. (Do not pierce through to the inside of the shoe with the needle and thread). Repeat the steps with the horizontal rows and the stars as shown in the illustration and material list.

Swarovski_5741 Heart Bead Light_Siam

Unknown's avatar

Create A Star-Studded Bracelet That Will Have You Shining Extra Bright This 4th of July!

DIY American Dream Swarovski Crystal Bracelet

Wrap your wrist in a simple-to-make, all-American Star-Spangled Banner bracelet made of woven Swarovski crystals. Now get ready for the fireworks, celebrate good times and have a blast making this star-studded design!

DIY American Dream Swarovski Crystal Flag Bracelet

Swarovski Crystals

Snap Fastener 1780/114 082 1pc. 11mm Silver/Crystal 001 (contact us for details)

Swarovski Xilion Bicone Beads 5328-3mm Light Siam (422 pieces)

Swarovski Xilion Bicone Beads 5328-3mm Sapphire (358 pieces)

Swarovski Xilion Bicone Beads 5328-3mm White Alabaster (288 pieces)

Supplies and Tools

Supplies: Adhesive tape, white Leather, 12x7cm, metallic silver Leather glue (Güttermann creative HT2) Nylon thread, 2m, 0.3mm, transparent Nylon thread, 3m, 0.15mm, transparent.

Tools: Bead weaving loom, Crystal Swarovski Applicator Hand Tool, Fine needle (no.12) Lighter and scissors.

Level of design: INTERMEDIATE. Take a look at the bottom for text instructions.

DIY American Dream Swarovski Crystal Bracelet Instructions Step 1

DIY American Dream Swarovski Crystal Bracelet Instructions Step 2

DIY American Dream Swarovski Crystal Bracelet Instructions Step 3

DIY American Dream Swarovski Crystal Bracelet Instructions Step 4

DIY American Dream Swarovski Crystal Bracelet Instructions Step 5

DIY American Dream Swarovski Crystal Bracelet Instructions Step 6

DIY American Dream Swarovski Crystal Bracelet Instructions Step 7

DIY American Dream Swarovski Crystal Bracelet Instructions Step 9

DIY American Dream Swarovski Crystal Bracelet Instructions Step 10

DIY American Dream Swarovski Crystal Bracelet Instructions Step 11

DIY American Dream Swarovski Crystal Bracelet Instructions Step by Step Instructions

STEP 1: Cut 2m of 0.3mm nylon thread. Tie a single knot onto one end of the bead weaving loom and thread it through the loom as shown in our illustrations with this step until you have 6 horizontal rows. Attach the other end to the loom with tape.

STEP 2: Cut 1m of 0.15mm nylon thread. Tie a single knot onto the end and slide on two Swarovski Bead art. 5328 3mm in Light Siam and two White Alabaster alternating. Repeat 3 times and end with two Light Siam beads. Slide the string underneath all the horizontal strings as shown in the illustration.

STEP 3: Insert the nylon thread back through the beads and each time over the horizontal string until the end. This will produce clusters of 4 beads and then 3 beads.

STEP 4: Repeat steps 2 & 3 to get 32 more vertical strings onto the loom.

STEP 5: Repeat step 2 & 3, but string on two Swarovski Bead art. 5328 3mm in Light Siam, two White Alabaster, two Light Siam and only one White Alabaster. Then string on 11 3mm Sapphire Beads. Repeat the pattern in this step once more. Continue to string on the same number of Light Siam and White Alabaster beads as done in this step and then refer to the illustrations for the random order of the Sapphire and White Alabaster beads to create the “stars”.

STEP 6: Remove the entire bracelet off the loom. Cut the two joined ends on one side to get six open ends. Tie a knot with the ends and melt the ends closer to knots as depicted in the illustration.

STEP 7: Cut two pieces of 7cm tape and place the tape under the nylon thread ends on both sides. Wrap the tape onto the thread ends and cut off the excess tape.

STEP 8: Cut two pieces of 5.7×3.2cm long metallic leather and glue them onto the bracelet ends so that they are folded into half. Cut off any excess leather.

STEP 9: Put the upper and lower dies into the Crystal Applicator Hand Tool that go with the Swarovski Snap Fastener art. 1780/114 082 082 001 11mm. Place the Swarovski Snap Fastener Silver/Crystal into the lower die of the Crystal Applicator Hand tool and place the back part of the Snap Fastener onto the upper die of the applicator. Put the metallic leather part of the bracelet in between the applicator tool and apply the snap fastener.

STEP 10: Change the upper and lower die of the applicator and insert the other pair of dies.

STEP 11: Insert the top and lower part of the Swarovski Snap Fastener into the applicator as done in step 9 and attach it onto the other side of the metallic leather.

Swarovski_5741 Heart Bead Light_Siam

Unknown's avatar

Sparkle as You Walk Down the Aisle with These Stunning DIY Embellished Shoes!

Wedding bouquet

Gorgeous bridal bouquet from Style Me Pretty

Once in a blue moon, in the middle of an ordinary life, love comes along and catapults you into a fairy tale. Make the most of it! Sparkle with Swarovski crystals as you walk down the aisle. Twinkle as you dance the night away and shine as you hug your guests.

DIY Swarovski Crystal Wedding Shoes

These beautifully DIY Swarovski embellished shoes will complement your wedding dress as you take the first steps of your married life.

DIY Swarovski Crystal Wedding Shoes banner

Please contact us for items not listed on line, we can certainly order them for you and the setting are very inexpensive.

Article Product Group Article No. Amount Size Color Color Code

Swarovski Crystal Fancy Stones 4200 Navette 14pcs. 11x3mm Crystal 001

Swarovski Crystal Fancy Stones 4228 Xilion Navette 16pcs. 15x7mm White Opal 234

Swarovski Crystal Fancy Stones 4230 Lemon 2pcs. 19x12mm Crystal 001

Swarovski Crystal Fancy Stones 4328 Xilion Pear 16pcs. 8×4.8mm Crystal 001

Swarovski Crystal Fancy Stones 4328 Xilion Pear 16pcs. 10x6mm Crystal 001

Settings 4200/S 1PH2OH 14pcs. 11x3mm Rhodium

Settings 4228/S 1PH2OH 16pcs. 15x7mm Rhodium

Settings 4230/S 1PH2OH 2pcs. 19x12mm Rhodium

Settings 4328/S 16pcs. 8×4.8mm Rhodium

Settings 4328/S 16pcs. 10x6mm Rhodium Ceralun (A+B) Sys.# 5011395 White SP 300

DIY Swarovski Crystal Wedding Shoes Step 1

DIY Swarovski Crystal Wedding Shoes Step 2

DIY Swarovski Crystal Wedding Shoes Step 3

DIY Swarovski Crystal Elegant Wedding Shoes

STEP 1: Place Swarovski Fancy Stone art. 4228 15x7mm White Opal into the Swarovski Settings art. 4228/S 1PH2OH 15x7mm Rhodium and gently close the prongs over the stone using tweezers. Repeat the step with all other Swarovski Crystals in the material list.

STEP 2: Mix the Swarovski Ceralun® according to the package instructions. Affix the Swarovski Settings with Swarovski Fancy stones onto the shoe using the Swarovski Ceralun®. Please note that you have to glue one half of the shoe first, let it dry and then glue the other half as shown in our illustrations with this step.

STEP 3: Repeat the steps 1-2 to create the other wedding shoe.

Have fun creating these stunning shoes!

Swarovski Love Bead